About | Privacy Policy | Terms of Use | Support | Contact Us
Copyright © 2026 Tipard Studio. All Rights Reserved.
Windows

Rip your favorite Blu-ray/DVD movies or videos to popular formats

Powerful software to play Blu-ray/DVD videos and audio

Create Blu-ray disc/folder/ISO file with your own video

Backup/Copy your favorite Blu-ray to disc/folder/iso files
Mac

Rip your favorite Blu-ray/DVD movies or videos to popular formats on Mac

Powerful software to play Blu-ray and popular video formats on Mac
Windows

Rip DVD to any popular video format quickly of full quality

Create DVD from videos and burn video to DVD/Blu-ray freely

Copy DVD to DVD disc/folder/ISO files in a 1:1 ratio
Mac

Rip DVD to any popular video format quickly of full quality on Mac

Burn or author a DVD from videos with subtitles and chapters on Mac

Copy DVD to DVD disc/folder/ISO files in a 1:1 ratio on Mac
Windows

Rip DVD, convert 4K video, edit, and upscale videos to 5K/8K

Repair broken videos with high accuracy and support many formats

Convert any video to MP3, MP4, MOV, WAV, and other 350 formats

Upscale resolution, optimize brightness and remove video noise

The easiest tool to capture screen, game, audio, etc. with high quality

Convert any 2D video to 3D video and convert 3D to 2D video

Convert 4K video to 4K/1080P and common videos

Convert TS video to various popular video/audio formats
Mac

Rip DVD, convert 4K video, edit, and upscale videos to 5K/8K on Mac

Repair broken videos with high accuracy and support many formats on Mac

Convert any video to MP3, MP4, MOV, WAV, and other 350 formats on Mac

Upscale resolution, optimize brightness and remove video noise on Mac

The easiest tool to capture screen, game, audio, etc. with high quality on Mac

Convert any 2D video to 3D video and convert 3D to 2D video on Mac

Convert 4K video to 4K/1080P and common videos on Mac

Convert TS video to various popular video/audio formats on Mac
Desktop

Rip and convert DVDs to MP3 and support other audio formats

Reset Windows Admin and Standard user account password in seconds

Accurately Convert any PDF file to Word with OCR

Convert PDF to Word, Excel, HTML and Image with OCR
Online

Easily remove watermarks from many image file formats free online
Tipard DVD Software Toolkit is all-in-one software. It can convert DVD and video to other video formats with excellent quality. Create DVD with video file and copy DVD to DVD disc, DVD Folder or ISO Image file. Apart from that, it can also transfer music, movies, photos and more files between iPhone/iPad/iPod and computer.
Click the icon on the top left side of the software to add DVD disc, DVD folder or IFO file. Or import the DVD source through "File" button on the Menu toolbar. This step is very simple.
After loading DVD file, next step is to select output profile. There are almost one hundred of video formats for selection. Choose the right video format according to your choice.
All things are prepared. Now you are able to convert the DVD. Just click "Convert" button and leave it for your other things.
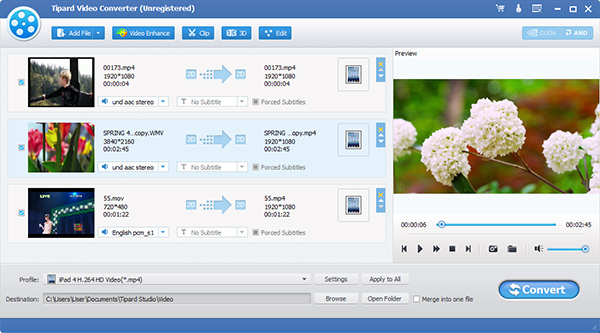
The easiest way of adding the video source is to drag and drop. Open the folder where the videos are. Check them and then drag and drop to the software directly.
Click "Profile" list to select the output format for the video. For devices, choose the default video format as possible as you can because the video settings are the best match for the device.
It's ready. Click "Convert" button and then the conversion gets started automatically. The conversion time depends on the video size and length.
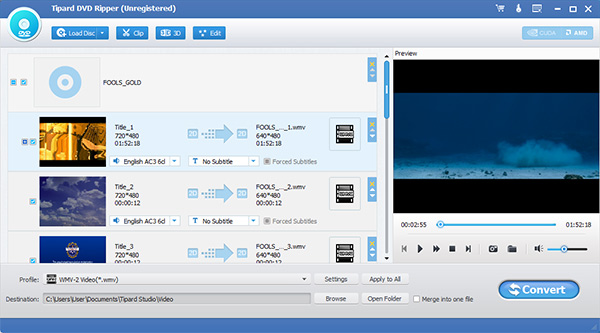
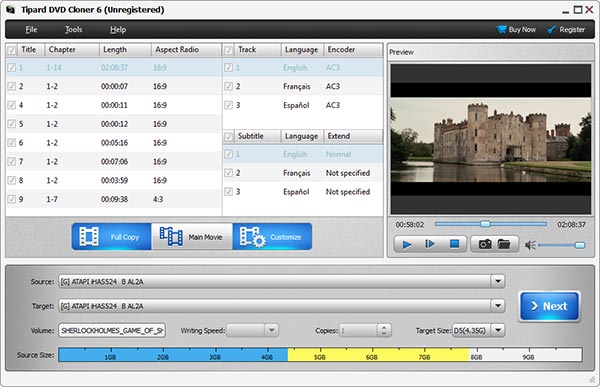
Click "File" button to add DVD source including DVD disc, DVD folder and ISO image file. Or select the option to automatically load the DVD file.
The copying mode is composed of Full Copy, Main Movie and Customize. Choose one mode and then click "Next" button to enter into another interface. In this interface check or uncheck some items according to your own requirement.
Select "Target" from the drop-down list, and adjust "Writing Speed", "Copies" and "Target Size" (Target Size decides whether to compress DVD). All is ready. Start to copy the source file by clicking "Start" button.
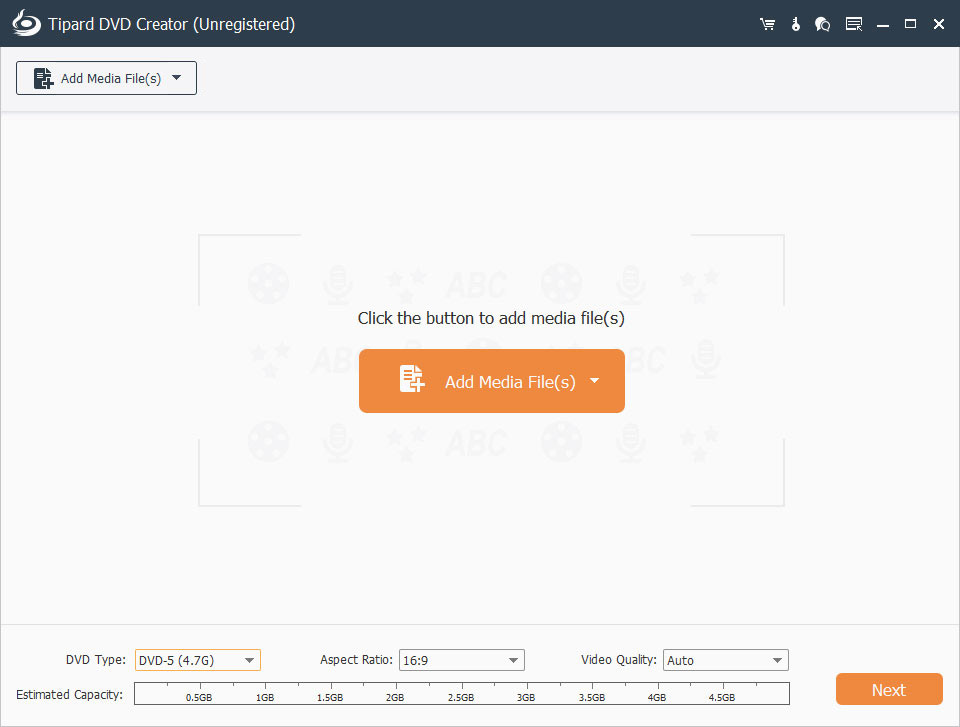
Click the icon on the top left side of the interface to add video or video folder. The information of the video is listed in the software.
Click Actions on the Menu toolbar > Edit Menu. The Edit Menu window pops up. In this interface, you can edit menu, frame, button and text for the output. Add background music and background picture (with your own picture). Or do nothing to Menu and just check the "No Menu" option.
Adjust Destination, Writing Speed, Copies and DVD Type according to your own needs. Note: If you want to compress the video, please select the DVD size is less than the video (This may affect the video quality). Last click is to Burn DVD.
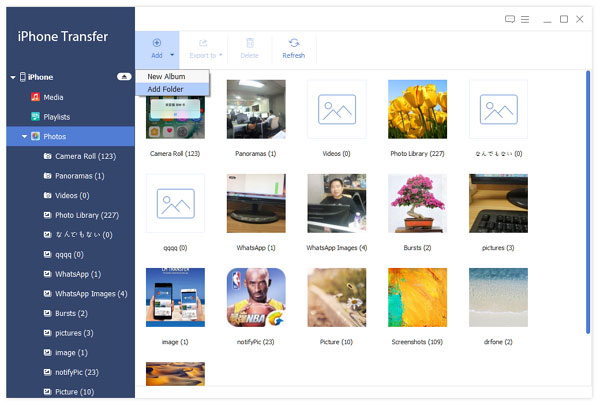
The iPhone can be recognized by the software automatically through connection. The information of the iPhone is displayed on the left column.
Click the category to be transferred on the left. The detailed content is displayed in the right section. Check some or all items you'd like to back up.
There are three transferring destinations: to computer, to other Apple devices and to iTunes library. Select one of them to transfer the file as you like.