About | Privacy Policy | Terms of Use | Support | Contact Us
Copyright © 2026 Tipard Studio. All Rights Reserved.
Windows

Rip your favorite Blu-ray/DVD movies or videos to popular formats

Powerful software to play Blu-ray/DVD videos and audio

Create Blu-ray disc/folder/ISO file with your own video

Backup/Copy your favorite Blu-ray to disc/folder/iso files
Mac

Rip your favorite Blu-ray/DVD movies or videos to popular formats on Mac

Powerful software to play Blu-ray and popular video formats on Mac
Windows

Rip DVD to any popular video format quickly of full quality

Create DVD from videos and burn video to DVD/Blu-ray freely

Copy DVD to DVD disc/folder/ISO files in a 1:1 ratio
Mac

Rip DVD to any popular video format quickly of full quality on Mac

Burn or author a DVD from videos with subtitles and chapters on Mac

Copy DVD to DVD disc/folder/ISO files in a 1:1 ratio on Mac
Windows

Rip DVD, convert 4K video, edit, and upscale videos to 5K/8K

Repair broken videos with high accuracy and support many formats

Convert any video to MP3, MP4, MOV, WAV, and other 350 formats

Upscale resolution, optimize brightness and remove video noise

The easiest tool to capture screen, game, audio, etc. with high quality

Convert any 2D video to 3D video and convert 3D to 2D video

Convert 4K video to 4K/1080P and common videos

Convert TS video to various popular video/audio formats
Mac

Rip DVD, convert 4K video, edit, and upscale videos to 5K/8K on Mac

Repair broken videos with high accuracy and support many formats on Mac

Convert any video to MP3, MP4, MOV, WAV, and other 350 formats on Mac

Upscale resolution, optimize brightness and remove video noise on Mac

The easiest tool to capture screen, game, audio, etc. with high quality on Mac

Convert any 2D video to 3D video and convert 3D to 2D video on Mac

Convert 4K video to 4K/1080P and common videos on Mac

Convert TS video to various popular video/audio formats on Mac
Desktop

Rip and convert DVDs to MP3 and support other audio formats

Reset Windows Admin and Standard user account password in seconds

Accurately Convert any PDF file to Word with OCR

Convert PDF to Word, Excel, HTML and Image with OCR
Online

Easily remove watermarks from many image file formats free online

Points:0
Redeem
User Guide
Welcome to Tipard Mac Video Converter Ultimate! Get ready to experience fast and easy video processing built perfectly for your Mac. This powerful tool is fully optimized for Apple Silicon, giving you incredible rendering speeds for all your 4K and 8K videos. Everything works smoothly on your Retina display, with a clean interface that feels completely native to macOS. You can easily import videos from your iPhone and manage your files locally and privately. No complicated setups, no cloud tracking, just a fast, reliable, and secure video workflow right on your Mac.
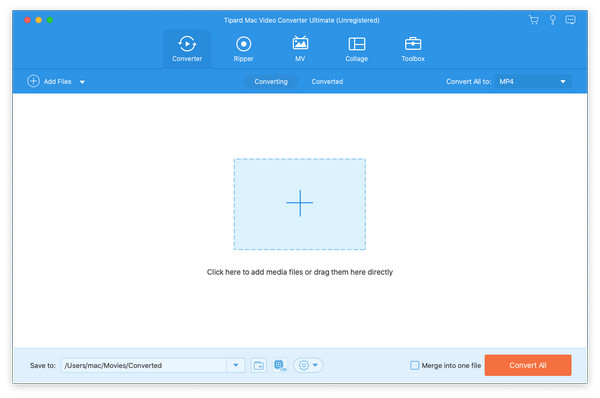
Step 1 Load video files
Click the Add Files button to add the media files you want to convert. You can also click the big Add button to import the videos, or simply drag the video files directly into the program.
Step 2 Choose an Output Format
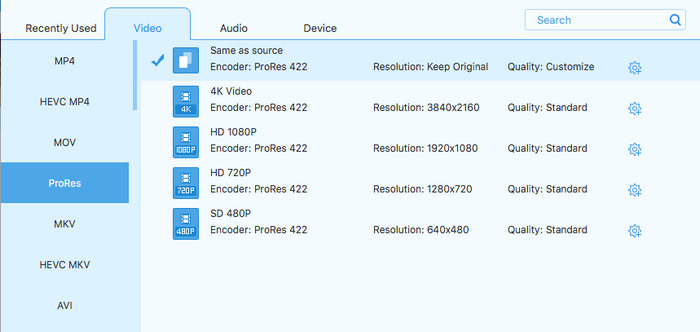
Click the Output Format dropdown button at the bottom left corner. Then, the output format window will appear. You can find the Video, Audio, and Device tab on the top side. For example, you can select Video, and then select a desired output video format, like MOV, MP4, and MKV. Then, you can select a desired output preset, like 4K Video or 1080P HD. Double-click to select it.
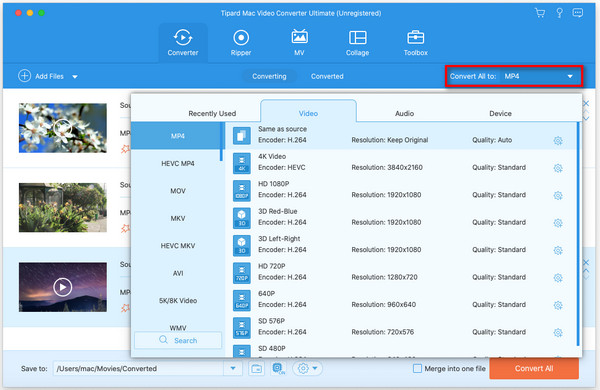
For Apple devices, MOV is the most compatible video format, though MP4 is also well supported now. But what's the most impressive about Tipard Mac Video Converter Ultimate is it offers a dedicated ProRes codec, which is optimized for large 4K/8K high-bitrate videos on Apple devices, especially the latest iPhones, iPads, and MacBooks.
Customization Options in Tipard Mac Video Converter Ultimate:
Customizing output format preset is also for a good media for a good media converter. On Tipard Mac Video Converter Ultimate, you can click the Custom Profile button (with a gear icon) on the preset bar you select.
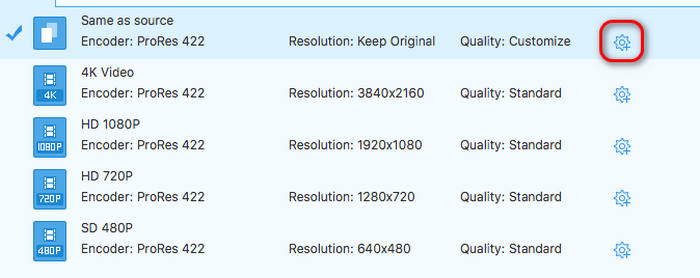
You'll see the Edit Profile window. Here, you can adjust the Video Quality, Encoder, Resolution, Bitrate, Frame Rate, Audio Encoder, Channels, and more settings. Then, just click the Create New button to create your own output preset.
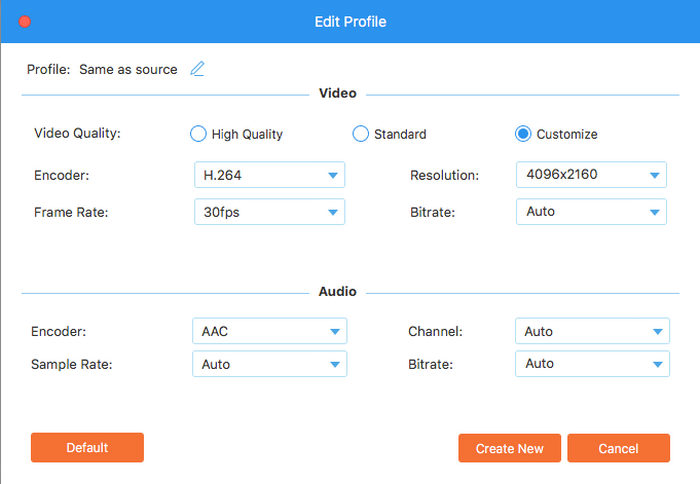
There are some important settings worth your attention, especially on Mac:
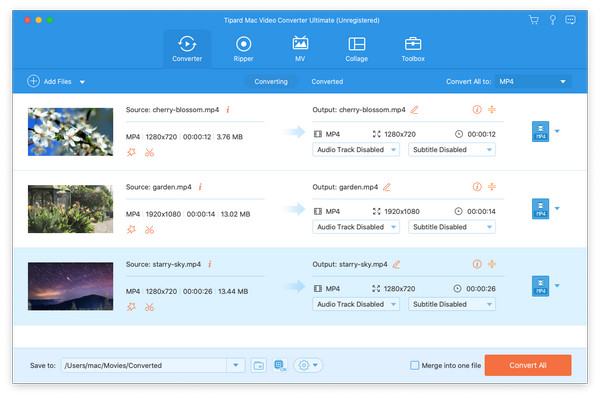
Step 3 Convert video and audio files
When you've finished your setup, you can start the conversion. First, ensure that Hardware Acceleration is turned on. Hardware acceleration can utilize the power of your M-series chip and VideoToolbox for near-instant video processing and seamlessly decode and encode HEVC, ProRes, AV1, and H.264 codecs while freeing up your Mac’s CPU for a smoother, distraction-free workflow.
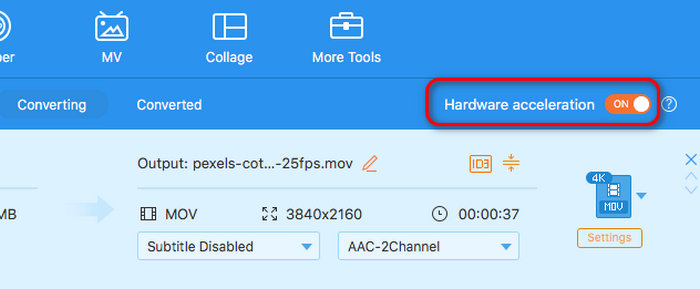
You can also turn on 120× Faster Conversion in a pro version to make the conversion ultra-fast. If you want to combine your videos, select Merge into one file.

Finally, you just need to click the Convert All button to easily convert your media files to your desired video, audio, or format optimized for a specific device, like iPhone, iPad, Apple TV, PS5, etc.
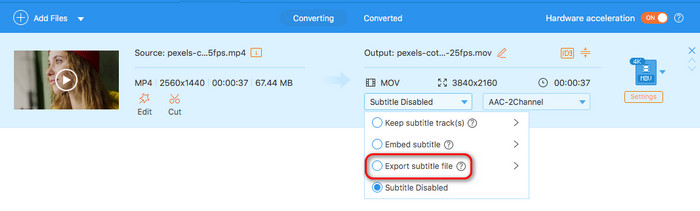
Tips: Extract Subtitle Files from Your Video
If you want to rip the subtitle files from a video, you can add your video, and then click the Subtitle dropdown list, and then select Export subtitle file. When you finally click the Convert All button, you'll also get the subtitle file(s).
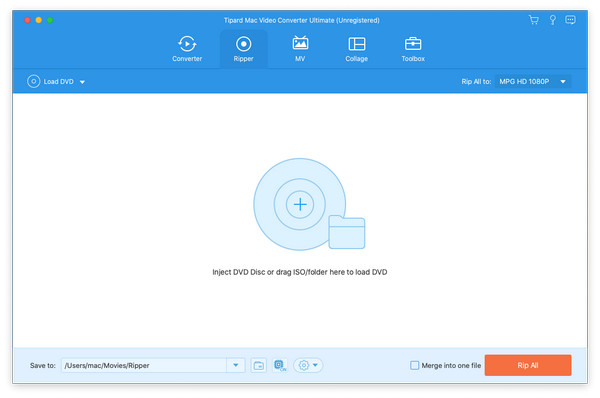
Step 1 Load DVD files
Launch Mac Video Converter Ultimate and locate the Ripper tab on your Mac. Click the Load DVD button to add the DVD disc, DVD folder, or DVD ISO file.
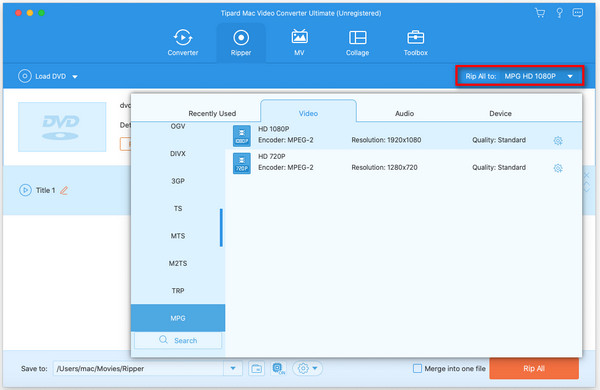
Step 2 Select output format
The default output format is MPG Lossless, which will keep the lossless output quality and keep the original full tracks and subtitles of your DVD.
If you want to choose another digital format, click on the Output Format at the bottom left corner of the page, and select the desired file format. You can also click Custom Profile to customize more output settings.
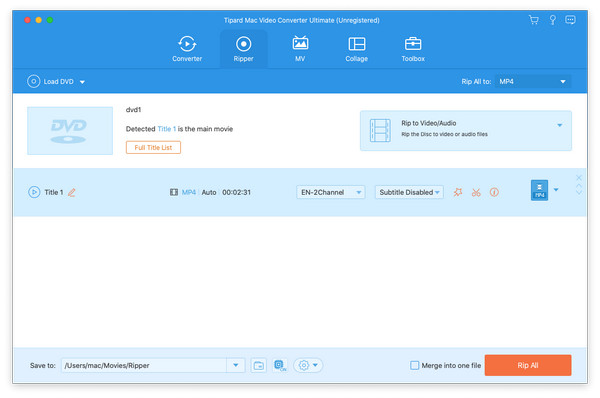
Step 3 Rip DVD to video/audio
Finally, go to the bottom left area to select the destination, and click the Rip All button to convert DVD to other video or audio formats.
Step 1 Add video(s)
In the bottom-left corner, click the Add button or the text Add. Select the wanted videos from your computer. Then you can adjust the order of them by clicking Forward or Backward. Features like Edit and Trim are also available.
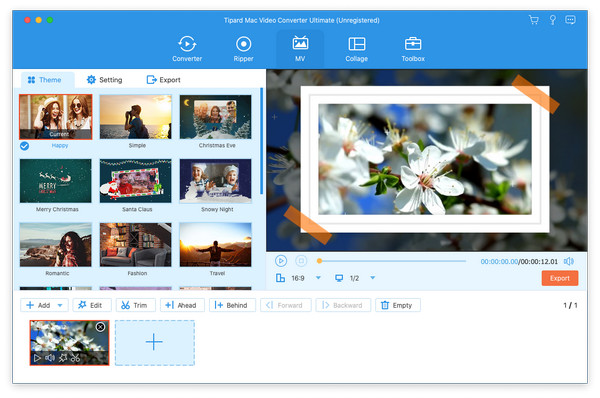
Step 2 Choose a theme
On the left, choose an appropriate theme for your video like Happy, Simple, Christmas Eve, etc.
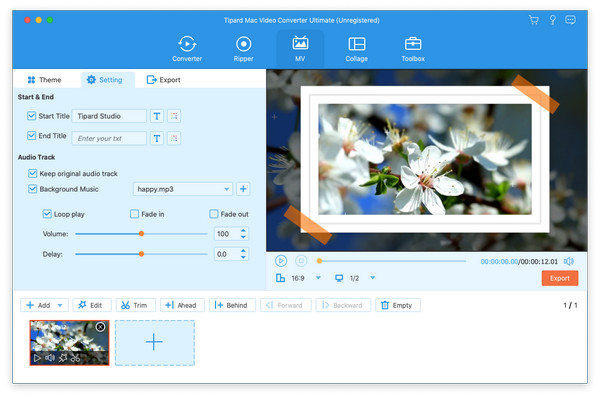
Step 3 Adjust MV settings
Choose Setting on top menu bar. Here you can set Start and End Title. Audio Track settings like adding Background Music, Loop play, Volume, and more are also changeable.
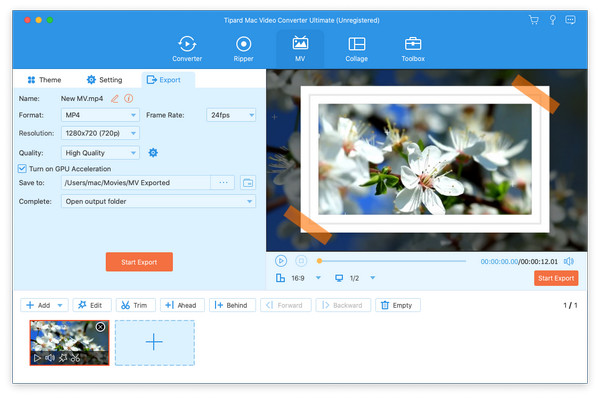
Step 4 Export MV
Switch to Export from the top menu bar. You can change the Name of your Besides, you can select a wanted Format, Frame Rate, Resolution, and Quality. Finally, choose Save to folder and click Start Export.
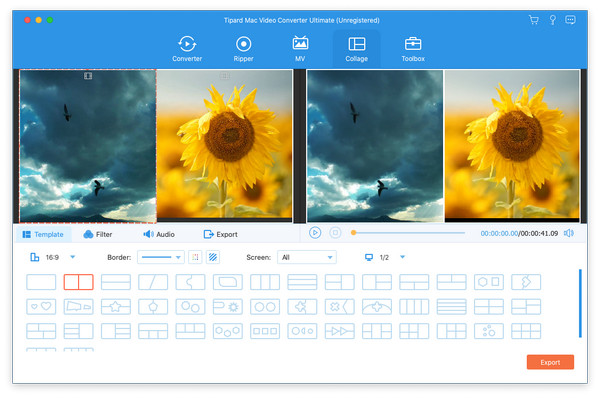
Step 1 Choose a template
Click the Add button and import the wanted videos. Down below, you can select a template you like. The Border, Screen, and aspect ratio are available to change.
Step 2 Add filter
Choose Filter on the top. Select a filter for each video separately to make your video more attractive.

Step 3 Adjust audio
Switch to Audio setting. You can choose to Keep the original audio track. For your reference, you can Click the "+" to add audio as the Background music. Besides, you can also Loop play, Fade in, or Fade out the added audio. Volume and Delay are also adjustable.

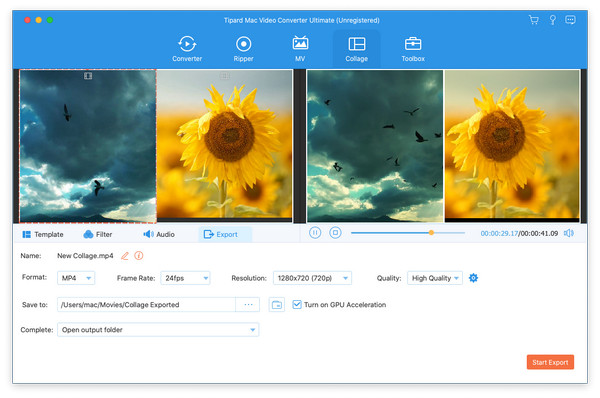
Step 4 Export collage
Click Export from the top bar. You can change the Name of the collage. You can also choose the Format, Frame Rate, Resolution, and Quality of the collage video. Then choose an output folder and hit the Start Export button.
Mac Video Converter Ultimate provides a built-in editor to edit the video or audio files further. You can click the Edit or Cut button to polish your videos or audio on a Mac.

The Clip feature helps you split your videos into pieces. After loading your DVD, you can click Cut to split videos into parts, add a new segment, copy and paste the segment, and more.

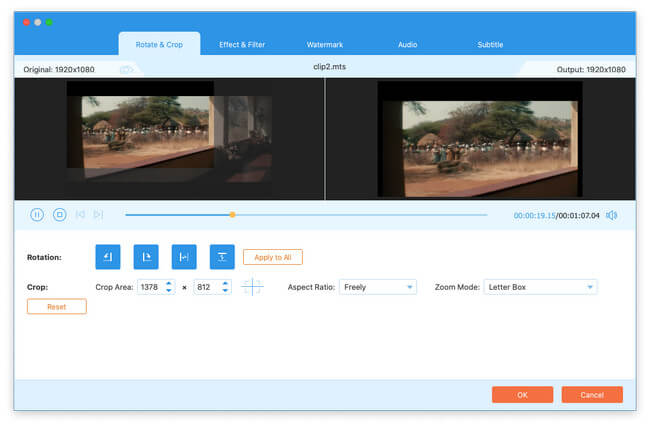
If you shoot videos sideways, you can use the Rotate feature. Simply click Edit and locate Rotate & Crop tab. It can rotate the video by 90, 180, or 270 degrees.
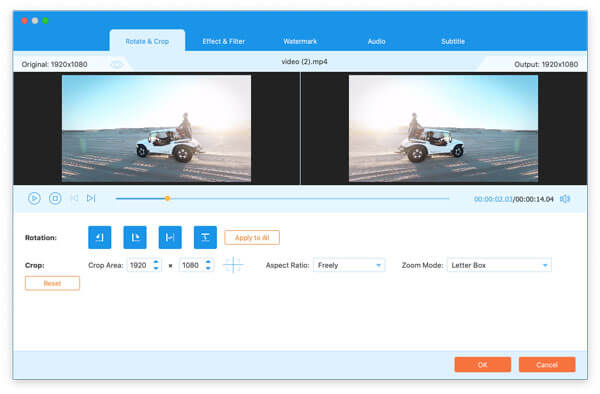
The Crop feature helps you remove unwanted portions from videos. Locate Rotate & Crop tab to get rid of the annoying edges. You can also adjust the aspect ration from 16:9, 4:3, 21:9, 16:10, 5:4, 1:1, 9:16, etc. Moreover, you can adjust the zoom mode from Letter Box, Pan & Scan, or Full.
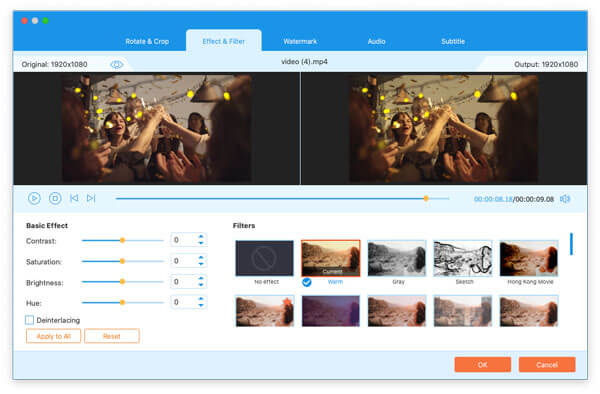
In the Effect & Filter tab, you can adjust the basic effects like contrast, saturation, brightness, and hue. Besides, you can apply filters like warm, gray, sketch, Hong Kong movie, orange dots, purple, plain, stars, and more.
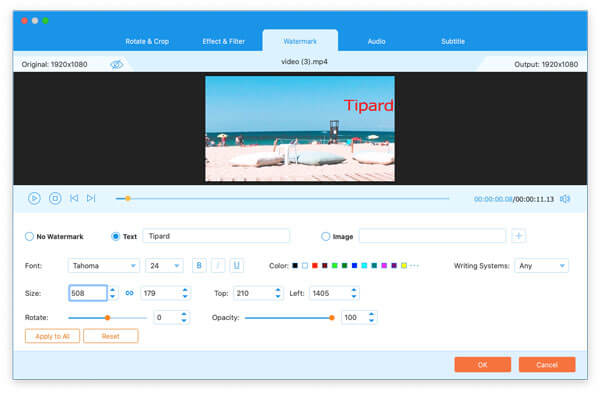
Want to add a logo to your work? You can apply a text watermark or image logo to the video. Meanwhile, you can adjust font, size, color, writing system, font position, rotation, and opacity.
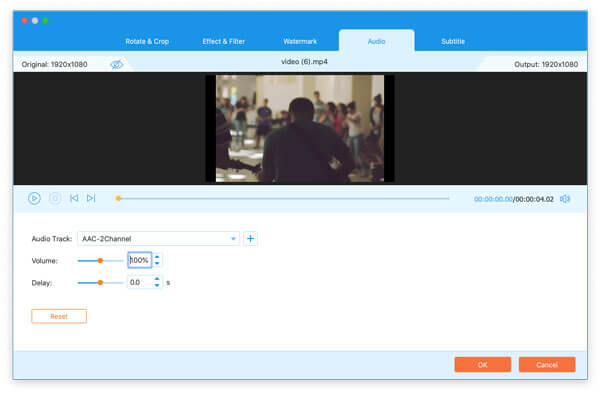
Want to add a background to your silent video? Locate Audio tab to add a new audio track, disable the existed audio track, adjust volume, and delay time.
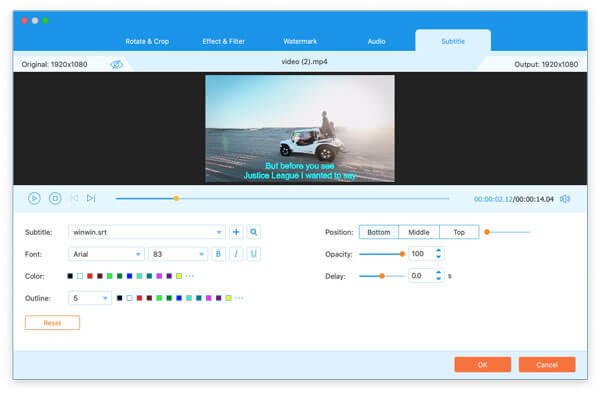
The Subtitle feature lets you add a subtitle to your movie. Here you can add or disable subtitle, adjust the subtitle font, type, color, outline, position, opacity, and delay time.
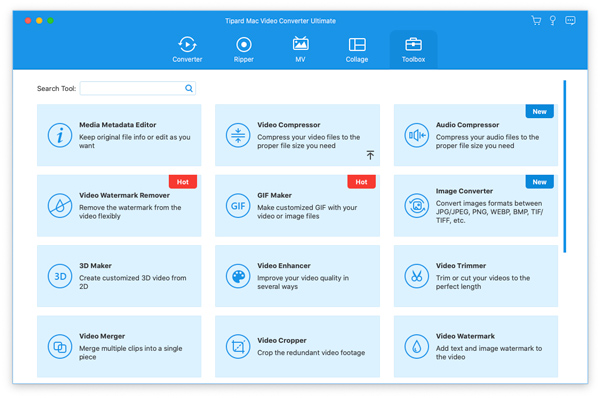
Tipard Mac Video Converter Ultimate provides additional tools for users, including editing metadata, compressing video, making GIFs, creating 3D videos, and enhancing videos. In addition, the top navigation bar is divided into video, audio, image, and data tools based on file type, as well as recently used tools, making it easy to find the tools you need.
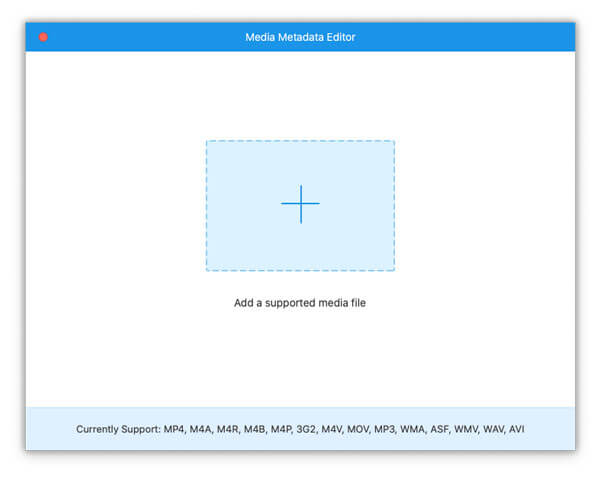
Step 1 Add media file
Locate the More Tools tab and select Media Metadata Editor. In the pop-up window, you can click the + button to add the media file.
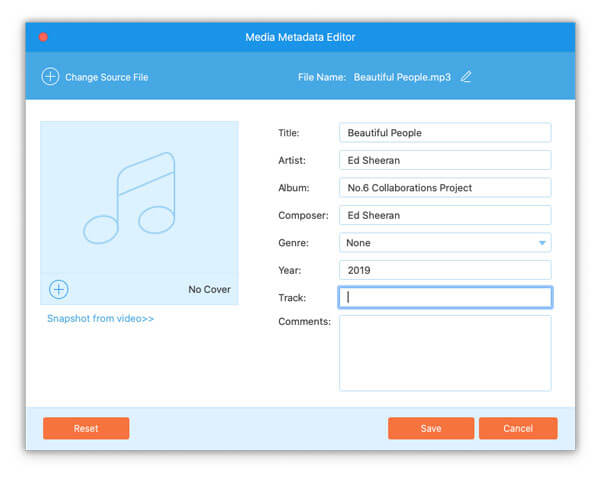
Step 2 Edit ID3 tag
In the Media Metadata Editor window, you can rename the video/audio, change the tags like title, artist, album, composer, genre, year, track, and comments. Then click the Save button to save the metadata changes.
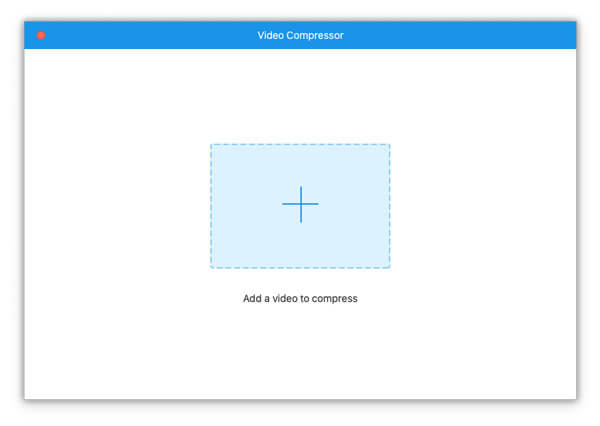
Step 1 Add video file
Select Video Compressor in Toolbox, and click the + button to load the video file you want to compress.
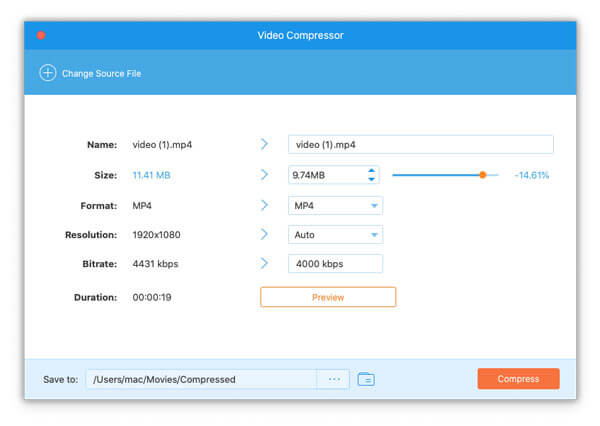
Step 2 Compress video
You can adjust the video size by moving the control bar left or right. You can also rename the video, change the output format and resolution. The Preview button lets you preview the compressed video for 10s. Then click the Compress button to compress the video file.
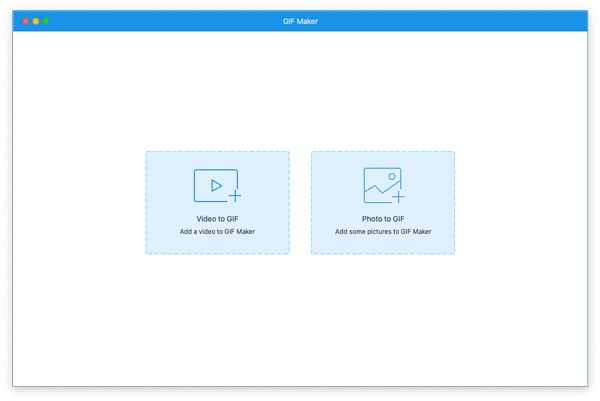
Step 1 Add video/photo files
Choose GIF Maker from the Toolbox interface. If you want to make a GIF from videos, you can click the Video to GIF button to upload the video file. If you would like to make a GIF from photos, you can choose the Photo to GIF button to import the image.
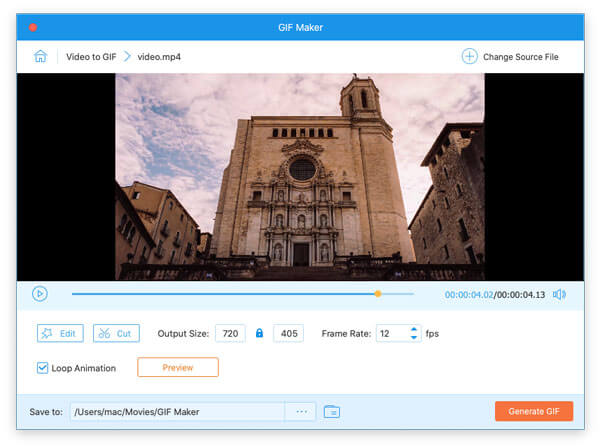
Step 2 Make GIF
In the GIF Maker window, you can adjust the output size, frame rate, and enable Loop Animation. Then click the Generate GIF button to start making GIF from video.
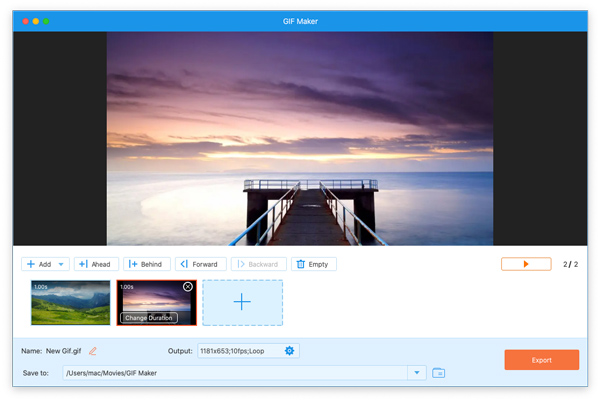
You can click the plus sign to add more photos when making a GIF from images. You also can change the order of your images as you like in the interface. Finally, click the Export button to finish.
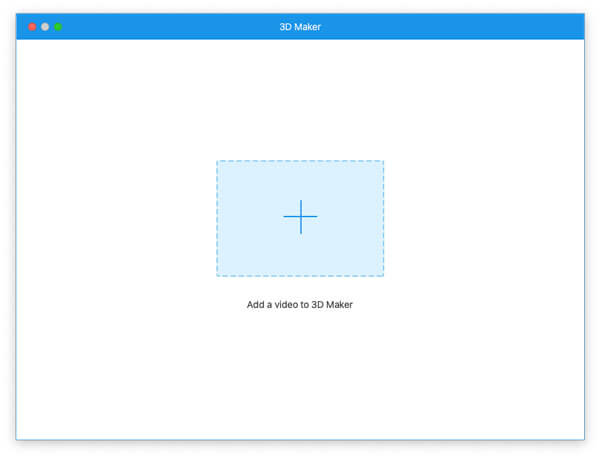
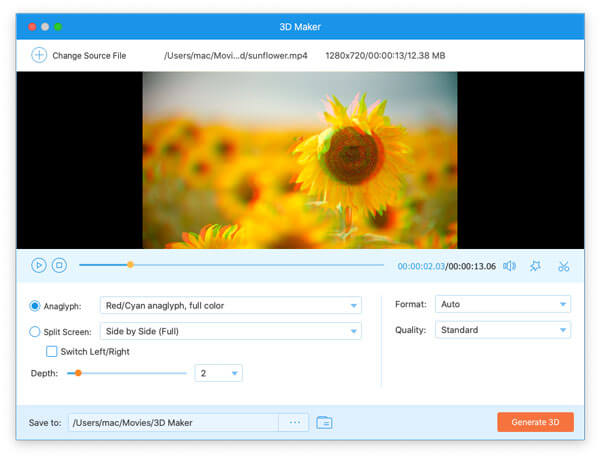
Step 1 Add video file
Find 3D Maker from the Toolbox, and click the + button to import the common video file.
Step 2 Convert 2D to 3D
In the 3D Maker window, you can apply Anaglyph or Split Screen 3D effects, enable Switch Left/Right. Then choose the output format and high quality, and click Generate 3D button to convert the 2D video to 3D.
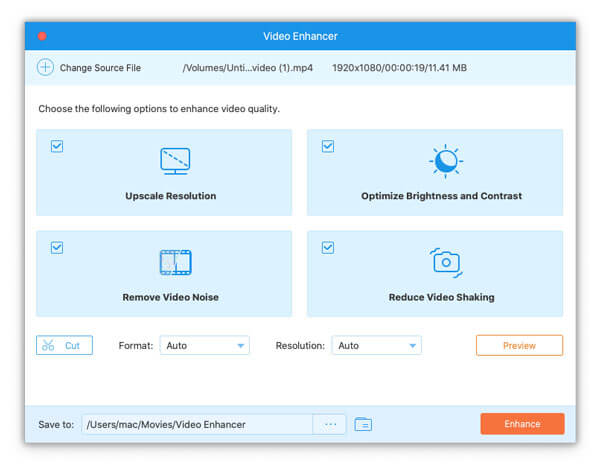
Step 1 Add video file
Select Video Enhancer and click the + button to add your video to the tool.

Step 2 Enhance video
It provides 4 options to enhance the video. You can upscale resolution, optimize brightness and contrast, remove video noise, and reduce video shaking. Then click the Enhance button to enhance the video.
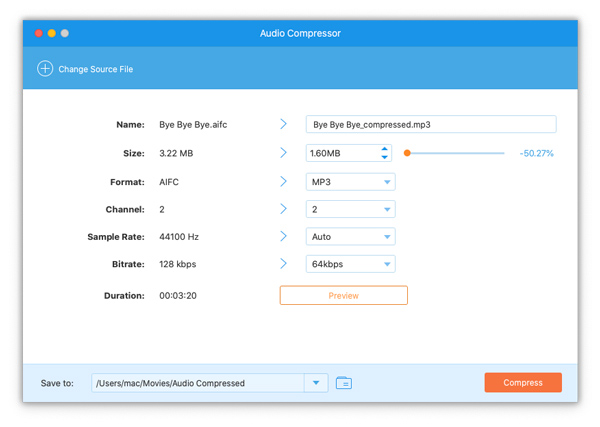
Step 1 Add an audio file
Select Audio Compressor from Toolbox and click the central plus sign to import the audio file you want to compress.
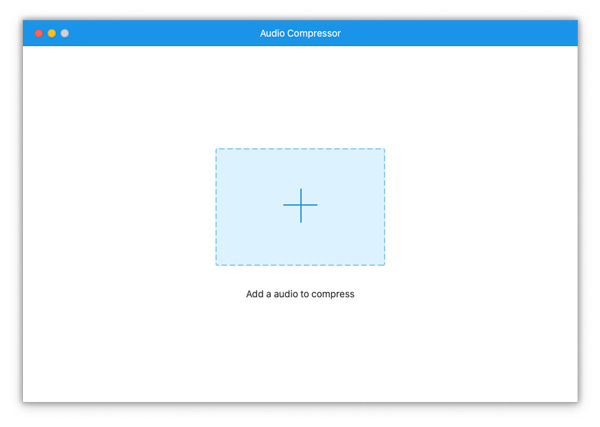
Step 2 Compress audio
You can reduce the size of your audio by sliding the Size bar. Then click the Compress button to complete.
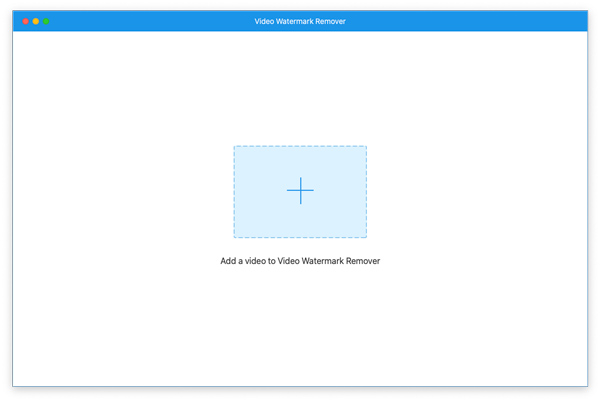
Step 1 Add a video file
Click the Video Watermark Remover button in the Toolbox interface and click the central plus sign to import the video you want to add a watermark to it.
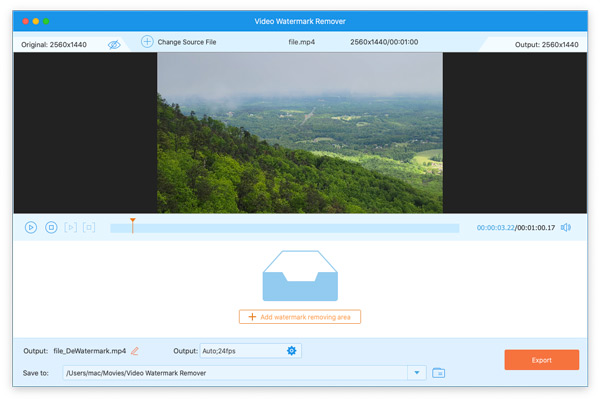
Step 2 Remove watermark
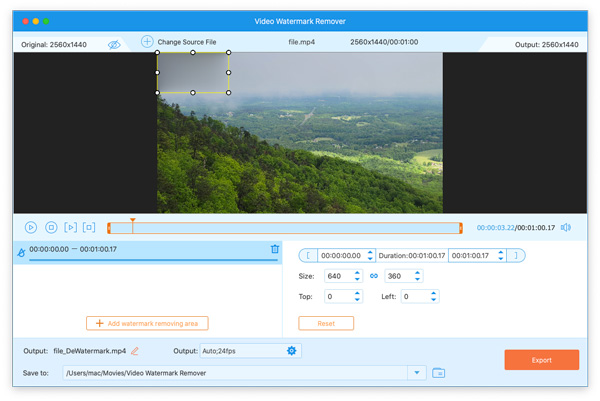
After importing the video, please click the Add watermark removing area button to select the watermark area you want to erase.
Then you can customize the watermark area size and position as you like by changing the number of Size, Top, and Left. Or you can directly use your mouse to drag the frame. Next, click the Export button to complete.
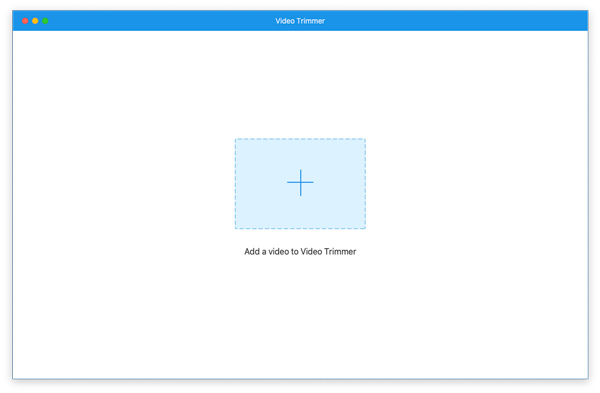
Step 1 Add a video file
Click the Video Trimmer button in the Toolbox interface and the central plus sign to import the video you want to cut.
Step 2 Trim video
Next, you can trim your video by dragging the start and end points of the timeline bar. You can also split your video into several segments by clicking the Split button. Later, click the Export button to save your video to your computer.

Step 1 Add a video file
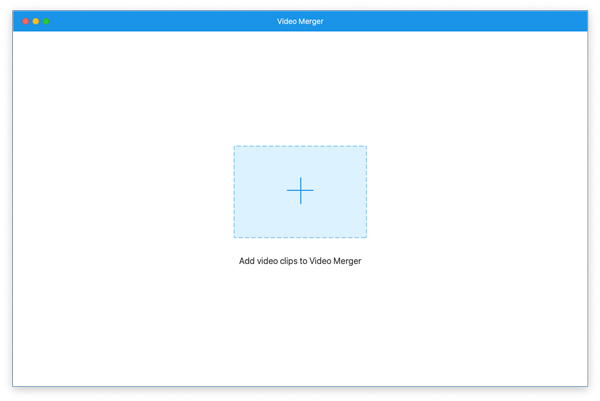
Select the Video Merger option of Toolbox and click the central + to add the video you want to combine with other videos.
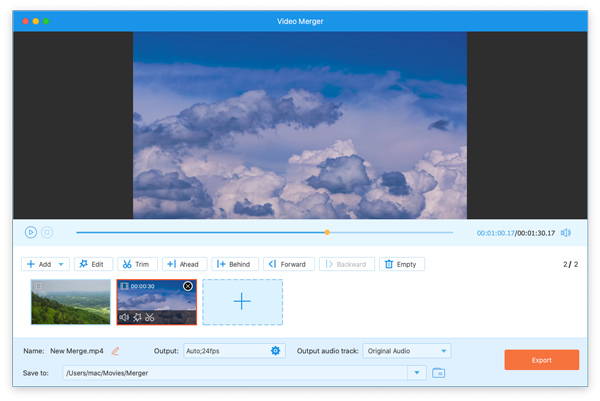
Step 2 Merge videos
In the interface, you can click the Add button or the plus sign to add more videos you want to merge. Lastly, click the Export button to save your video to your computer.
Step 1 Add a video file
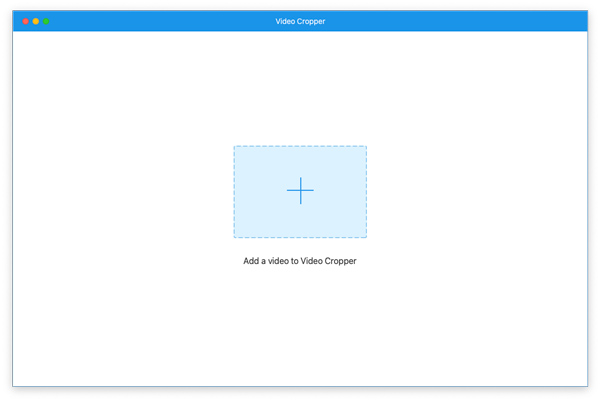
Select the Video Cropper option of Toolbox and click the central + to add the video you want to remove dark edges.
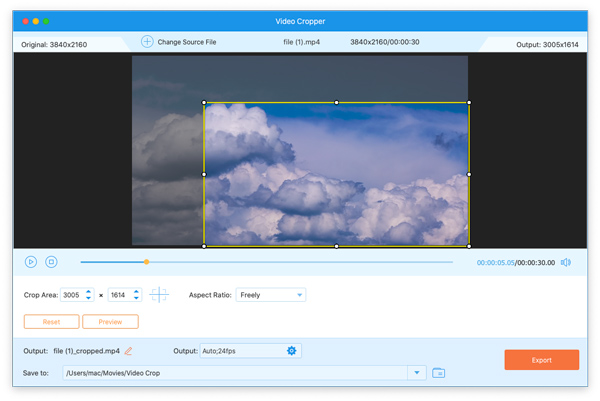
Step 2 Crop video
After adding the video to this tool, you can select the area to keep by dragging the yellow frame. You can also click the Aspect Ratio drop-down menu to choose a suitable aspect ratio for your video. Then click the Export button to save your video to your computer.
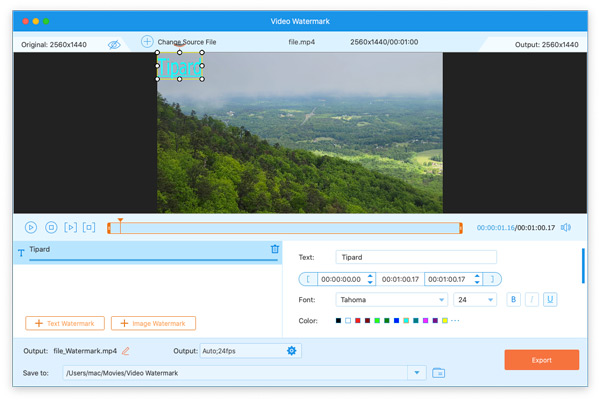
Step 1 Add a video file
Click the Video Watermark button in the Toolbox interface and click the central plus sign to import the video you want to add a watermark to it.
Step 2 Add a watermark to the video
If you want to add a text watermark to your video, you can select the Text Watermark option. Please click the Image Watermark button if you prefer to add an image watermark to your video.

When adding a text watermark to the video, you can input your watermark content in the Text box. Then you can change the font, size, color, etc., of your text watermark.
When adding an image watermark to your video, you can click the Add button of Image to add or exchange the image watermark. And you can customize the duration, orientation, and opacity of your image watermark.
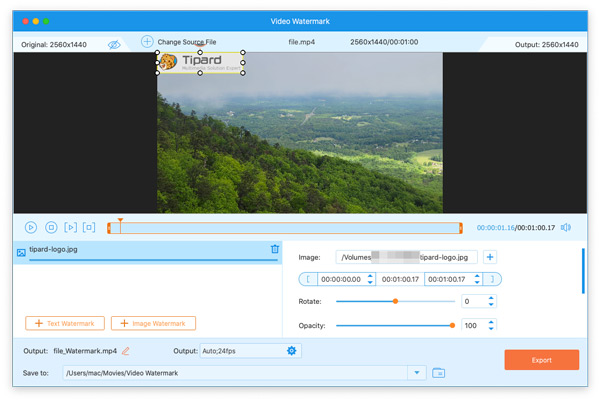
Finally, click the Export button to save your video to your computer.
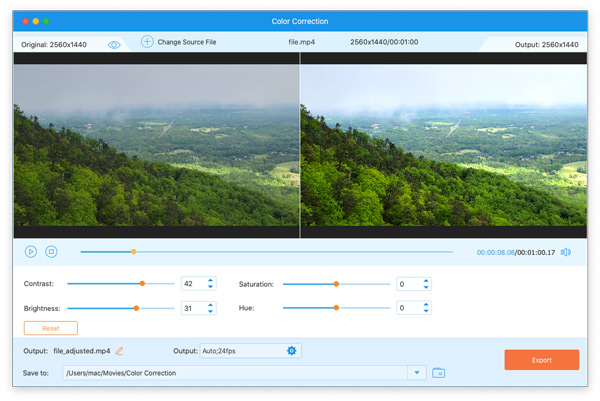
Step 1 Add a video file
Select the Color Correction option of Toolbox and click the central + to add the video you want to adjust video effects.
Step 2 Correct video color
Here you can adjust your video effects by sliding the bar of Contrast, Brightness, Saturation, or Hue. After that, click the Export button to save your video to your computer.
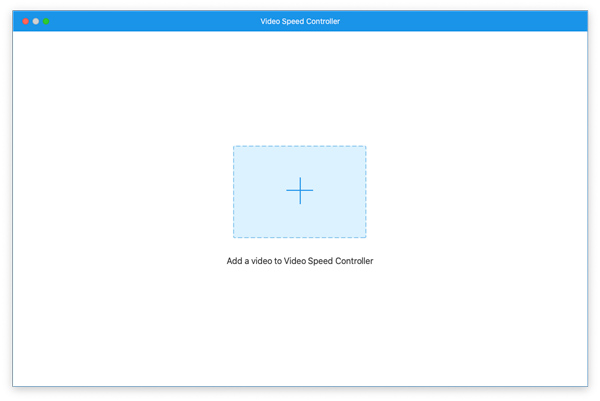
Step 1 Add a video file
Click the Video Speed Controller button in the Toolbox interface and the central plus sign to import the video you want to speed up or slow down.
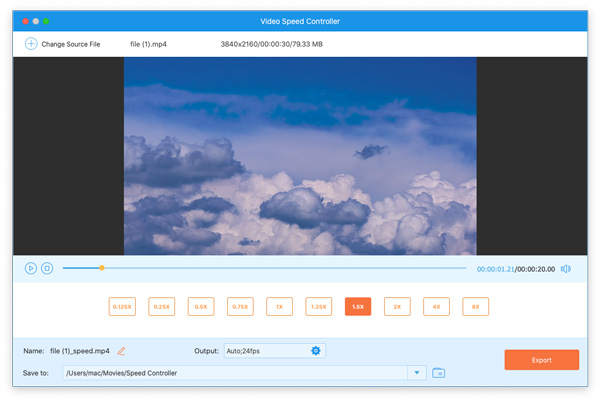
Step 2 Change video playback speed
If you want to speed up your video, you can click the 1.5X and Export buttons to save your video to your computer.
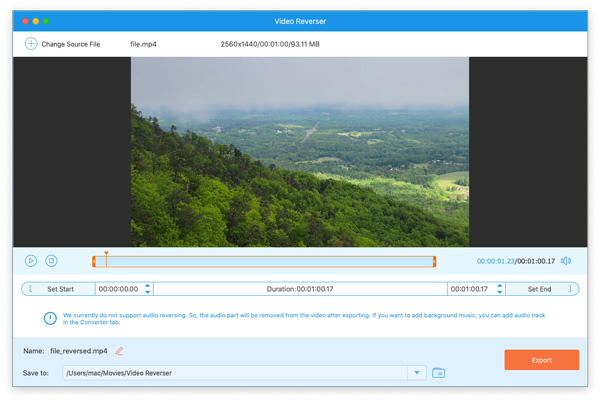
Step 1 Add a video file
Select the Video Reverser option of Toolbox and click the central + to add the video you want to turn your video backward.
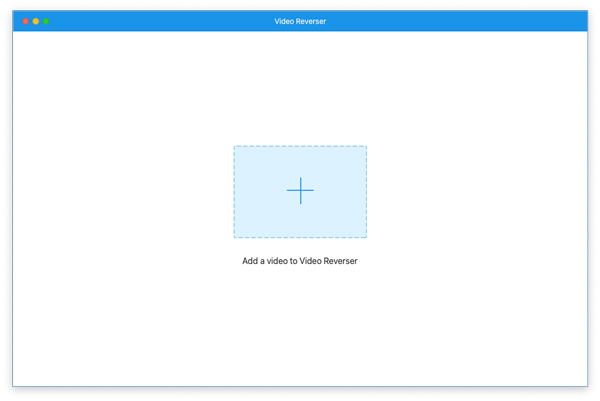
Step 2 Reverse video
This tool can reverse the whole video or a specific part of your video. You can drag both ends of the timeline to select the specific part of your video. Then click the Export button to save your video to your computer.
Step 1 Add a video file
Click the Video Rotator button in the Toolbox interface and the central plus sign to import the video you want to rotate or flip.
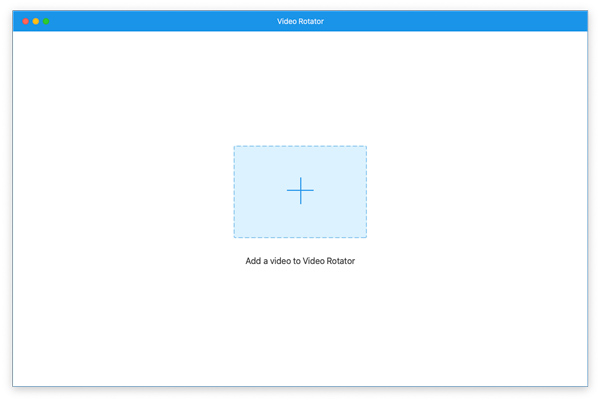
Step 2 Rotate or flip the video
You can select four options to rotate or flip your video: Rotate 90 degrees to the left, Rotate 90 degrees to the right, Flip horizontally, and Flip vertically. After selecting the orientation, you can click the Export button to save your video to your computer.

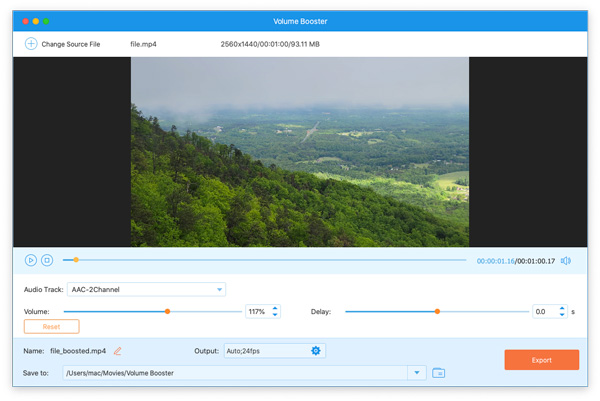
Step 1 Add a video file
Select the Volume Booster option of Toolbox and click the central + to add the video you want to turn up the volume of your video's audio track.

Step 2 Turn up the video volume
If you think your video's volume is too low, you can use this tool to turn up the volume by sliding the Volume bar from left to right. Then click the Export button to save your video to your computer.
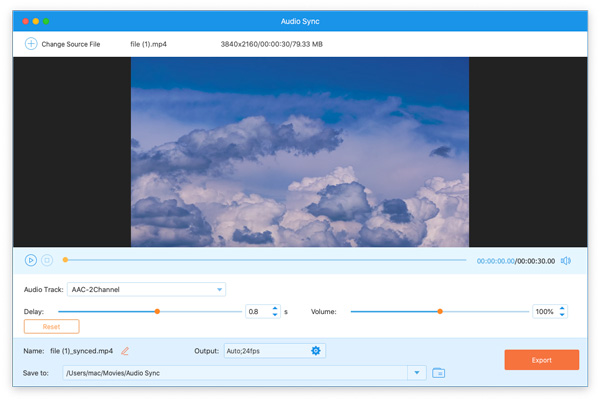
Step 1 Add a video file
Click the Audio Sync button in the Toolbox interface and the central plus sign to import the video you want to fix the audio and video out-of-sync problem.
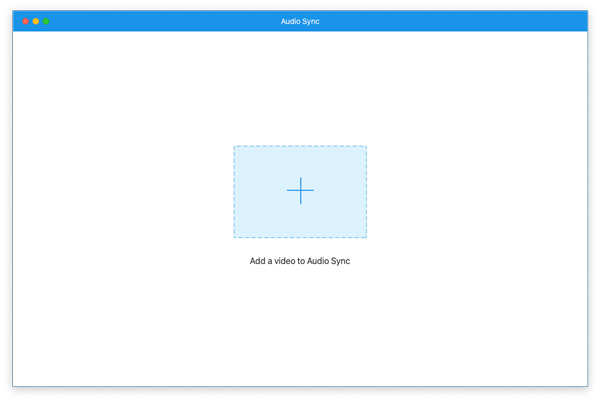
Step 2 Sync video and audio
Please slide the Delay bar to sync the audio with your video based on your needs. Next, click the Export button to save your video to your computer.
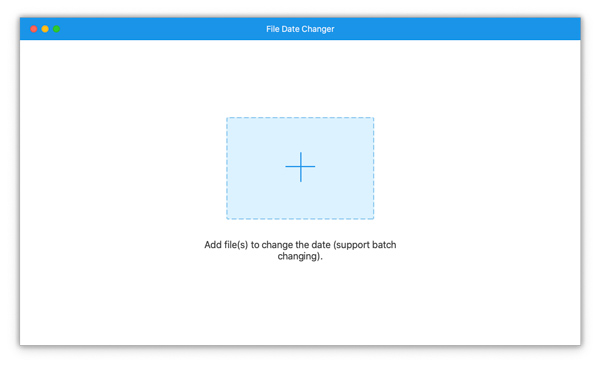
Step 1 Add a file
Select the File Date Changer option of Toolbox and click the central + to add the file you want to change its dates as you like.
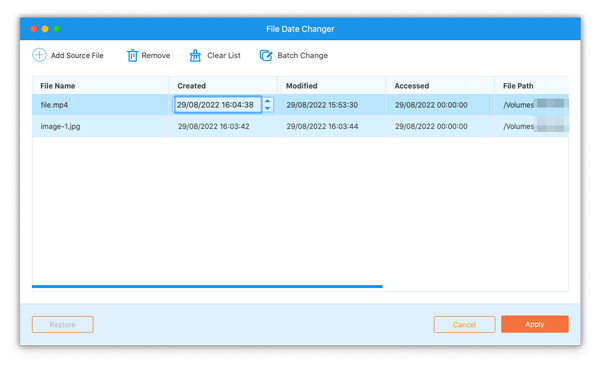
Step 2 Change file dates
This tool enables you to change your video's created date, modified date, and accessed date if needed. And you can click the Add Source File button to import more files. To change the date, please click on the date, and then you can edit it. After editing, please click the Apple button to export files with the date changing.
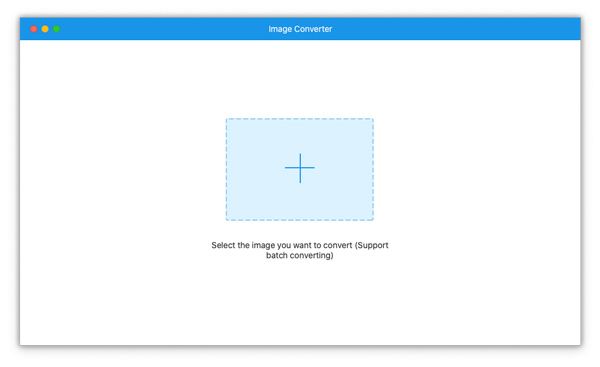
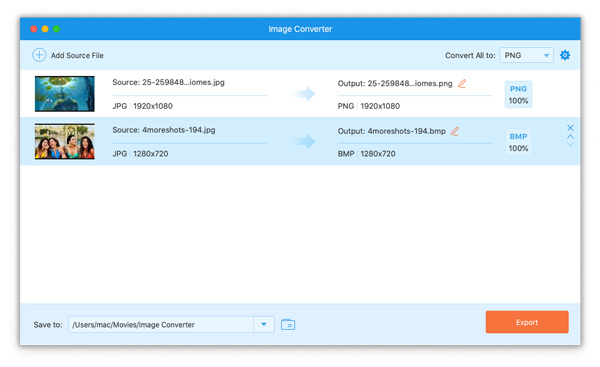
Step 1 Add an image file
Go to the Toolbox tab and click the Image Converter button to import the photo you want to change format by clicking the center plus sign.
Step 2 Converter image format
After importing the image, you can click the drop-down button next to Convert All to for selecting the format to convert into. Here are image formats you can select: JPG/JPEG, PNG, BMP, TIF/TIFF, WEBP, and DDS. Then, you can click the Export button to finish the conversion. If you have other pictures to convert, you can click the Add Source File button to import them.
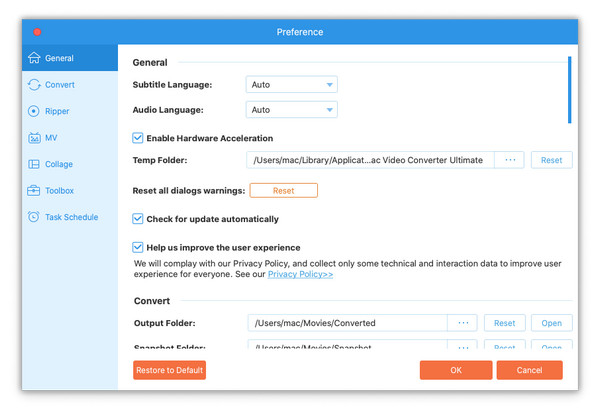
Tipard Mac Video Converter Ultimate lets you make preference settings. As you open this program, click Tipard Mac Video Converter Ultimate and select Preferences to further adjust the settings.
In the General settings window, you can select the subtitle language and audio language, enable GPU acceleration, and check for updates automatically.
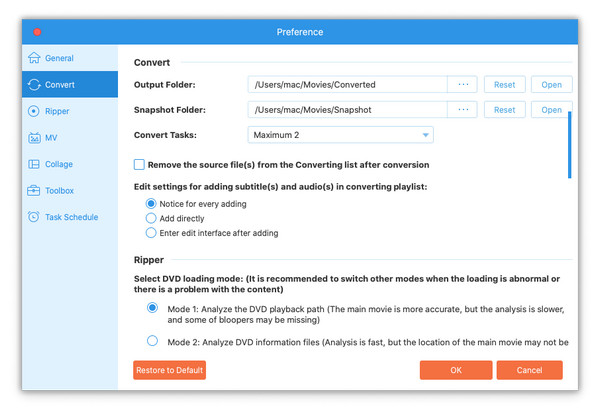
In the Converter tab, you can select the zoom mode, output folder, snapshot folder, snapshot formats, and set the conversion tasks. You can also choose to remove the source file after conversion, and put the notice when editing settings for adding subtitles and audio.
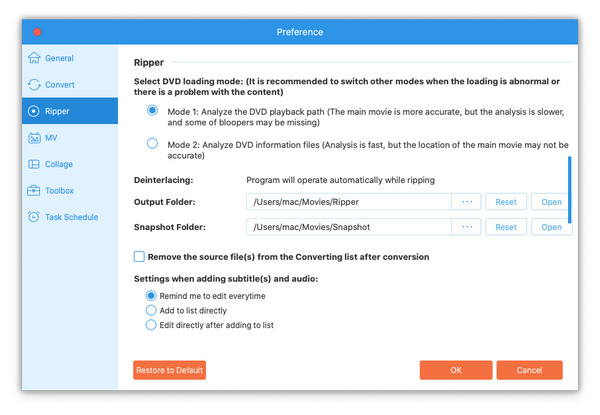
In the preference settings of Ripper, you can change the output folder and snapshot folder. You can also set to remove the source file after conversion, and set settings when adding subtitles and audio.
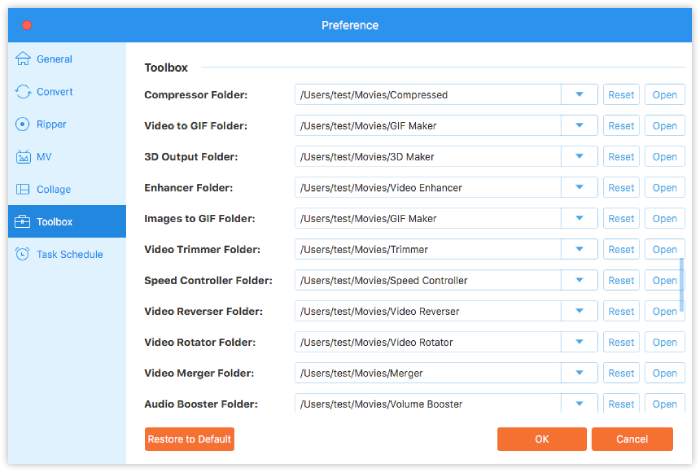
Here, you can set all the destination folders for all the editing tools, such as compressed video, generated GIF file, newly created 3D video, and enhanced video.
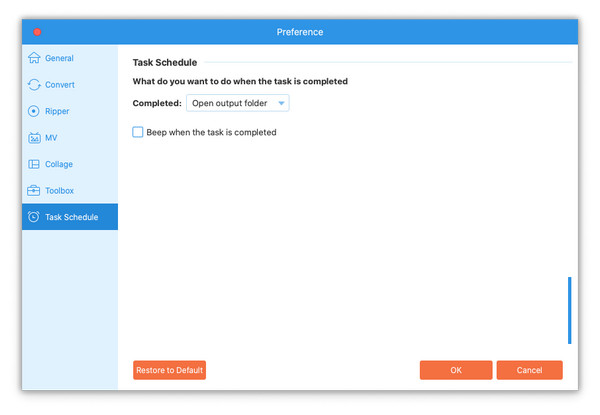
Here you can set the next instruction when the task is completed.