About | Privacy Policy | Terms of Use | Support | Contact Us
Copyright © 2026 Tipard Studio. All Rights Reserved.
Windows

Rip your favorite Blu-ray/DVD movies or videos to popular formats

Powerful software to play Blu-ray/DVD videos and audio

Create Blu-ray disc/folder/ISO file with your own video

Backup/Copy your favorite Blu-ray to disc/folder/iso files
Mac

Rip your favorite Blu-ray/DVD movies or videos to popular formats on Mac

Powerful software to play Blu-ray and popular video formats on Mac
Windows

Rip DVD to any popular video format quickly of full quality

Create DVD from videos and burn video to DVD/Blu-ray freely

Copy DVD to DVD disc/folder/ISO files in a 1:1 ratio
Mac

Rip DVD to any popular video format quickly of full quality on Mac

Burn or author a DVD from videos with subtitles and chapters on Mac

Copy DVD to DVD disc/folder/ISO files in a 1:1 ratio on Mac
Windows

Rip DVD, convert 4K video, edit, and upscale videos to 5K/8K

Repair broken videos with high accuracy and support many formats

Convert any video to MP3, MP4, MOV, WAV, and other 350 formats

Upscale resolution, optimize brightness and remove video noise

The easiest tool to capture screen, game, audio, etc. with high quality

Convert any 2D video to 3D video and convert 3D to 2D video

Convert 4K video to 4K/1080P and common videos

Convert TS video to various popular video/audio formats
Mac

Rip DVD, convert 4K video, edit, and upscale videos to 5K/8K on Mac

Repair broken videos with high accuracy and support many formats on Mac

Convert any video to MP3, MP4, MOV, WAV, and other 350 formats on Mac

Upscale resolution, optimize brightness and remove video noise on Mac

The easiest tool to capture screen, game, audio, etc. with high quality on Mac

Convert any 2D video to 3D video and convert 3D to 2D video on Mac

Convert 4K video to 4K/1080P and common videos on Mac

Convert TS video to various popular video/audio formats on Mac
Desktop

Rip and convert DVDs to MP3 and support other audio formats

Reset Windows Admin and Standard user account password in seconds

Accurately Convert any PDF file to Word with OCR

Convert PDF to Word, Excel, HTML and Image with OCR
Online

Easily remove watermarks from many image file formats free online

Points:0
Redeem
User Guide
Download and install Tipard DVD Ripper for Mac. Then launch it on your Mac.
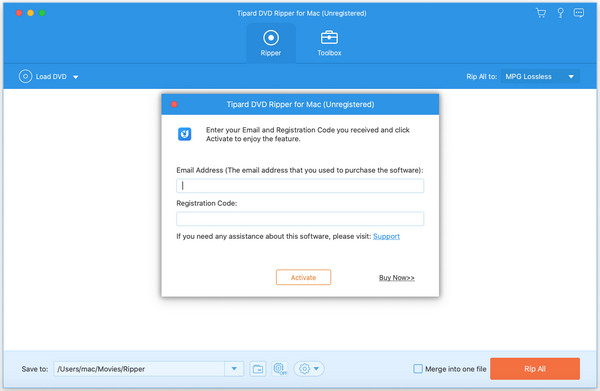
Each time when you open the ripper, the register window will pop up. If you close the window accidentally, don't worry. You can still register through other ways.
Click the Register button (a key button). Enter the Email Address you used to purchase the software. Then you'll receive a Registration Code. You can enter the code and click Activate.
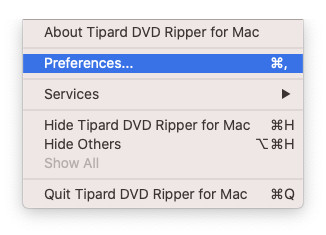
Tipard DVD Ripper updates from time to time to improve user experience. Please make sure that you have the latest version installed on your Mac. You can choose Preference from the drop-down list.
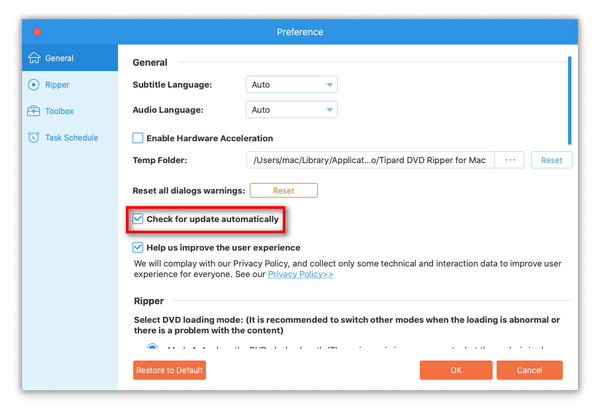
In the General Preference, you can check the box of Check for update automatically. When there is an update, the latest install package will be downloaded automatically.
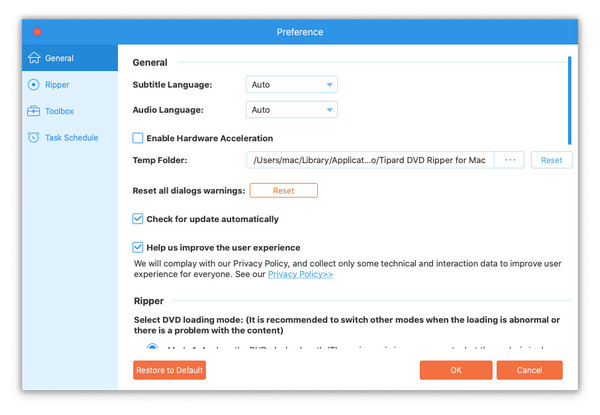
Choose Preference from the list. Then you'll enter the Preference window.
In the General Preference, besides the updating setting, you can change the Subtitle Language and Audio Language. You can choose to Enable Hardware Acceleration and change the Temp Folder where all the files are stored.
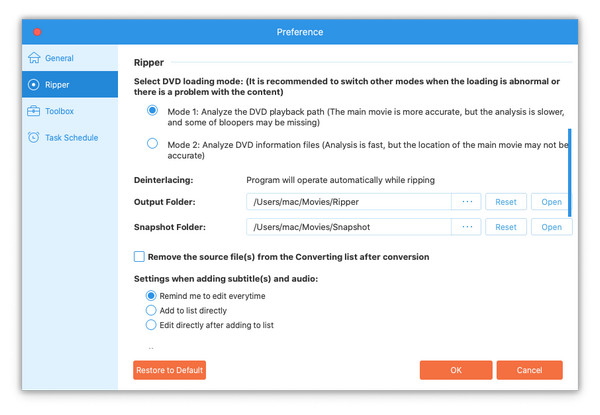
In the Ripper Preference, you can select DVD loading mode. Mode 1 is recommended. You can also change the Output Folder and Snapshot Folder. You can also set the action after conversion or when adding subtitles and audio.
In the Toolbox Preference, you can change the output folder for each tool.
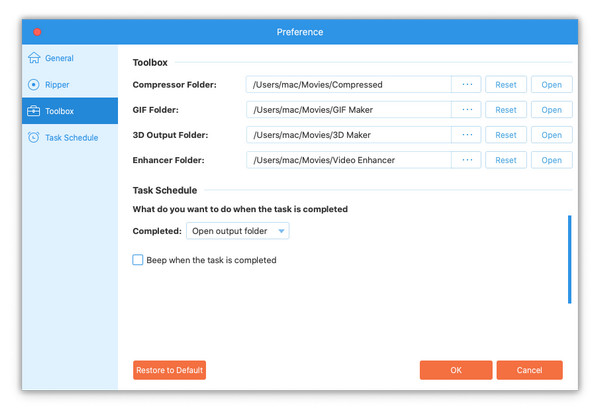
In the Task Schedule Preference, you can choose What do you want to do or whether to beep when the task is completed. When everything is ready, you can hit the OK button to save the settings.
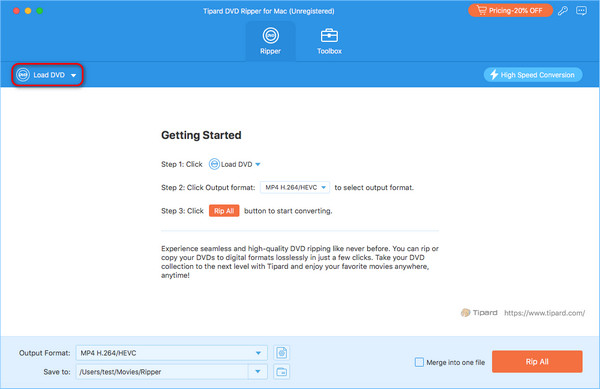
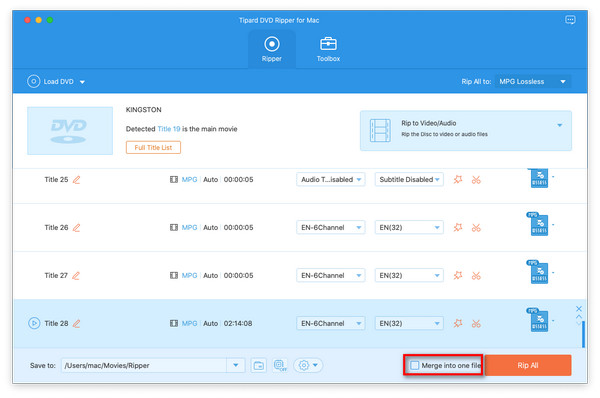
Step 1 Load DVD
Click Load DVD at the top-right corner of the interface. You can choose Load DVD Disc, ISO, Folder, or Load AVCHD Disc or Folder from the drop-down list. You can also drag the target file into the ripper directly.
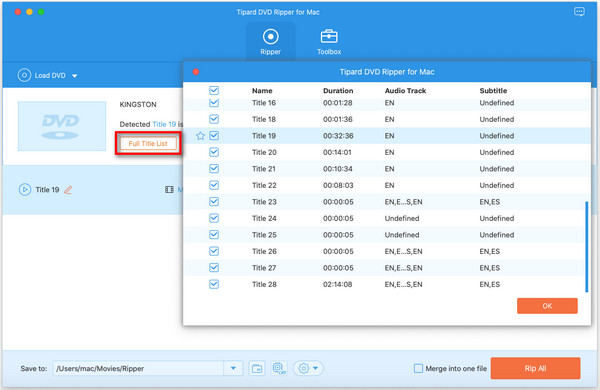
Step 2 Choose Titles
When your DVD is loaded, you can select:
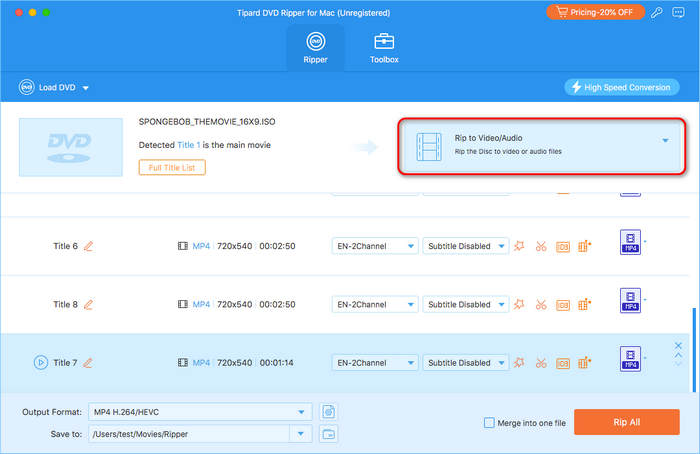
Step 3 Select Output Format
Tipard DVD Ripper can rip your DVD to digital files, ISO Image, and DVD Folder. You have three options:
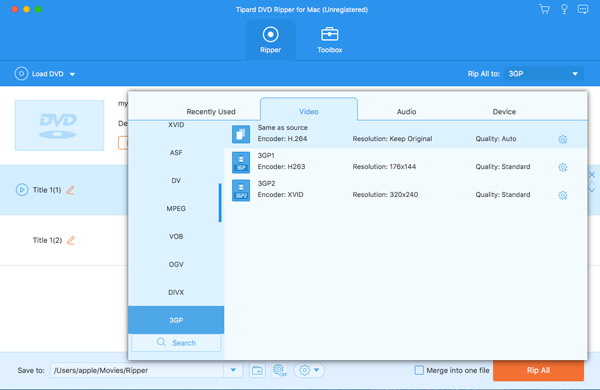
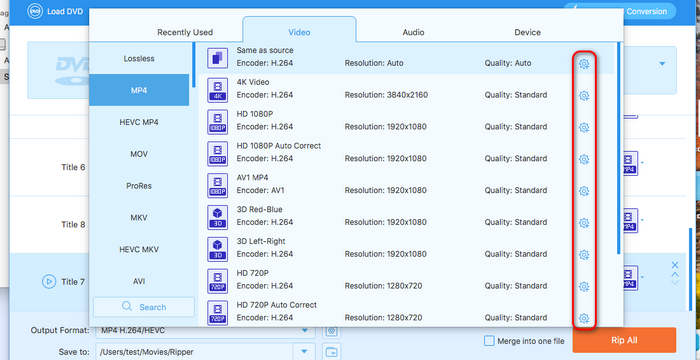
If you select video/audio as the output, you can click the Output Format dropdown button on the bottom left side. Then, select a desired output format, like HEVC MP4, 4K MP4, HD 1080p, etc. If you want to save the DVD video as a lossless file, you can click Lossless and then select Lossless MKV or Lossless MPG.
Step 4 Customization
Tipard DVD Ripper for Mac also offers deep customization options. When you are selecting an output format, you can click the Custom Profile button to start your customization.
In the customization panel, you can adjust the video codec (such as H.264, H.265, AV1, and more), video resolution, bitrate, frame rate, and audio codec, sample rate, bitrate, channels, and more. Click the Create New to save your customization. You can use this customization for other DVDs.
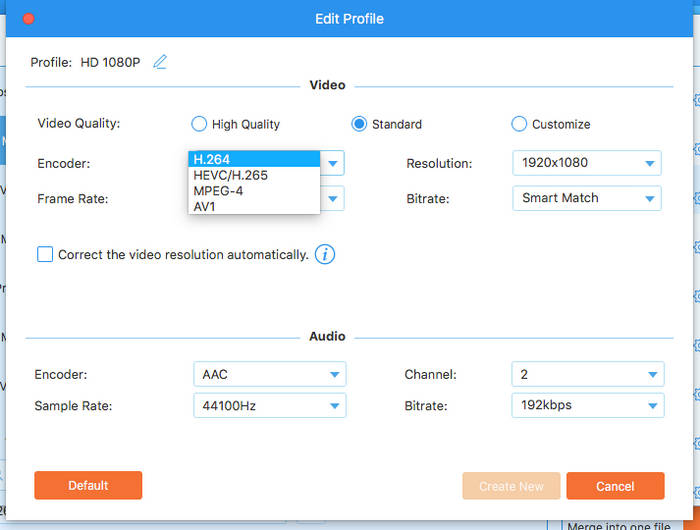
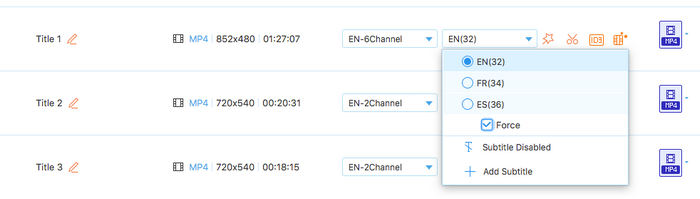
You can also customize the subtitle tracks. Click the Subtitle dropdown list to select a desired language. You can also toggle on the Force option to force the subtitles to be displayed.
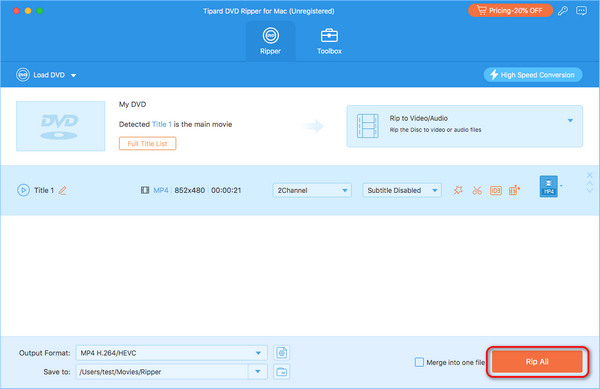
Step 5 Start Ripping
Before ripping, you can change the output folder where the ripped file is stored. The you can click Rip All to rip your DVD.
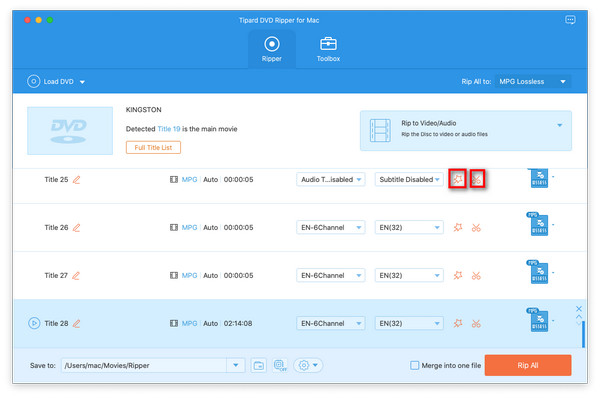
You can click the Edit button (a star image) and the Cut button (a scissor image) to edit your video. In the whole process, you can preview the effect while editing. Now, let's dive into it!
Note: If you want to edit the video, you should not select MPG Lossless and Same as source as the output format.
In the main interface, you can combine the selected titles into one. Check the box of Merge into one file before ripping. Then you'll get the merged video.
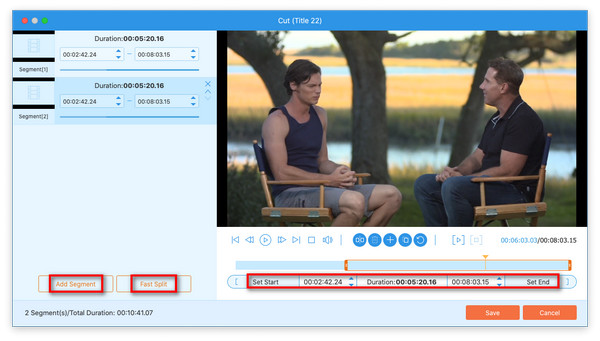
Click the scissor image and enter the cutting window. You can cut the video by dragging the rectangle or changing the time in Set Start and Set End. You can also Add Segment and Fast Split the clip. When everything is ready, you can click OK to save the settings.
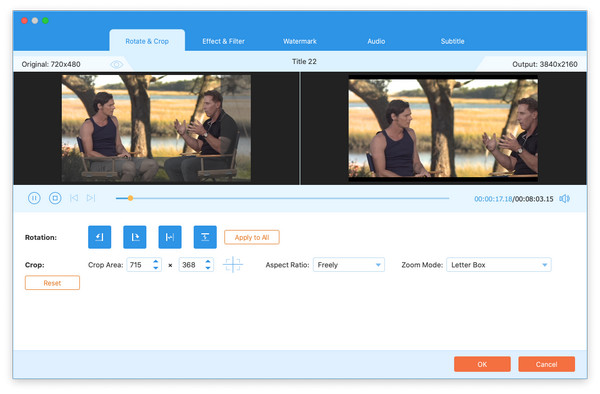
Click the star image to enter the editing window. You'll see the Rotate & Crop option first. Here you can Left Rotate or Right Rotate the video or flip the video vertically and horizontally. You can also drag the rectangle or change the number in the Crop Area to adjust the display range. The Aspect Ratio and Zoom Mode can also be changed according to your need.
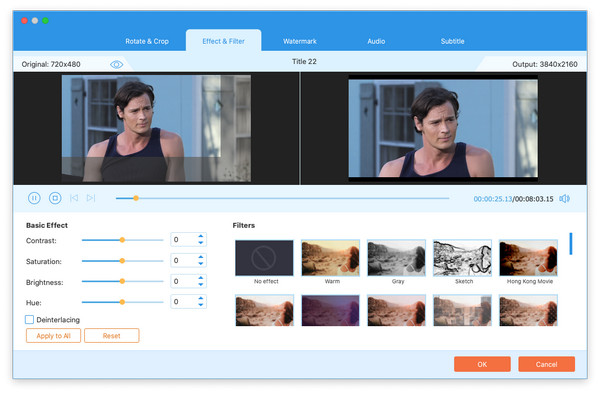
Switch to Effect & Filter window from the top menu bar. Here you can change the Basic Effect like Contrast, Saturation, Brightness, Hue, and Deinterlacing. Then you can choose a filter on the right to make your video more attractive. Then click OK to save the settings.
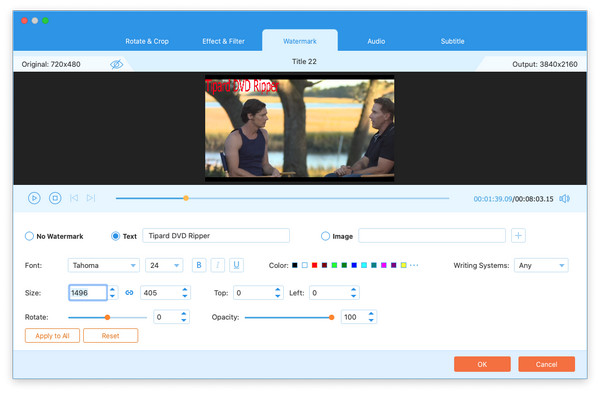
Choose Watermark on the top. You can choose Text or Image as your watermark. For the text watermark, you can change the Font, Color, Size, Opacity, etc. For the image watermark, you can change the Size, Top and Left distance, Opacity, etc. Then click OK.
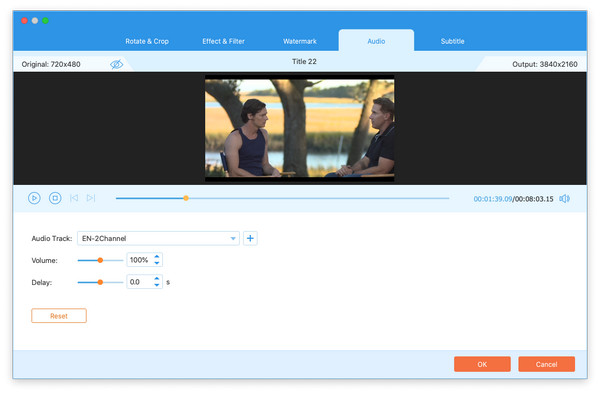
Choose Audio from the top menu bar. You can change the internal Audio Track or add your own. You can change the Volume and Delay time. If you're satisfied with the outcome, you can hit the OK button.
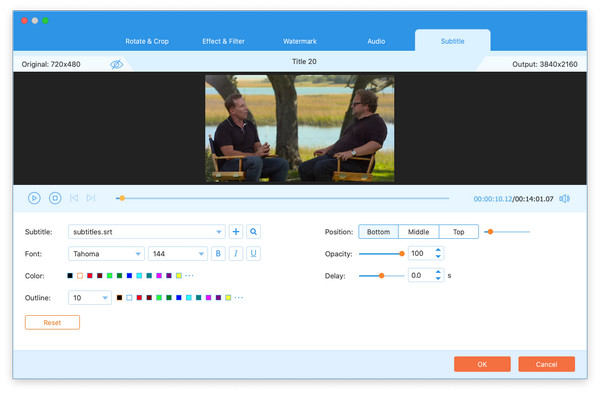
Switch to the Subtitle window. You can add external subtitles from your computer. You can change the Position, Font, Opacity, Color, Delay, and Outline of the subtitles. When all settings are done, click OK to get the edited video.
This DVD ripper supports many useful tools to add flavor to your video. Choose Toolbox from the top menu bar to see the features provided.

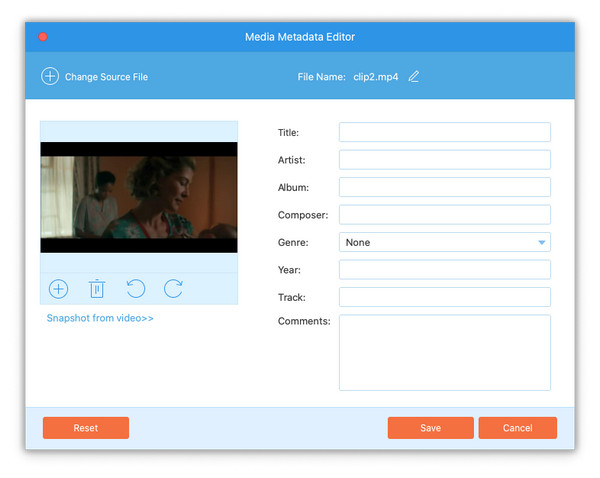
Click the Plus button to add your files into the editor. Then you can change the cover of the media metadata. You can also edit the Title, Artist, Album, Composer, Genre, Year, Track and Comments. Then click Save to get the media metadata.
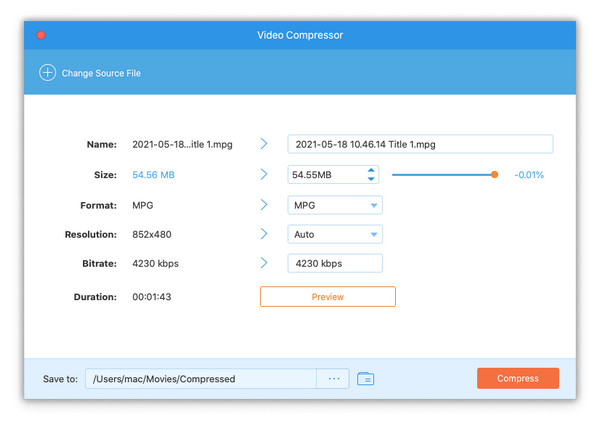
Add the wanted video file into the compressor. You can change the Name, Size, Format, Resolution Bitrate, and Duration. Then you can choose the Save to folder and click Compress.
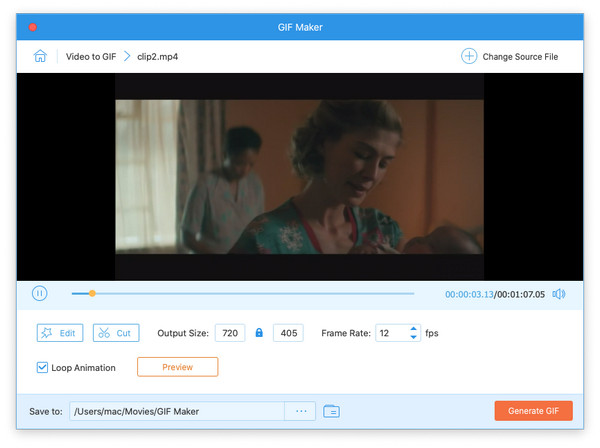
Add a video to GIF Maker. You can Edit or Cut the video first. Then you can change the Output size and the Frame Rate of the GIF. Change the output folder and click Generate GIF.
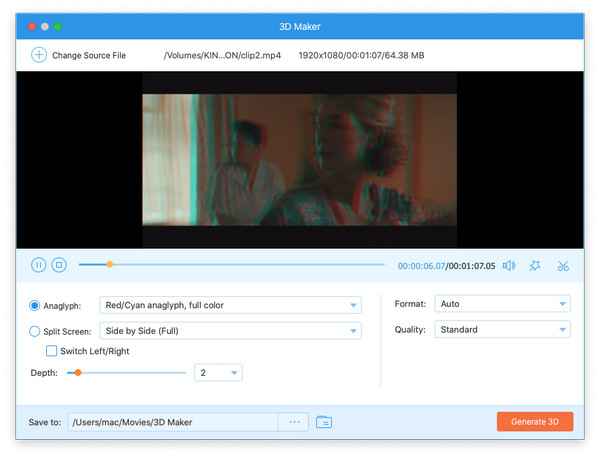
Add a video file to 3D Maker. You can choose Anaglyph or Split Screen as the 3D effect. You can also change the Format, Quality, and Depth of the video. When all settings are ready, click Generate 3D to get your own 3D video.
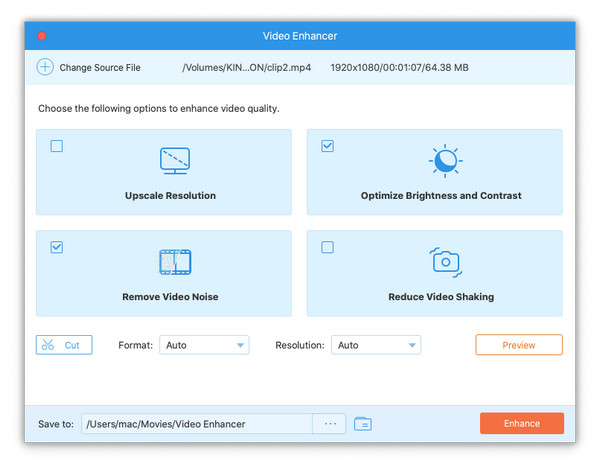
Click the Plus button and choose the wanted file from your computer. Here you can choose to Upscale Resolution, Optimize Brightness and Contrast, Remove Video Noise, and Reduce Video Shaking. Then you can Preview the effect to see whether it is satisfying. Then change the stored folder and hit the Enhance button to get the enhanced video.