About | Privacy Policy | Terms of Use | Support | Contact Us
Copyright © 2026 Tipard Studio. All Rights Reserved.
Windows

Rip your favorite Blu-ray/DVD movies or videos to popular formats

Powerful software to play Blu-ray/DVD videos and audio

Create Blu-ray disc/folder/ISO file with your own video

Backup/Copy your favorite Blu-ray to disc/folder/iso files
Mac

Rip your favorite Blu-ray/DVD movies or videos to popular formats on Mac

Powerful software to play Blu-ray and popular video formats on Mac
Windows

Rip DVD to any popular video format quickly of full quality

Create DVD from videos and burn video to DVD/Blu-ray freely

Copy DVD to DVD disc/folder/ISO files in a 1:1 ratio
Mac

Rip DVD to any popular video format quickly of full quality on Mac

Burn or author a DVD from videos with subtitles and chapters on Mac

Copy DVD to DVD disc/folder/ISO files in a 1:1 ratio on Mac
Windows

Rip DVD, convert 4K video, edit, and upscale videos to 5K/8K

Repair broken videos with high accuracy and support many formats

Convert any video to MP3, MP4, MOV, WAV, and other 350 formats

Upscale resolution, optimize brightness and remove video noise

The easiest tool to capture screen, game, audio, etc. with high quality

Convert any 2D video to 3D video and convert 3D to 2D video

Convert 4K video to 4K/1080P and common videos

Convert TS video to various popular video/audio formats
Mac

Rip DVD, convert 4K video, edit, and upscale videos to 5K/8K on Mac

Repair broken videos with high accuracy and support many formats on Mac

Convert any video to MP3, MP4, MOV, WAV, and other 350 formats on Mac

Upscale resolution, optimize brightness and remove video noise on Mac

The easiest tool to capture screen, game, audio, etc. with high quality on Mac

Convert any 2D video to 3D video and convert 3D to 2D video on Mac

Convert 4K video to 4K/1080P and common videos on Mac

Convert TS video to various popular video/audio formats on Mac
Desktop

Rip and convert DVDs to MP3 and support other audio formats

Reset Windows Admin and Standard user account password in seconds

Accurately Convert any PDF file to Word with OCR

Convert PDF to Word, Excel, HTML and Image with OCR
Online

Easily remove watermarks from many image file formats free online

Points:0
Redeem
User Guide
A camera is a must-have in our daily life. It records the merriest moment when hanging out with friends and family. Sometimes we may lose or do some damage to our precious memory videos. Therefore we need to backup them on a DVD in case of loss or damage. Tipard DVD Creator for Mac is a professional DVD Maker allowing you to convert almost all video files to DVD with ultra-fast burning speed and original quality. You can follow the steps below and create your desired DVD movies.
Step 1 Install and launch program
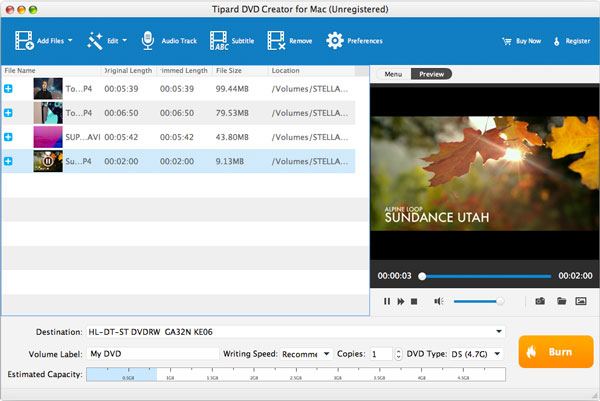
First of all, you need to download the software here and install it on your computer. Run the program after the successful installation. Here's the main interface of the program.
Step 2 Add files to program
Click the Add Files button on the toolbar. Here you can press the Ctrl or Shift button on the keyboard to add multiple video files to the program. Or you can drag the files to the program directly.
Step 3 Burn videos
After you add files to the program, you can see the estimated capacity. Insert a blank DVD, then click the Burn button to burn the videos to the DVD. In a short while, you can get your DVD movies
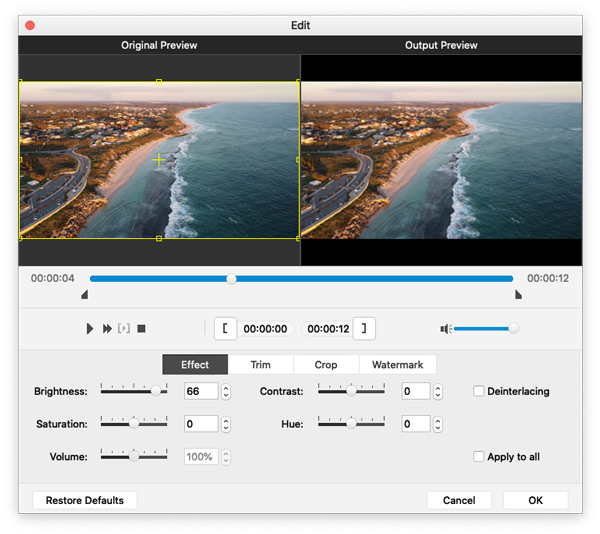
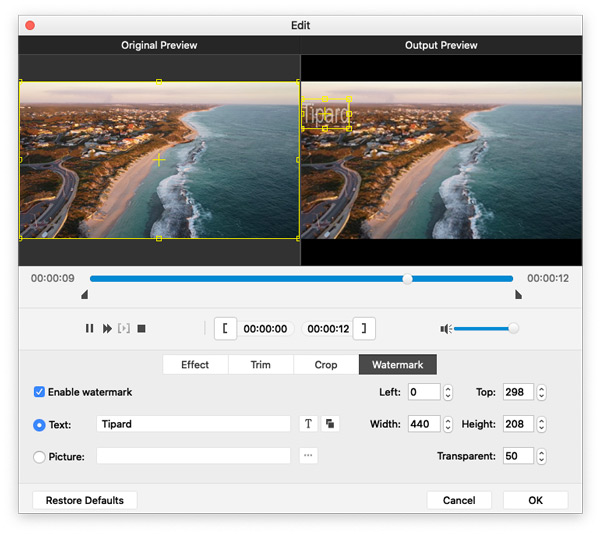
Step 1 Effect function
In the Edit window, you can adjust the video effect like Brightness, Contrast, Saturation, Hue, and Volume. You can drag the slide bar of each parameter to change the corresponding effect. Or you can input the value you want in the corresponding text box. You can get the ideal video effect with the best Mac DVD Creator.
Step 2 Trim video length
If you want a part of the video file, it's easy to make it with Mac DVD Creator. In the Trim editing window, please drag the slide bar to set the start and end times; or input the start and end times in the corresponding text box.

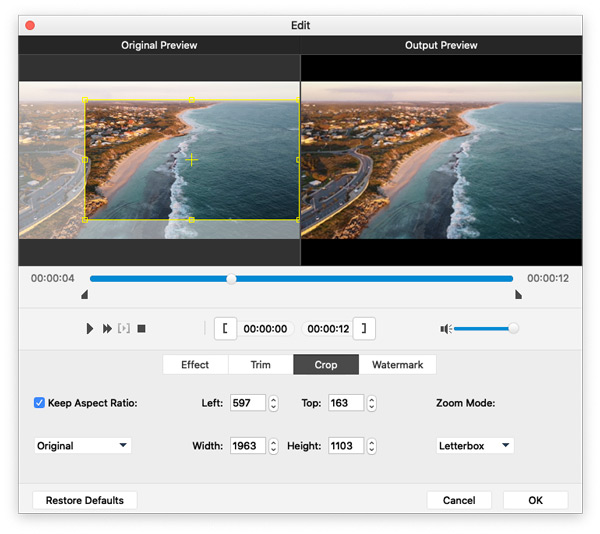
Step 3 Crop video frame
This versatile DVD Creator for Mac guarantees you the perfect video frame. Click the Crop panel and check the Keep Aspect Ratio option. Here you can choose Original, Crop area, 16:9, and 4:3 to adjust the video frame as you like.
Step 4 Watermark function
In the Watermark editing window, please check the Enable watermark option. Please check the Text or Picture option to add a text/image watermark to the video. Also, the position of the watermark is adjustable according to your preference.
Step 1 Adjust the audio track
Click the Audio Track button to open the Edit Audio/Subtitle window. Here you can add or remove the audio track, select the audio language, and adjust the volume, Latency, Encoder, Bitrate, and Channels as you like.
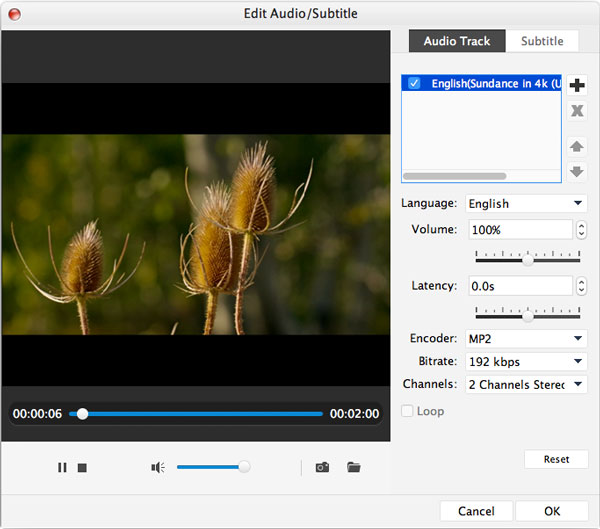
Step 2 Adjust subtitle
With the assistance of the best Mac DVD Maker, you can add the subtitle to the program or remove the subtitle if you don't like it. In addition, you're granted to choose the language, the position of the subtitle, the Font Name & Size & Color of the subtitle.
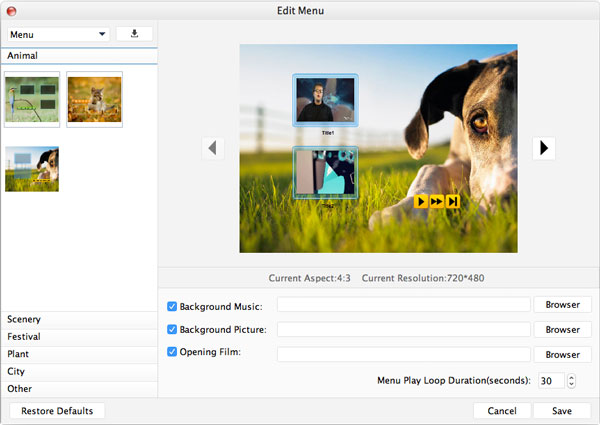
Step 3 Edit the menu
Once you own this all-in-one DVD Maker, you can edit the DVD menu. You can adjust the DVD menu, frame, button, and text. Moreover, you're free to add background music, background pictures, and opening films to the DVD movies at your disposal.