About | Privacy Policy | Terms of Use | Support | Contact Us
Copyright © 2026 Tipard Studio. All Rights Reserved.
Windows

Rip your favorite Blu-ray/DVD movies or videos to popular formats

Powerful software to play Blu-ray/DVD videos and audio

Create Blu-ray disc/folder/ISO file with your own video

Backup/Copy your favorite Blu-ray to disc/folder/iso files
Mac

Rip your favorite Blu-ray/DVD movies or videos to popular formats on Mac

Powerful software to play Blu-ray and popular video formats on Mac
Windows

Rip DVD to any popular video format quickly of full quality

Create DVD from videos and burn video to DVD/Blu-ray freely

Copy DVD to DVD disc/folder/ISO files in a 1:1 ratio
Mac

Rip DVD to any popular video format quickly of full quality on Mac

Burn or author a DVD from videos with subtitles and chapters on Mac

Copy DVD to DVD disc/folder/ISO files in a 1:1 ratio on Mac
Windows

Rip DVD, convert 4K video, edit, and upscale videos to 5K/8K

Repair broken videos with high accuracy and support many formats

Convert any video to MP3, MP4, MOV, WAV, and other 350 formats

Upscale resolution, optimize brightness and remove video noise

The easiest tool to capture screen, game, audio, etc. with high quality

Convert any 2D video to 3D video and convert 3D to 2D video

Convert 4K video to 4K/1080P and common videos

Convert TS video to various popular video/audio formats
Mac

Rip DVD, convert 4K video, edit, and upscale videos to 5K/8K on Mac

Repair broken videos with high accuracy and support many formats on Mac

Convert any video to MP3, MP4, MOV, WAV, and other 350 formats on Mac

Upscale resolution, optimize brightness and remove video noise on Mac

The easiest tool to capture screen, game, audio, etc. with high quality on Mac

Convert any 2D video to 3D video and convert 3D to 2D video on Mac

Convert 4K video to 4K/1080P and common videos on Mac

Convert TS video to various popular video/audio formats on Mac
Desktop

Rip and convert DVDs to MP3 and support other audio formats

Reset Windows Admin and Standard user account password in seconds

Accurately Convert any PDF file to Word with OCR

Convert PDF to Word, Excel, HTML and Image with OCR
Online

Easily remove watermarks from many image file formats free online

Points:0
Redeem
User Guide
Before starting to convert Blu-ray or DVD files, do not forget to make the preference settings according to your needs.
Click the name of this software on the top-left corner and select Preferences… from the pull-down option.
There are 5 preference options for you.
General
In the default General tab, you can set the subtitle language, audio language, hardware acceleration, update option, etc. as you like.

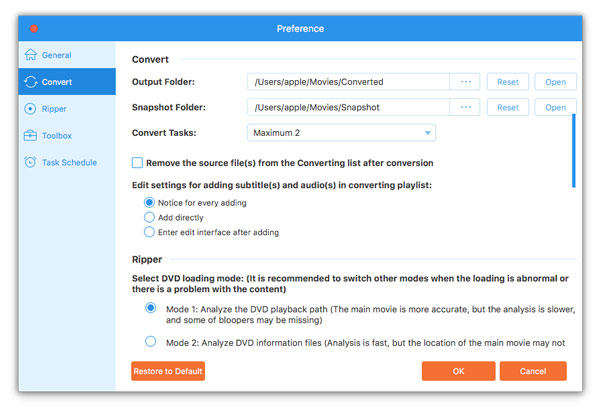
Convert
Switch to the Convert tab, you can see the preferences of setting the output folder, snapshot format, and more settings.
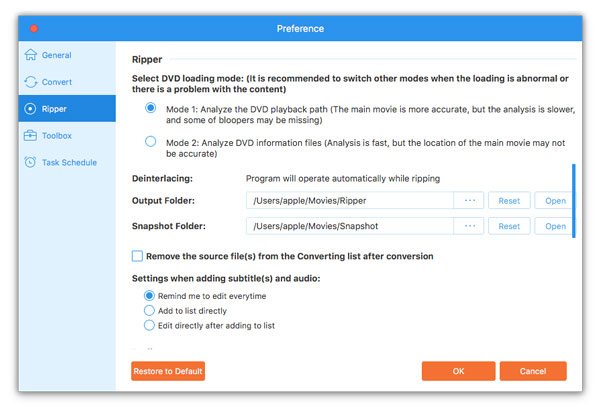
Ripper
Navigate to the Ripper tab, where you can select DVD loading mode, deinterlacing feature, the ripping output folder, snapshot folder, etc.
Toolbox
Locate to the Toolbox tab, you can see the output folder for 3D making, GIF creating, etc.
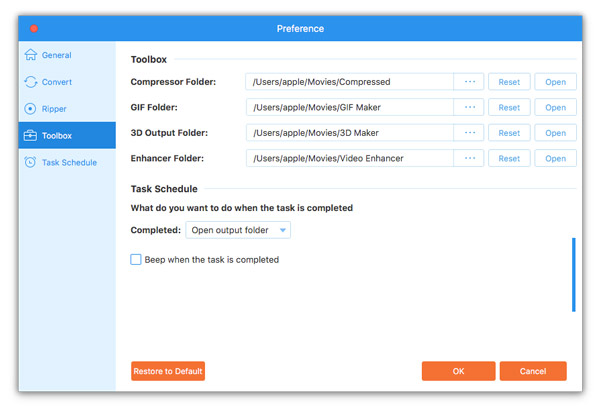
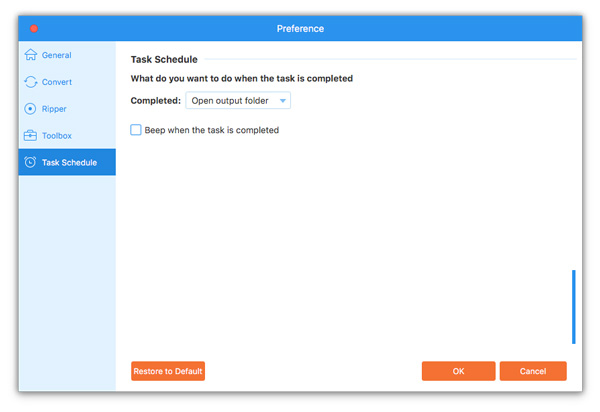
Task Schedule
Head to the Task Schedule tab, you can open the output folder after conversion completed, beep when the task is done.
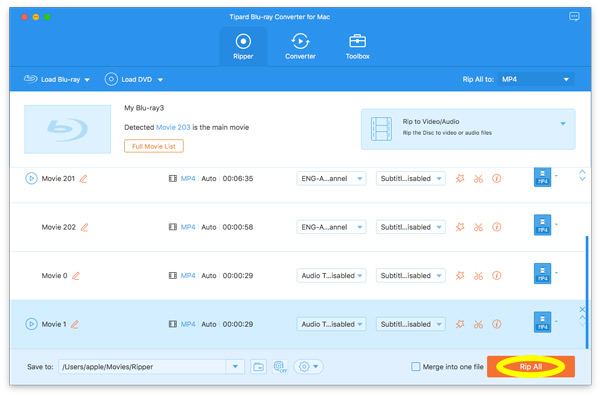
Step 1 Load Blu-ray files
To convert a Blu-ray disc to other video or audio formats, you should connect a Blu-ray drive to your computer, and insert the Blu-ray disc into the drive.
Run Blu-ray Converter for Mac on your Mac computer. Go to the Ripper workspace.
Click the Load Blu-ray drop-down option to import your Blu-ray disc, or Blu-ray Folder.
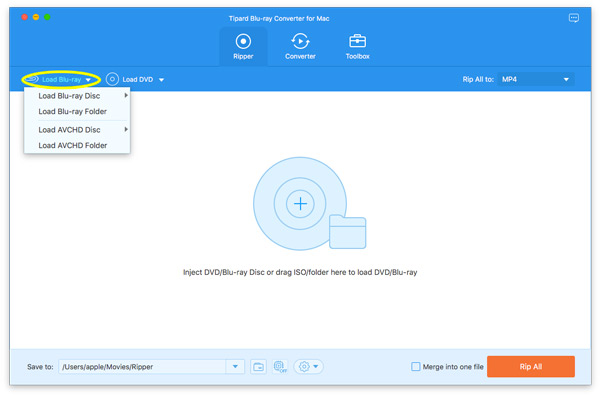
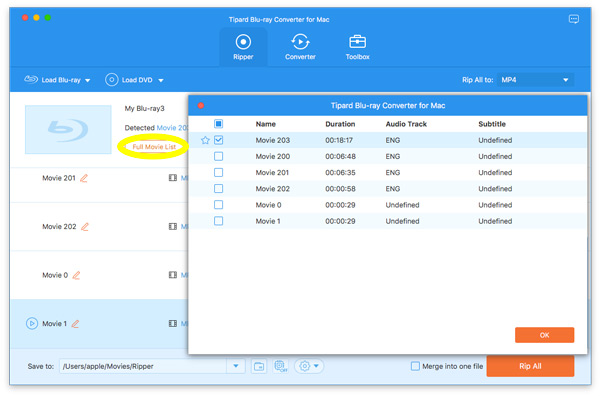
Then this software will load the main movie automatically into this software.
If you want to see other Blu-ray movie titles, click Full Movie List to find your target video.
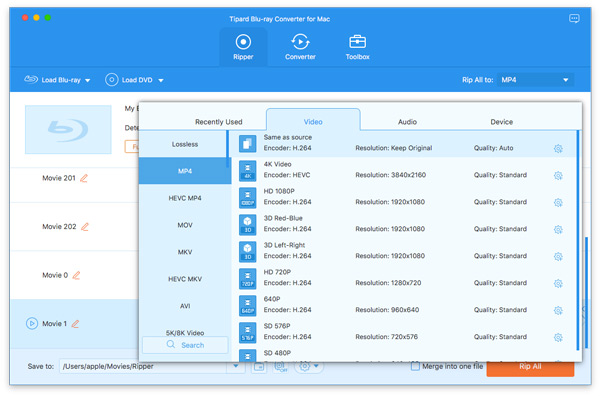
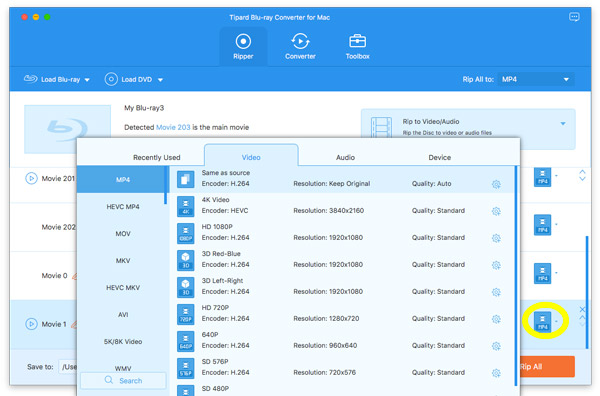
Step 2 Choose output video or audio format
To select the output video or audio format for Blu-ray files, you should click the pulldown list of Convert All to on the top-right corner.
The default output format for Blu-ray is MKV Lossless which can preserve the lossless output quality and chapter info.
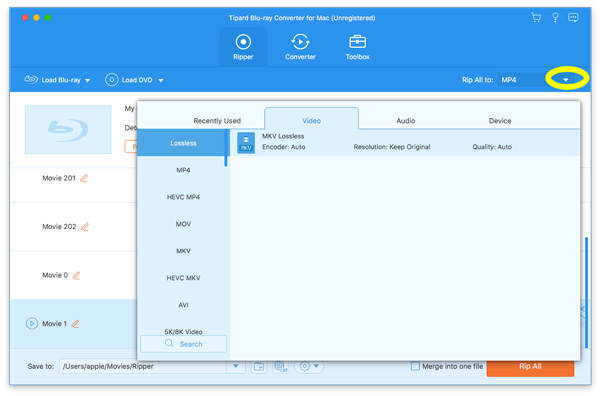
If you want to rip Blu-ray to other digital formats for easy playback on devices, just switch to other tabs from the sidebar to select them.
Choose Lossless or Other Formats?
Blu-rays have high video and audio quality, so many people tend to choose MKV Lossless, which is remuxing the original streams without re-encoding. Whether you need to remux or re-encode depends on your specific requirements:
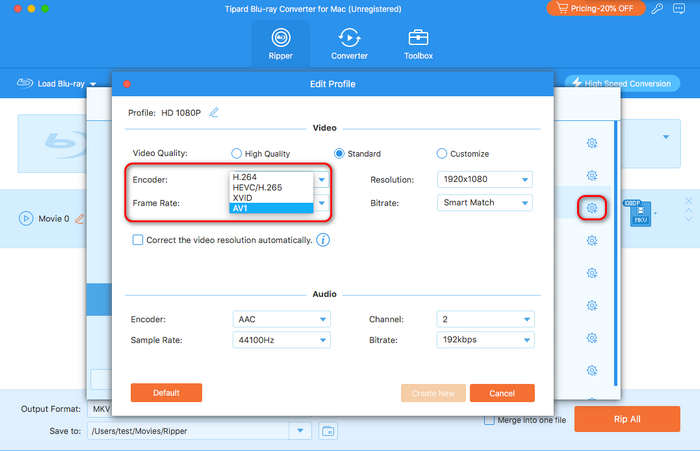
How to Choose H.265 or AV1 Codec?
H.265 is as popular as H.264. When you rip Blu-rays and DVDs with Tipard Blu-ray Converter for Mac, click the Custom Profile button, and then click the Encoder dropdown button to select HEVC/H.265 or AV1.
You also can change to the Audio or Device tab to decide each video by click the format button on the right side of the video file.
To choose a different output format for each Blu-ray titles, you can select the drop-down output list by clicking the Output format one by one.
Step 3 Rip Blu-ray on Mac
Specify the folder where the ripped Blu-ray movies should store on your Mac from the drop-down option at the bottom, and finally, click Convert All to start ripping Blu-ray videos.
Step 1 Load DVD Disc/ISO/Folder
To convert DVD to other digital formats, you should put the DVD into your DVD drive on this Mac.
Again, go to the Ripper tab, click Load DVD to choose Load DVD Disc, Load DVD ISO, Load DVD Folder, Load AVCHD Disc, and Load AVCHD Folder.
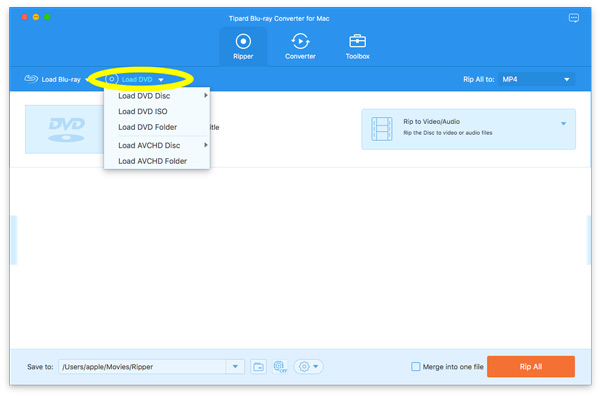
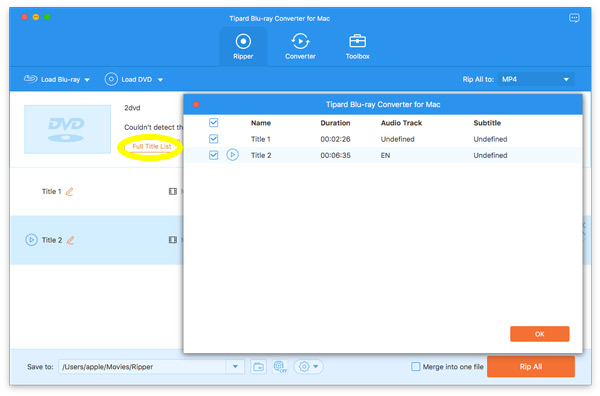
Then the main DVD title will be loaded automatically. If you want to see other DVD titles, click the Full Title List to find your target video.
Step 2 Choose output video format for DVD
The default lossless output format for DVD is MPG Lossless which can preserve the lossless output quality.
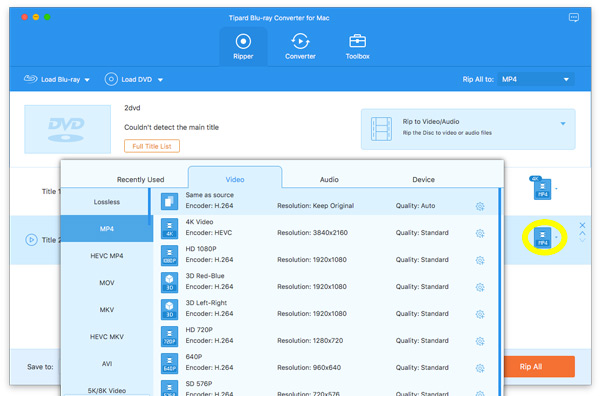
If you want to rip DVD to digital formats, just find the Rip All to drop-down option to select the output format or device you need.
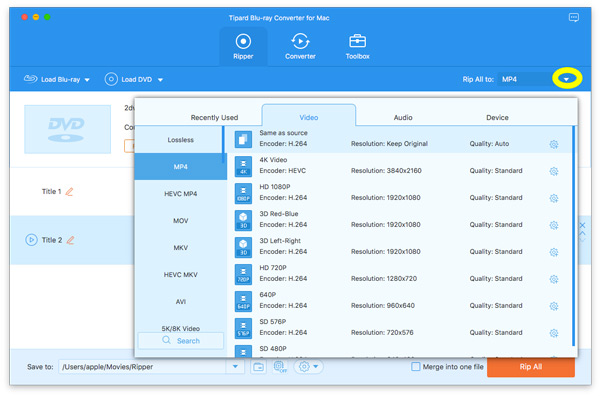
To choose a different output format for each DVD title, you can select the drop-down output list by clicking the Output format one by one.
Step 3 Rip DVD
Select a path for the converted files on the bottom bar on your Mac computer. And then click the Rip All button to start the DVD ripping.

Apart from ripping DVD or Blu-ray with this software, you can use it to convert video and audio formats on your Mac.
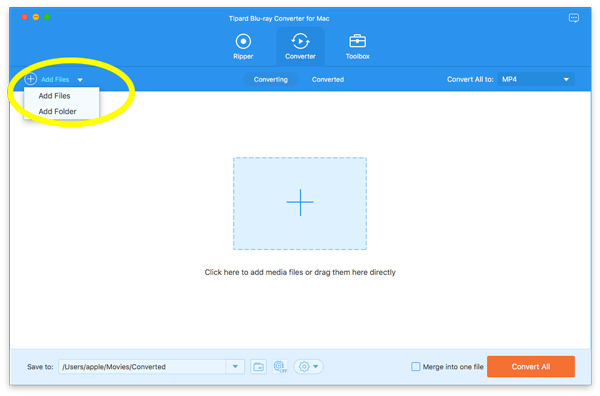
Step 1 Add video or audio files
Launch this software on your Mac, and head to the Converter tab.
Click the Add Files button on the top-left corner to import multiple video or audio files, or the whole folder.
This software also lets you import multiple videos or audio files by dragging and dropping.
Step 2 Select the output format
To change the video or audio formats, you should select the output format from the pulldown option of Convert All to on the top-right side.
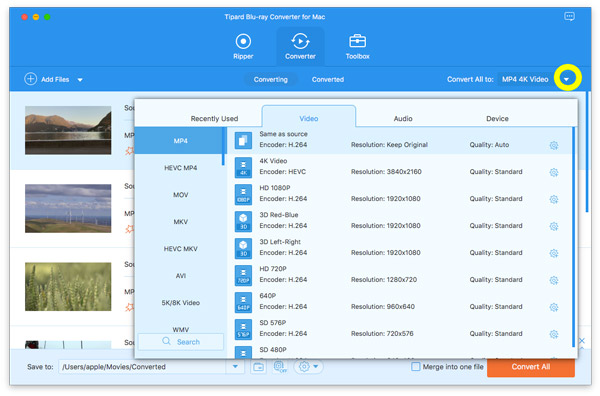
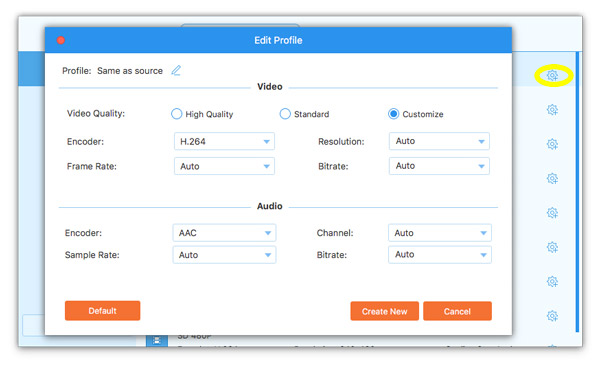
If you want to change the format settings, you can click the Gear button on the right to customize the profile. In the pop-up window, you can change settings as follows.
Video: Quality, Encoder, Resolution, Frame Rate, and Bitrate.
Audio: Encoder, Channel, Sample Rate, and Bitrate.
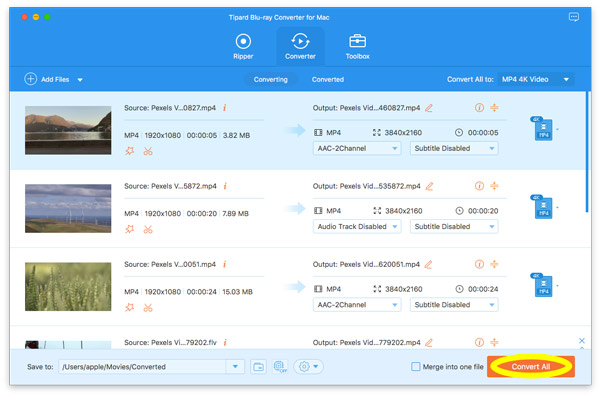
Step 3 Convert video and audio
Select a path for the converted files on the bottom bar. And then click the Convert All button to start converting on your Mac computer.
Before starting to convert video or rip Blu-ray or DVD, you can refine your footage by editing it.
The edit button (A star image) is easy to be found under the imported video information on the left side of Converter.
Or find it on the right to the imported video information on the right side for Ripper.
Step 1 Set the cut option
After loading the videos or Blu-ray/DVD files to this software, you should click the cut button (A scissor image) in the main interface.
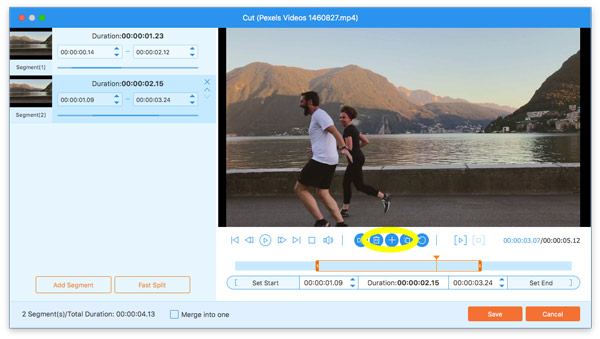
Step 2 Set the trim point
This software can cut unwanted parts from one video file and keep others you need. Besides, it lets you add a new selected segment. You can copy and paste a selected clip by setting the starting and ending point.
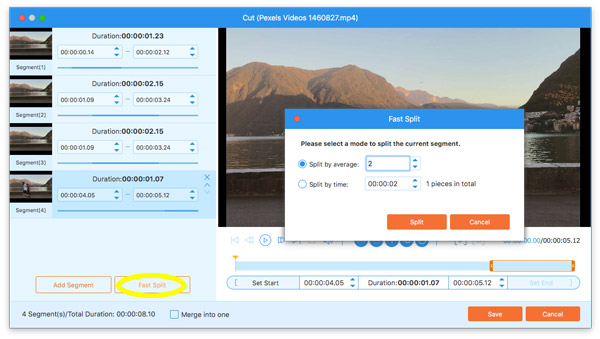
The split feature allows you to split the selected part into 2 parts.

The Fast Split feature on the left pane lets you split one file into average clips by numbers and time.
To set the starting and ending point, you can drag the progress bar or adjust the time value to confirm it
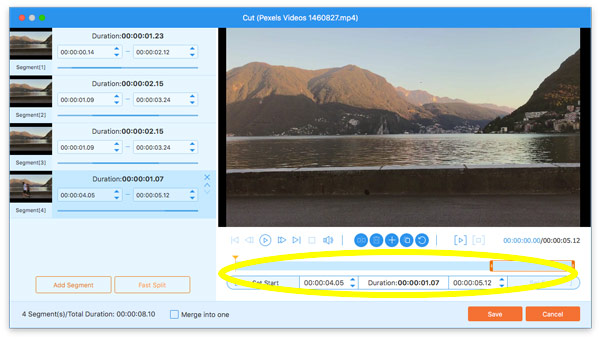
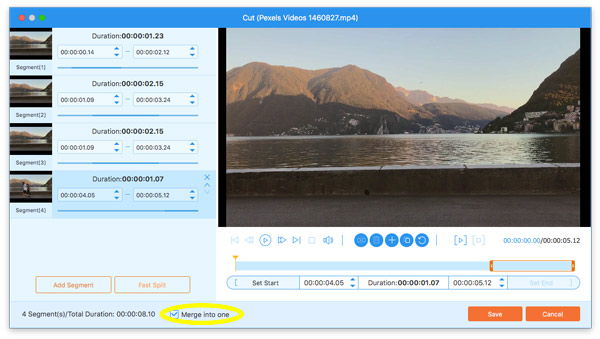
Then all the video clips will appear on the left pane. Click the arrow-down or arrow-up feature to arrange the order you like. Finally, select the checkbox of Merge into one to combine all the multiple clips in the order you like.
Finally, click the Save button.
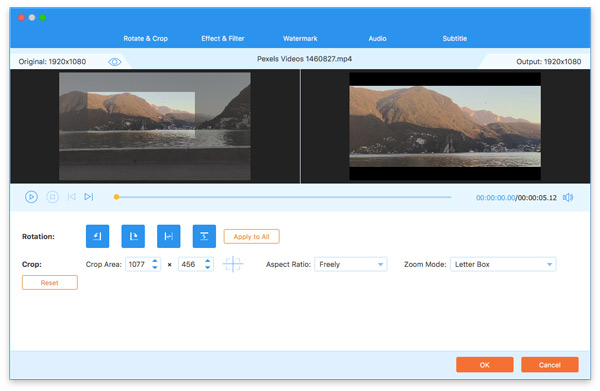
After entering the edit window, you will go to the Rotate & Crop tab by default. If not, just switch to it.
It lets you rotate a video in 90 counterclockwise or clockwise. Besides, it can flip a video vertically or horizontally.
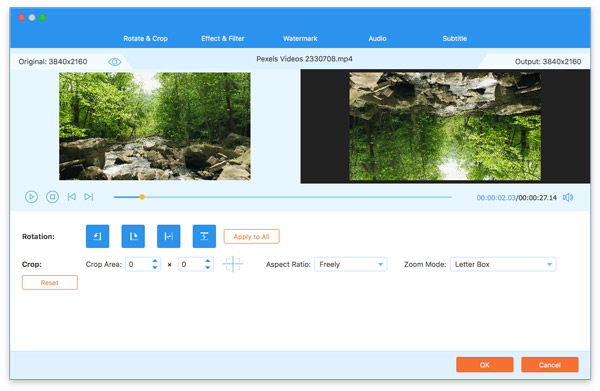
The crop area lets you get rid of unwanted black bars, by setting the cropping region value or moving the yellow frame to decide it.
The aspect ratio and letterbox can be available to adjust according to your needs.
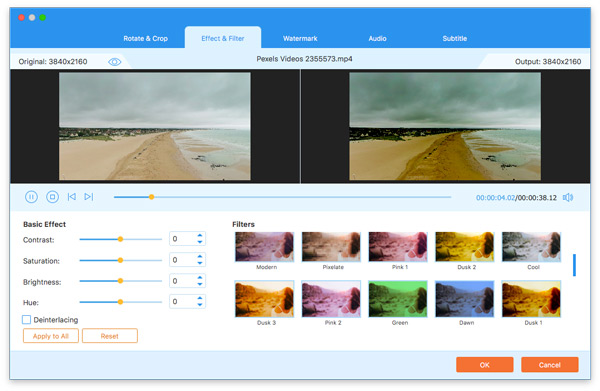
Navigate to the Effect & Filter tab, where you can adjust the video contrast, hue, saturation, and brightness to create a different style of a video file.
Besides, the Filters option lets you apply various video filters like gray, sketch, cool, etc.
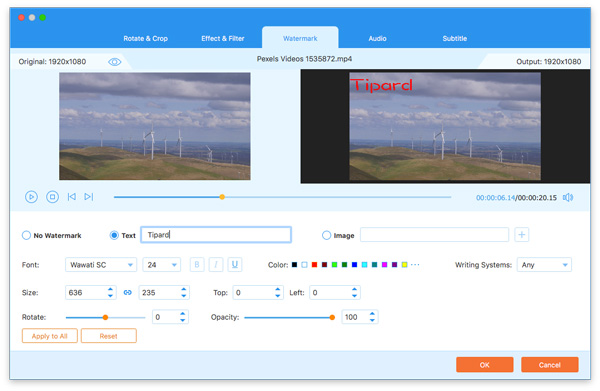
Go to the Watermark tab, and here you can add a text or image watermark to your video file.
Select the checkbox or Text or Image, then you can input the watermark text or add the watermark image. The tools besides let you change the text style, image size, color, opacity, position, and more.
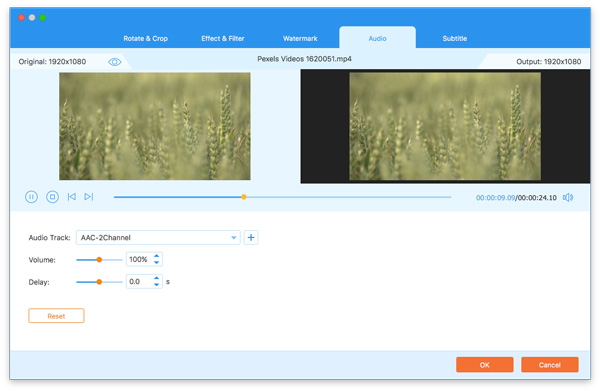
This software enables you to change the background audio of a video file by locating in the Audio tab.
It lets you add one or more audio tracks by clicking the add button. To silence the audio from a video file, you can also choose Audio Track Disabled.
You can select one from the multiple audio tracks. Besides, the audio volume and delay are available for you to customize.
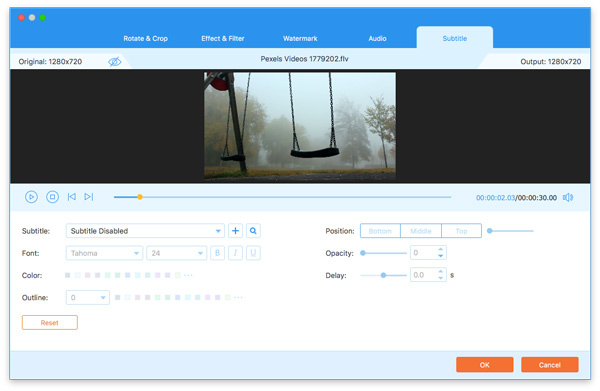
To change or add a new subtitle for your video file is easy to make it. Go to the Subtitle tab, and you can add SRT, SSA, and ASS subtitles to a video file.
Do not forget to adjust the subtitle size, font, color, position, opacity, and other parameters to create the best effect for you.
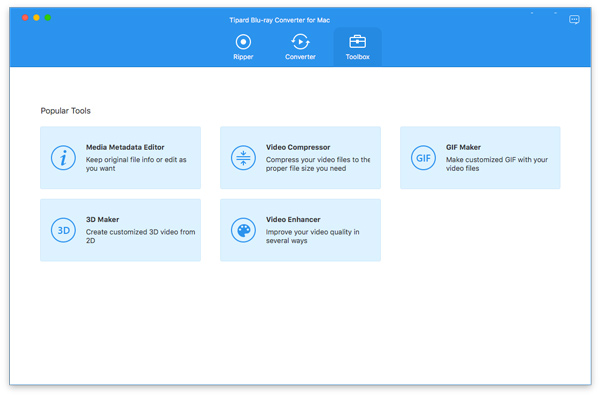
In the main interface, go to the Toolbox tab, and you can use the tools underneath it.
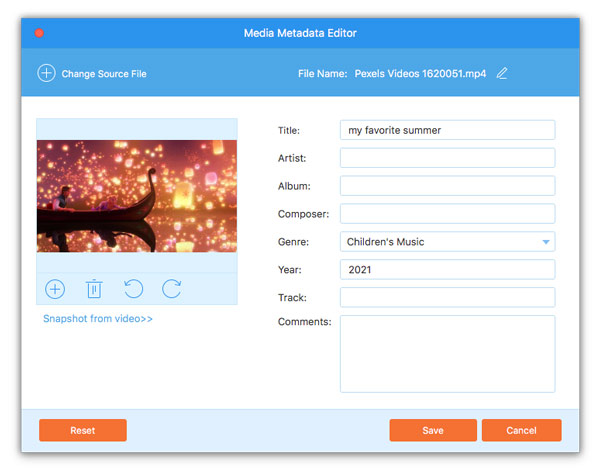
Step 1 Click Media Metadata Editor and add a file in supported formats, such as MP4, M4A, M4R, M4P, 3G2, M4V, MOV, MP3, WMA, ASF, WMV, and AVI.
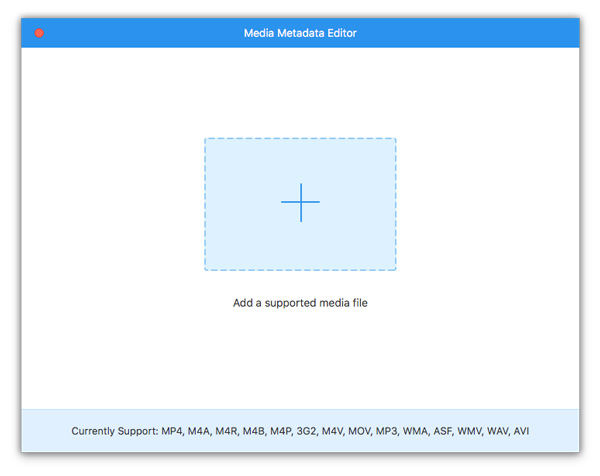
Step 2 Add a thumbnail for your video, and set the video title, artist, composer, album, genre, year, track, etc. Click Save to apply it.
Step 1 Click Video Compressor, and add a video file that you want to reduce the size by adding or dragging.
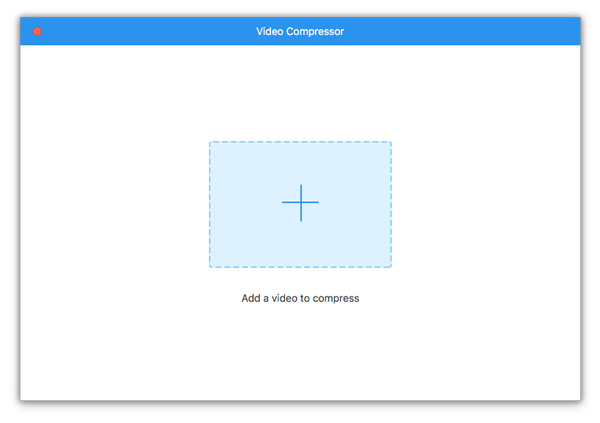
Step 2 Set the output size, format, and resolution, and click the Compress button to start to shrink a video file size.

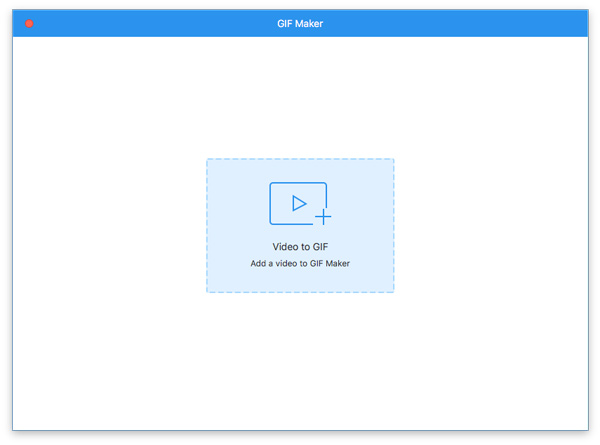
Step 1 Select GIF Maker, and add a video file that you want to create GIF from.
Step 2 Set the output dimension, frame rate, and loop option to create a GIF from a video. The Edit and Cut option allow you to edit the video and trim it before creating the animated GIF image.
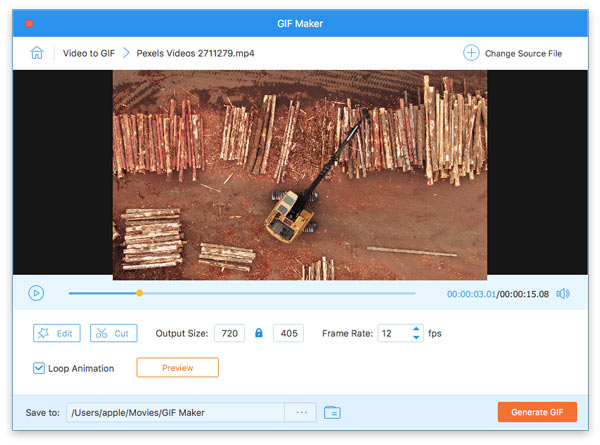
Click Generate GIF to begin making GIF from a video file.
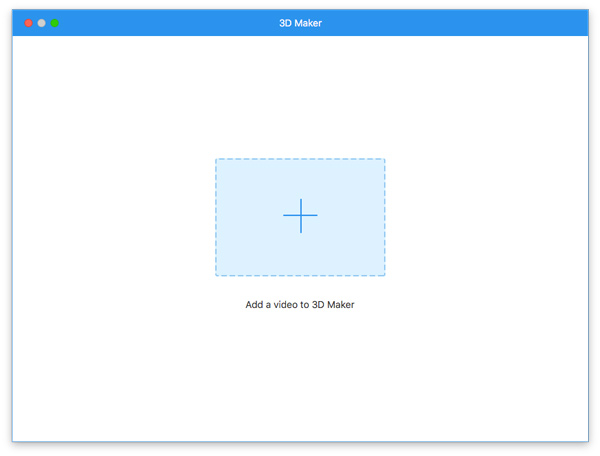
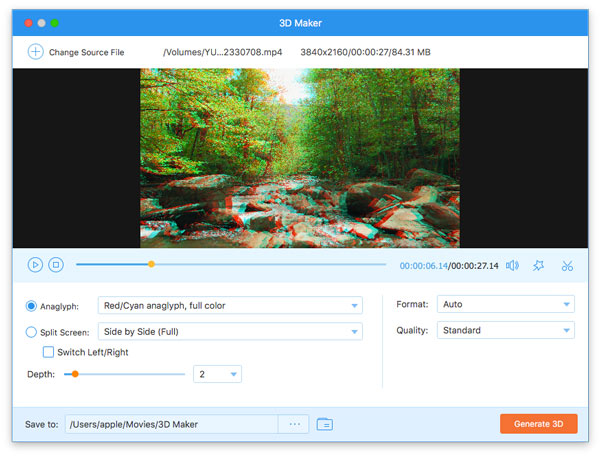
Step 1 Choose 3D Maker from Toolbox, and add one video that you want to convert to 3D.
Step 2 Enable 3D mode from either Anaglyph or Split Screen. Choose the 3D mode, output format, and quality. After setting the 3D depth, click the Generate 3D button to convert the 2D video to a 3D movie.
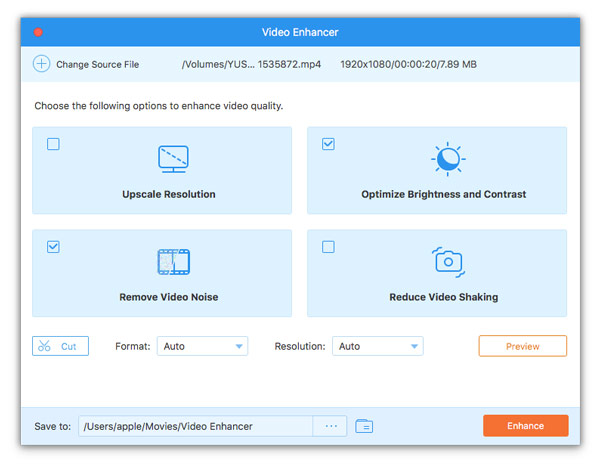
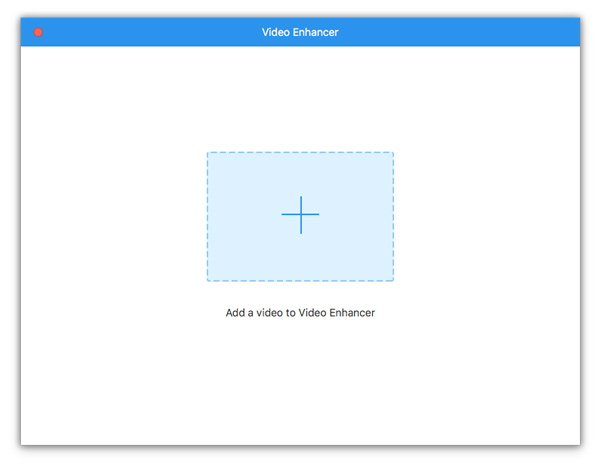
Step 1 Click and select Video Enhancer. Add the video file you want to enhance quality for.
Step 2 Tick the options that you want to enhance the video quality from Upscale Resolution, Optimize Brightness and Contrast, Remove Video Noise, and Reduce Video Shaking.