Learn the Steps on How to Reverse a Video in Premiere
Adobe Premiere Pro is a non-linear video editing software that Adobe Inc develops. This video editing software is a famous application for many professional editors. It has many editing tools that you can use to enhance and create unique effects on your videos. With Adobe Premiere Pro, you can create multiple camera sequences, audio assignments, add transitions, and make animations. Moreover, this application is known for exporting high-quality videos. And in this article, we will show you another cool effect that you can do with Adobe Premiere Pro, and that is to reverse a video. Continually read this post to learn the steps on how to reverse a clip in Premiere.
Part 1. How to Reverse a Clip in Premiere
You are probably among the people who search for professional video editing software to reverse your video. Video editors and vloggers are using Adobe Premiere Pro for their post-production needs. And there are many reasons a person wants to reverse a video. So, in this part, we will walk you through how to make a video go backwards in Premiere.
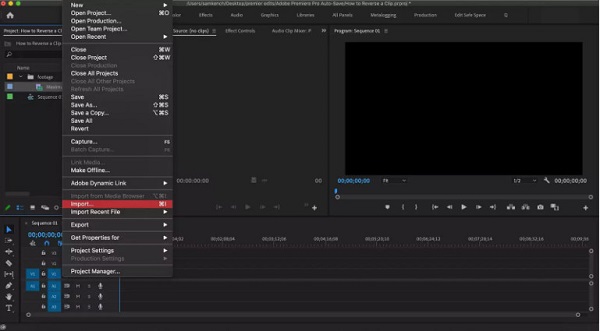
Step 1First, download Adobe Premiere Pro on your computer, and launch it. Then, import the video that you wish to reverse. To import video files, click File > Import or simply drag your file to the project bin.
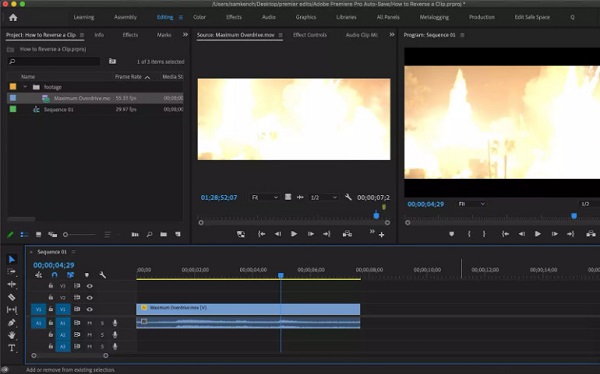
Step 2Once the video clip is uploaded, you can now prepare your selection. If you plan to reverse the whole clip, drag the video to your Timeline. Or, you can press the shortcuts on your keyboard, press (,) or (.). But if you only want to reverse a part of your video, you must first separate the part from the rest of the video. You can separate a part of your video by using the I and O keys or by splitting your video clips into pieces.
There are numerous ways on how you can split a video on Premiere; the easiest one is to place the play head where you want to cut your video, then hold Command, and press K (If you are editing on a Mac device.) Or, you can press CTRL + K on your keyboard if you are using a Windows device.
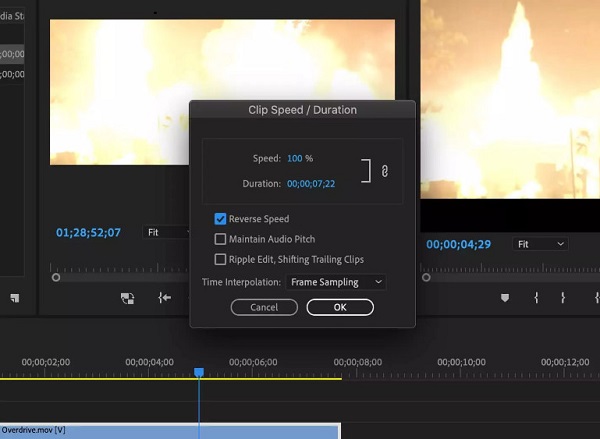
Step 3And now, we will reverse your clip in Premiere. Right-click the video and select the Speed/Duration option. A new window will prompt with a checkbox that reads Reverse Speed. By checking the Reverse Speed box, Premiere will immediately reverse your video. Click OK to save all the changes made.
Optional. You can change the speed of your video from the Reverse Speed pop-up box. You can do both simultaneously if you want a reversed video that is sped up or slowed down. You can also add a slow-motion effect to your video with the same pop-up box.
Simple, right? Those are the steps on how to make a video play in reverse using Premiere Pro. By following these steps, you can amazingly reverse your video without having a hard time.
Pros and Cons of Using Adobe Premiere Pro to Reverse Videos
Pros:
- • Offers many advanced editing tools you can use.
- • The video reversing process is simple to operate.
- • You can export high-quality videos in any format.
- • Available on all operating systems, including Windows and macOS.
Cons:
- • Adobe Premiere Pro is not free to use.
- • The tools are hard to navigate.
- • Requires in-depth knowledge of the application to edit videos.
Part 2. Alternative Ways to Using Premiere to Reverse Videos
Indeed, Adobe Premiere Pro is a splendid app to reverse videos. However, it is not free to use, and the other editing tools are hard to use and navigate. So, people are searching for an application that is easier to use. If you are among the people who are searching for an alternative on how to make a video go in reverse in Premiere, then we have a solution for you.
1. Tipard Video Converter Ultimate
If you are looking for the most outstanding alternative to Adobe Premiere Pro, then Tipard Video Converter Ultimate is the solution for you. This offline application can help you reverse your videos easily. With the application's video reverser feature, you can reverse your videos entirely or by portion. In addition, it supports all video formats, like MP4, AVI, MKV, WMV, MOV, M4V, WebM, VOB, SWF, and 500+ more formats. It also has many built-in advanced editing tools that you can use, including a video merger, color correction, video watermark, volume booster, and more from the Toolbox. Tipard Video Converter Ultimate is your ideal video reverser tool because it can reverse your video without compromising the quality.
How to reverse a video using Tipard Video Converter Ultimate:
Step 1 Download and install the software on your video by clicking the Download button below. After downloading, open the app on your device.
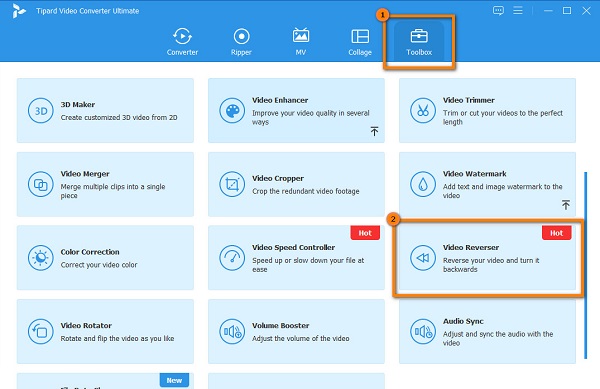
Step 2 And then, on the first interface, navigate to the Toolbox panel, and select the Video Reverser feature from the list of tools.
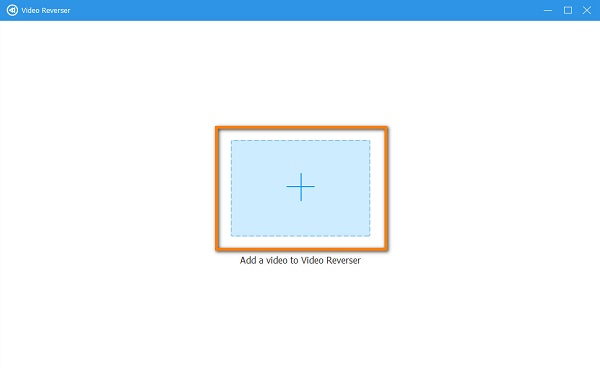
Step 3 To import video files, click the plus (+) sign icon or drag and drop your video into the plus sign box.
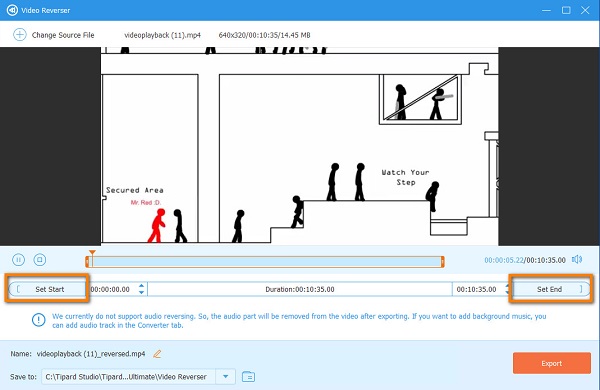
Step 4 After uploading your video, Tipard Video Converter Ultimate will automatically reverse your video entirely. But you can also select a portion from your video that you want to reverse. Click the Set Start and Set End button to reverse a part from your video.
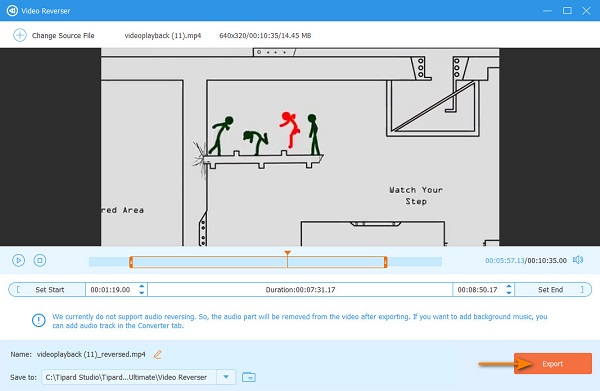
Step 5 Finally, click the Export button at the bottom right side of the interface to save your output.
2. Video Candy
Another alternative that you can use to reverse videos is Video Candy. Video Candy is an online application accessible on all web browsers, like Google and Safari. This online video reverser uses AI technology which automatically reverses your video once you upload it. Furthermore, it has a simple user interface and is free to use. However, it has a slow uploading process, which makes it inconvenient for other users.
How to reverse a video using Video Candy:
Step 1Open your browsers and search for Video Candy. Then, on the main user interface, click the Add File button to upload a clip.
Step 2Wait for your video to upload, then you will see that Video Candy automatically reversed your video.
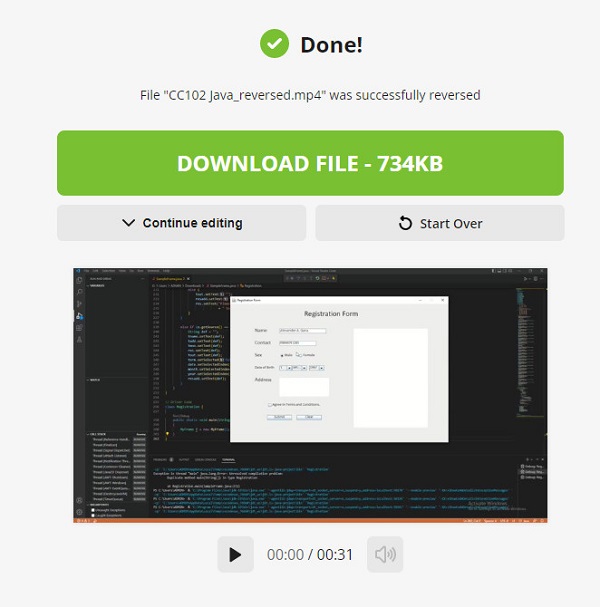
Step 3Click the Download File button to save your reversed video from this video reverser.
Part 3. FAQs about How to Reverse Clips in Premiere
How much does Adobe Premiere Pro cost?
Adobe Premiere Pro's most purchased plan is $20.99 per month for an annual plan. Users can also compensate annually for $239.88 per year or month-to-month for $31.49 per month.
Which is better, Premiere Pro or After Effects?
Adobe Premiere Pro is primarily used for editing videos. In contrast, Adobe After Effects is primarily used for compositing. When it comes to reversing, Adobe Premiere Pro is better.
Can I import an MKV video file in Adobe Premiere?
Adobe Premiere removed the support for MKV with the latest release of Adobe Premiere CC 2019 13.1.3.
Conclusion
Some users thought it hard to reverse a clip in Adobe Premiere Pro. But with the given steps, you can easily learn how to make a video play backwards in Premiere Pro. So, reverse your video now, and enjoy using the reverse feature of Adobe Premiere. But, if you want a video reverser, that is easier to use, download Tipard Video Converter Ultimate.