How to Cut A Video in PowerPoint on Your Windows Computer
Sometimes you need to insert videos and images into your PowerPoint presentations. And if in your video you have unwanted content, you can remove that specific part by trimming or cutting out that part of the video. Luckily, the PowerPoint app has a feature that allows you to trim your videos. However, many people don't know how to use the trimming feature of PowerPoint. In this article, you will be knowledgeable on how to trim videos in PowerPoint on your PC.
Part 1. How to Trim Videos in PowerPoint
Microsoft's PowerPoint is among the most used applications that Microsoft produced. You can use this app if you are presenting a presentation for your class, business, and other organizational meetings. In addition, Microsoft PowerPoint contains many features that you can use to create unique and magnificent slides that will delight your audience/listeners. And there are times that you need to insert a video or image on your slides to highlight a specific topic or scenario. Perhaps you want to cut out a part of the video that you are trying to insert and look for a way to trim it. The PowerPoint app has a built-in video trimmer that you can use to cut out unnecessary parts. And if you do not know how to trim videos on PowerPoint, we will teach you how to do it. Read the guidelines below to learn how to clip a video on PowerPoint.
Note: You can only trim videos on PowerPoint if the video is from your computer. You cannot trim the video if the video comes from the web.
Step 1 If the PowerPoint app is not yet downloaded on your desktop, download and install it first. Then, run the app once it is installed.
Step 2 Create your presentation on the application's main user interface and insert the video from your computer.
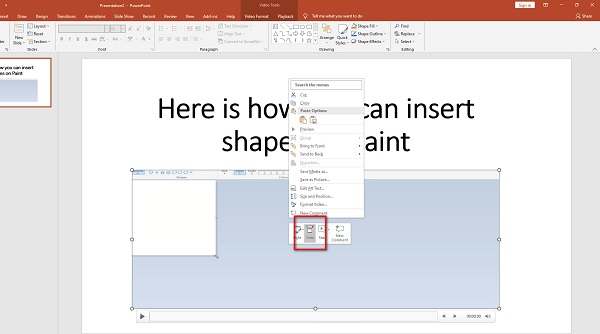
Step 3 After inserting your video clip, right-click your video clip to prompt the Trim and the other options.
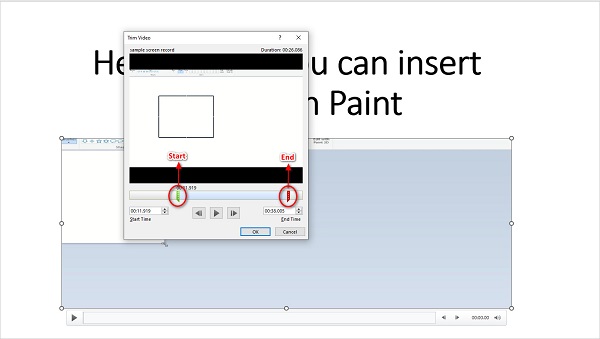
Step 4 And then, the Trim Video Window will appear where you will trim your video. To cut your video, place the green handlebar where you want to start your video. Then, place the red handlebar where you want to end your video clip. You can also manually select your video's Start Time and End Time by ticking the up/down arrows beside the Start/End Time.
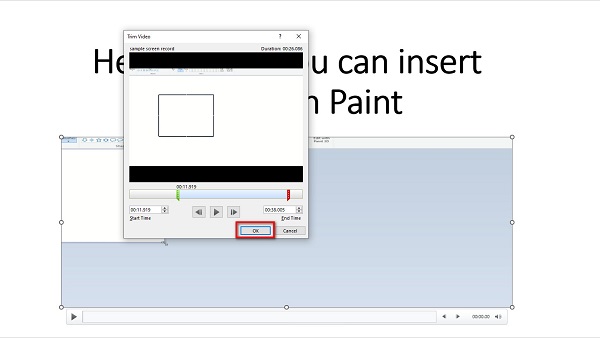
Step 5 Hit OK to save the changes you made to your video. And then, your video is now trimmed. You can now play it by pressing the F5 button > Space bar on your keyboard.
Whoo! That's quite a process. If you are among the people who search for how to trim video in PowerPoint 2013, 2016, 2010, or 2007, you can also use the steps above.
Part 2. Better Way to Cut Videos than Using PowerPoint
Trimming videos in PowerPoint is easy. However, as mentioned above, you cannot cut the videos that are not from your device. But do not be anxious because, in this section, we will show you an alternative on how to cut videos for PowerPoint. Read this section comprehensively to learn how to trim videos using the most hassle-free video trimmer application.
Tipard Video Converter Ultimate is among the most used video trimming applications that you can use on your Windows or Mac device. This offline video trimmer allows you to easily cut your video by moving the handlebars on the timeline of your video or by using the Fast Split option. Moreover, it has an intuitive user interface, making it a beginner-friendly tool. It can also trim your videos while maintaining their quality of it. Furthermore, it has many advanced editing features that you can use, including a video converter, video reverser, color correction, GIF maker, and many more. Also, it supports almost all video formats, such as MP4, MOV, MKV, AVI, VOB, FLV, WMV, WebM, and 500+ more formats. Another great feature that Tipard Video Converter Ultimate offers is that you can trim two or more videos simultaneously with its batch trimming process. Tipard Video Converter Ultimate is an ideal video trimmer application for many. So, if you also want to use this app to cut/trim your videos, read the steps below.
How to cut videos using Tipard Video Converter Ultimate:
Step 1 To start, download the Tipard Video Converter Ultimate by clicking the Download button below for Windows or Mac. Then, follow the installation procedure, then open the app on your computer.
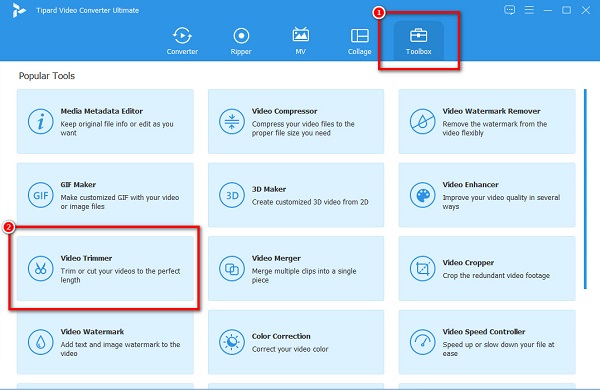
Step 2 Go to the Toolbox panel on the first interface and select the Video Trimmer feature. Then you will be led to a new interface.
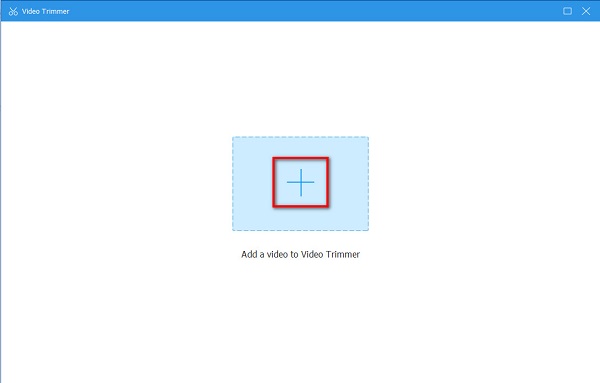
Step 3 Next, hit the plus (+) sign button to import the video you want to trim. For convenience, you can drag and drop your video file to the plus (+) sign box. If you want to trim a GIF, this program can also directly do it for you.
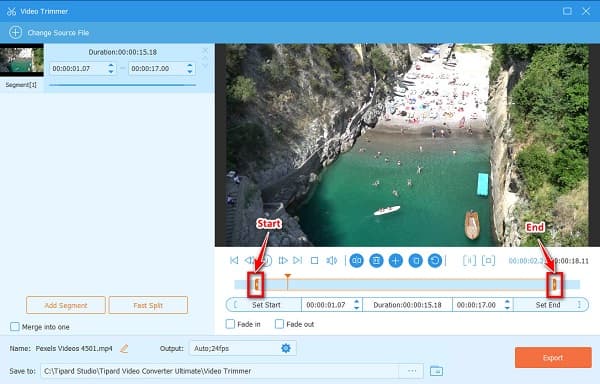
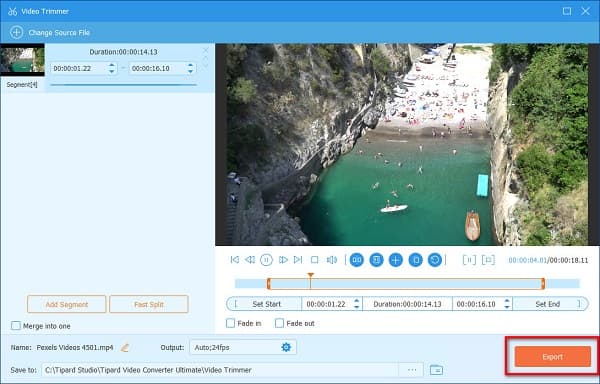
Step 4 Then, after uploading your video, you will see the preview and the Timeline of your video. Move the left handlebar to where you want to start your video. Then, move the right handlebar to where you want to end your video.
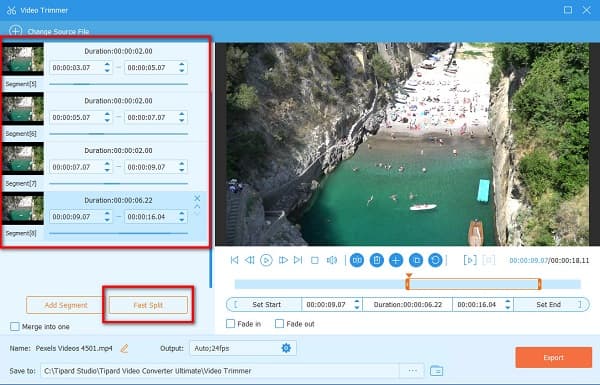
Optional. If you wish to split your video into parts, you can use the Fast Split feature to separate your video by average. But if you do not want to split your videos, proceed to the next step.
Step 5 And lastly, click the Export button to start trimming your video. Then, wait for a couple of seconds, and your video output will be ready on your computer files.
Simple, right? As easy as pie, you can trim the video you want to shorten for your PowerPoint presentation.
Part 3. Tips on Cutting Videos in PowerPoint
The video that you trimmed on the PowerPoint app will only be trimmed on the PowerPoint app. The original video that you have will not be affected. And if you want to save a separate copy of your trimmed video, follow the guide steps below.
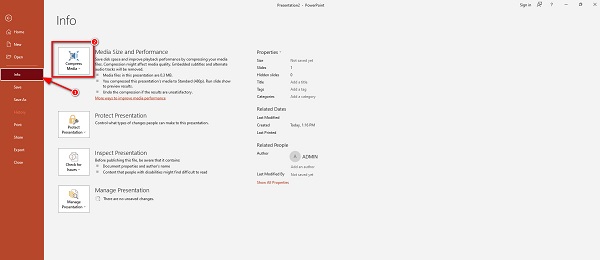
Step 1 Go to File > Info.
Step 2 Click the Compress Media option and select the level of compression you want. The Compress Media tab will open then the compression process will begin.
Step 3 When the compression process is done, select the video that you trimmed. Right-click it and click Save Media as.
Step 4 Type the file name you want and select the location of your output. Click here to learn how to compress videos in PowerPoint.
Part 4. FAQs about How to Trim A Video in PowerPoint
How to trim video in PowerPoint 2016?
Here are the steps to trim videos using PowerPoint 2016.
1. Open the PowerPoint application on your desktop, select your video, then click the Playback tab on the Ribbon.
2. Then, click the Trim Video.
3. A dialogue box will prompt. Then move the green handlebar to set the starting point of your video. And then, move the red handlebar to set the endpoint of your video.
4. After that, click the OK button if you are done trimming your video.
Will I lose the quality of my video when trimming in PowerPoint?
No, PowerPoint can trim your videos without affecting or ruining their quality.
Can I trim a video on PowerPoint on my Mac device?
Definitely. You can use PowerPoint on Mac to trim the videos that you want. PowerPoint is available on all media platforms, like Windows and Mac.
Conclusion
Suppose you want to know all about how to trim videos in PowerPoint. In that case, this guidepost will provide all the necessary steps to cut your video on the PowerPoint application on your desktop. The problem with using PowerPoint to cut your media is that you cannot trim the videos from the internet. So, if you want to trim a video downloaded from the internet, use Tipard Video Converter Ultimate.