
Big PowerPoint files can be a pain. They take forever to load. They slow down your slideshow. And sometimes, you cannot even send them by email because the file is too large. Most of the time, it is the video inside that makes the file so heavy.
Do not worry; we are here to help you resolve that issue. In this guide, you will learn how to compress videos in PowerPoint, reduce video size before inserting them, and link videos. You will see how this can help speed up your presentation, make it easier to share, and even save space on your device.
Method 1. Compress Media in PowerPoint (Built-in Tool)
If your PowerPoint presentation is taking too long to load or share, it may be due to the large video file inside it. The good news is that PowerPoint has a built-in Compress Media tool. You do not need to install anything. It is already there if you are using PowerPoint 2019 or Microsoft 365. This tool enables you to compress your media, resulting in a smoother-running and faster-loading slideshow.
Check the tutorial below to learn how to compress media in PowerPoint:
Step 1 Open your PowerPoint file.
Step 2 Click the File tab in the top-left corner. On the left side, click Info.
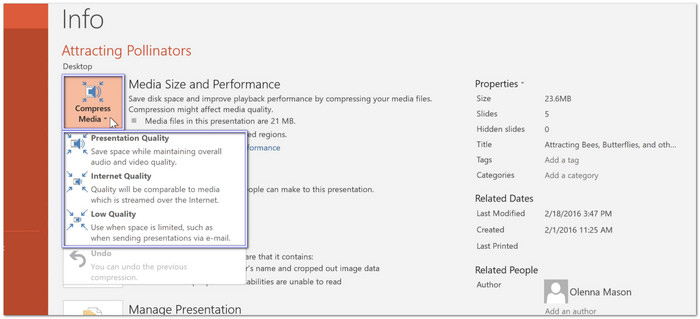
Step 3 If your slides have videos or audio, you will see Compress Media under Media Size and Performance.
Step 4 Click Compress Media, then choose a quality:
- Presentation Quality (best quality)
- Internet Quality (smaller file)
- Low Quality (smallest file)
Step 5 PowerPoint will start shrinking the media. So, please wait a bit. When done, it will show how much space you saved.
Can't Find the Compress Media Option?
Here is why it might be missing:
1. You are using an older PowerPoint version.
Compress Media only works in PowerPoint 2019, PowerPoint 2021, or PowerPoint 365. If you have PowerPoint 2016, 2013, or an earlier version, the Compress Media feature is not available.
2. Your slides do not have video or sound.
The Compress Media option only appears when there is media to compress. The Mac version does not have this feature. It is only available on Windows versions. On a Mac, you have to compress media before adding it to the slides.
Quick Tip: To check your version, open PowerPoint, go to File, Account and look under About PowerPoint.
Method 2. Reduce Video Size Before Inserting
Have you ever tried adding a video to PowerPoint, only to find that it made the whole presentation slow or too large? That is because some videos are just too big. But do not worry; Tipard Video Converter Ultimate makes this easy to fix.
This program allows you to shrink the size of your video before inserting it into your slides. You can drag the slider or tap the arrow down to make the file smaller. You can also change the format, pick a lower resolution, or tweak the bitrate to save even more space.
Refer to the guide below to discover how to reduce video size in PowerPoint before inserting:
Step 1 First, get Tipard Video Converter Ultimate installed on your Windows or Mac computer.
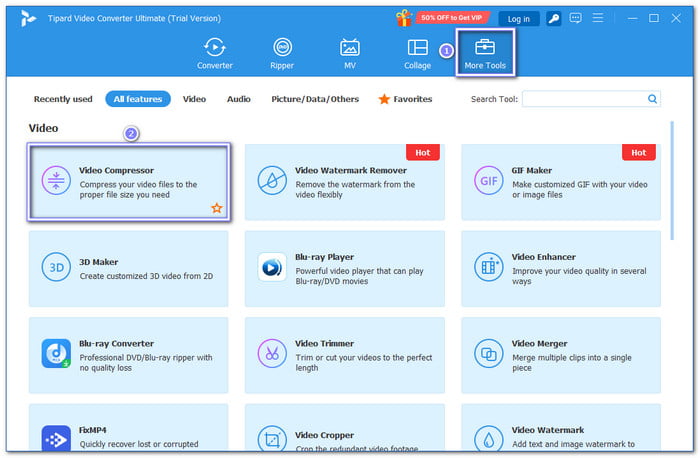
Step 2 Look at the top bar and click More Tools. Inside the Toolbox, find and select Video Compressor. You will see a big add button in the center. Click it. Now, pick the video you want to shrink.
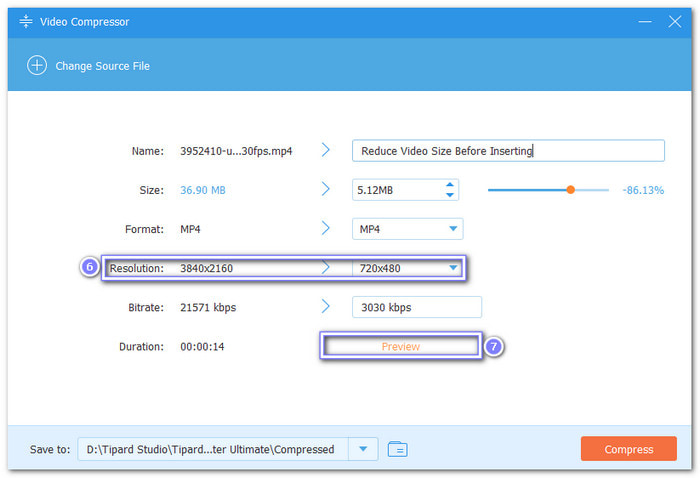
Step 3 After uploading your video, you will see a new screen. You can rename your video if you want. Slide the Size bar to the left to reduce the file size.
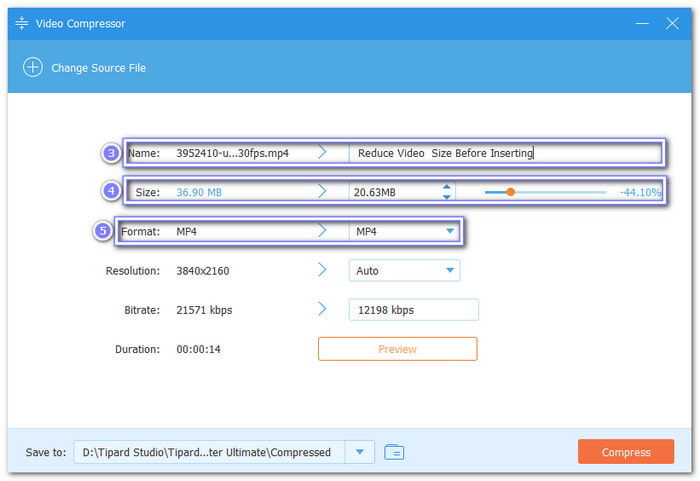
Step 4 Click the Resolution drop-down and pick a lower resolution. It helps make the file even smaller. Bitrate and Duration will change automatically based on the size you picked. To see how it looks, click Preview.
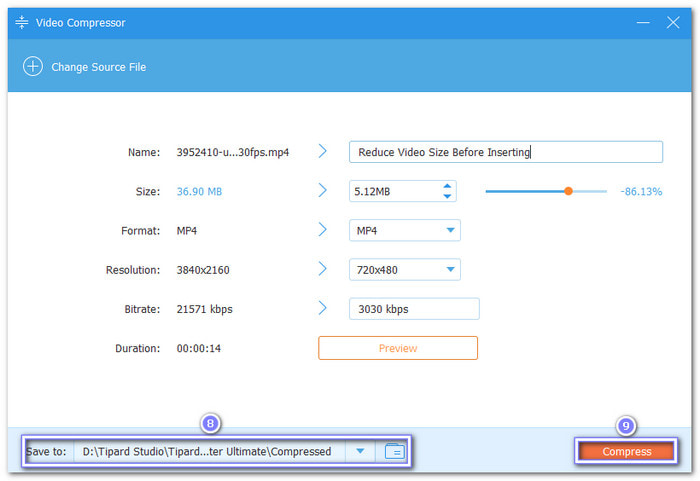
Step 5 If you get your preferred file size, proceed with choosing a folder under Save To, and then hit the Compress button. Now, your video is smaller and ready for PowerPoint.
Helpful Tip: In case you need to insert an MP4 into PowerPoint, and your file is in another format, you can also use Tipard Video Converter Ultimate's Video Compressor tool to do that. Just select MP4 on the Format drop-down before diving into compression. You would not need another tool to accomplish that!
Method 3. Link to Video Instead of Embedding
Big videos can make your PowerPoint file heavy and slow. That is a problem if you want to share it or play it on another device. A good way to fix this is by linking to the video online instead of adding it directly. It keeps your file small, and the video will still play when you present it.
Step 1 Open your browser. Go to YouTube and look for the video you want to use.
PowerPoint only works with certain video sites like YouTube. Not all links work.
Step 2 Once you are on the video page, click the address bar at the top. Right-click and choose Copy, or press Ctrl + C on your keyboard. You now have the link ready.
Step 3 Open your PowerPoint again. Pick the slide where you want the video to show.
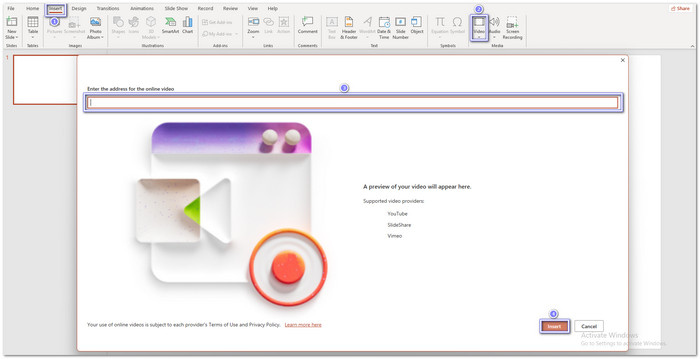
Step 4 Click the Insert tab at the top. Then, click Video, and choose Online Video from the drop-down. A small box will pop up.
Step 5 In the box, right-click and paste the link you copied earlier or press Ctrl + V to paste it.
Then, click the Insert button. PowerPoint will place the video on your slide. It will look like a box with a play button.
Reminder: You will need an internet connection during the slideshow to play it.
Bonus. Tips for Compressing Videos in PowerPoint
Creating a PowerPoint presentation with videos is fun, but the file size can increase rapidly. Even if you have already applied PowerPoint compression video techniques, there are still more ways to make it smaller. These simple tips can help you further reduce the video size. They also ensure that your slideshow plays smoothly and does not lag.
1. Use MP4 (H.264 codec)
Always use MP4 files with H.264. They are smaller and work best in PowerPoint. Other formats may not play well or may be too big.
2. Trim Unnecessary Parts
Cut out the parts you do not need. It lowers the file size fast. PowerPoint has a Trim tool for videos, too, so you can surely trim videos in PowerPoint with no need for an extra tool.
3. Avoid 4K Unless Needed
4K looks nice, but it is heavy. Use 1080p or lower for slideshows—no need for super high quality on small screens.
4. Test Playback After Compression
After compressing, press play. Make sure your video still works. Check the sound and picture to avoid surprises.
5. PPT Still Too Large After Video Compression?
Big images can also make files large. Compress pictures inside PowerPoint, too. Go to File > Compress Pictures to shrink them.
Conclusion
You have now learned how to compress media in PowerPoint. Just a few clicks and your file size goes down. But sometimes, the results are not enough. In that case, you can make your video smaller before putting it into your slideshow. You can rely on Tipard Video Converter Ultimate for that. It allows you to reduce the video size quickly. Try it out and share your experience here!
More Reading


About the Author
