Simple Steps on How to Reverse Videos in Windows Movie Maker
One of the most popular video editors on your Windows computer is Windows Movie Maker. It has many video editing capabilities, that's why many professional and novice editors use this application. With Windows Movie Maker, you can add special effects, transition overlays, customize titles, merge videos, and more. But what's even more impressive is that you can use Windows Movie Maker to reverse your videos. So, if you are searching for editing software that can reverse your videos, then Windows Movie Maker is the software for you. Read this guidepost continually to learn the steps on how to reverse videos in Windows Movie Maker.
Part 1. How to Reverse Videos Using Windows Movie Maker
Since Windows Movie Maker is among the most used video editing applications for Windows computers, and you can use it to reverse videos, we will provide the steps you need. Below are the easy steps to reverse videos using Windows Movie Maker.
Step 1First, download the Windows Movie Maker on your desktop. Launch the application once it is installed. And then, click Add Videos and Photos to select the video. Once you have the footage, find the first frame of your video, which you will use as the starting point of your reversed clip. To do this, move the slider to the left of the timeline and then preview it. Pause it and take note of the time code.
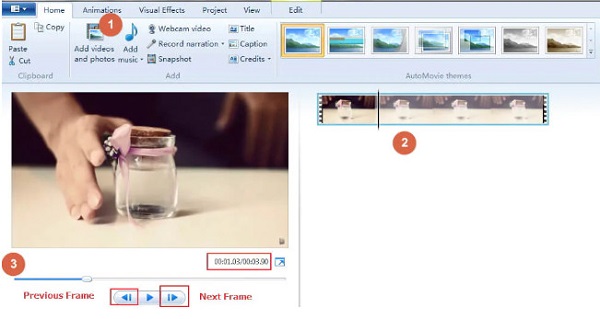
Step 2And then, you need to make a folder where you can save the materials of the reverse video. Take snapshots using the Snapshot button on your Home tab and save the photos to the file you created. After taking the snapshots, click the Save button, and the snapshots will be added to your timeline.
Step 3Next, move your cursor to the following frame and repeat the snapshot to get all the necessary frames to make a reverse video. Continue to do this process until you reach the end of the footage you would like to reverse.
Step 4After that, select all the images you saved on your file and click the Video Tools Edit tab. And on the Duration field, enter the target duration of your reverse video.
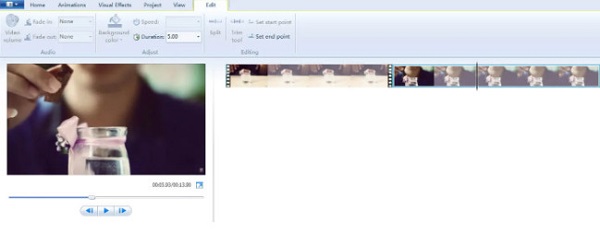
Step 5And for the last step, delete the original video file from the timeline, leaving only the images you took. And you can now play your reversed video. Make sure that you have the correct ratios for your video. You will have a perfect reversed video if you have done it correctly.
And that's it! By following the steps above, you will learn how to use Windows Movie Maker to reverse clips.
Pros and Cons of Using Windows Movie Maker to Reverse Videos
Pros:
- • Free to the users of Microsoft Windows.
- • It has a simple user interface.
- • It supports the most standard video formats, like MP4, AVI, WMV, etc.
- • It has many video editing features.
- • The Windows Movie Maker can freeze and crash.
- • You cannot do complex editing.
- • The video reversing feature often crashes.
Cons:
Part 2. Alternative Way to Using Windows Movie Maker to Reverse Videos
We cannot deny that Windows Movie Maker is a good application for reversing videos. However, as many people complain, it often crashes, especially in the reverse video feature. That's why we searched for the best alternative you can use to reverse your videos on your Windows computer.
Tipard Video Converter Ultimate is the most excellent alternative if you are looking for a video reverser. This software was originally a video converter, but it has many advanced editing features, including a video reverser, video merger, video watermark remover, and more. And in its video reverser, you can rewind your video entirely or partially in just a few clicks. In addition, this software has an easy-to-use user interface making it a beginner-friendly application. Also, it supports numerous video file formats, such as MP4, AVI, MOV, MKV, FLV, VOB, WMV, M4V, and 500+ more. Furthermore, when you reverse videos using Tipard Video Converter Ultimate, the quality of the video will not be ruined. Plus, it is available to download on all operating systems, like Windows, macOS, and Linux. Therefore, if you like to use Tipard Video Converter Ultimate as an alternative for how to reverse a video on Windows Movie Maker, follow the easy instructions below.
Step 1To start, download and install Tipard Video Converter Ultimate on your desktop by clicking the Download button below for Windows or Mac. Once you have installed the software, launch it immediately.
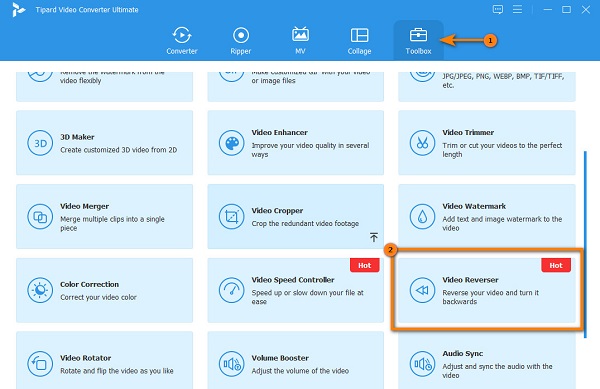
Step 2And the software's main user interface, go to the Toolbox panel. You will see the list of tools that the app offers. Click the Video Reverser feature.
Step 3Next, to upload a video, click the plus sign icon. You can also drag and drop the video from your computer files to the plus sign box to upload the video you wish to reverse.

Step 4After uploading your video file, Tipard Video Converter UItimate will automatically reverse your video entirely. But if you want to reverse specific parts from your video, drag the slider to where you want the clip to start and click Set Start. To select the ending of your video, move the slider to the right and click the Set End button.
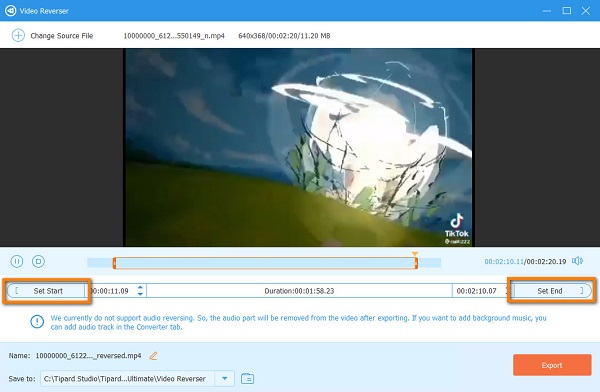
Step 5Lastly, click the Export button located at the bottom right corner of the user interface to save your output on your device's files.
Simple, right? With Tipard Video Converter Ultimate, you can reverse any video and export them with high quality. Moreover, it retains the quality of your video.
Part 3. FAQs about How to Use Windows Movie Maker to Reverse Videos
Does Windows Movie Maker support MKV file formats?
Apparently, many video editing software does not support MKV video file formats, like Windows Movie Maker, Adobe Premiere, Final Cut Pro, etc.
Can I download Windows Movie Maker on my Mac device?
Yes. The good thing about Windows Movie Maker is that it is available on your Windows or Mac PC for free.
Can I use Windows Movie Maker to remove watermarks from my videos?
No. Although some users put a blurry part of the watermark on their video, it does not remove the watermark professionally. So, if you are looking for software to remove watermarks from videos losslessly, try Tipard Video Converter Ultimate's video watermark remover.
Conclusion
Many video editors are searching for a video reverser application to highlight some part of their video or, sometimes, to add fun. And learning how to reverse a clip in Windows Movie Maker is easy if you follow these steps. However, it is inconvenient that the software you are using always crashes. So, if you want a more convenient way to reverse your videos, download Tipard Video Converter Ultimate.