How to Compress Videos on QuickTime With Easy Methods
QuickTime player is a popular media streaming application common in Mac devices. This media streaming app allows you to play MKV and MOV videos, which macOS supports. In addition, using QuickTime, you can also record the parts of your screen and create video tutorials, and it also allows you to trim or cut your lengthy videos. What's more, you can record a video or audio with this tool. However, some videos that it produces sometimes have a huge file size. So, finish reading this post if you want to know how to compress videos on QuickTime.
Part 1. How to Compress Videos in QuickTime
QuickTime player is the standard media player for Mac devices. These media streaming apps also have many functions, including a video compressor. Although it only offers a few video resolutions, it is still an effective app for compressing your QuickTime videos. And if you are using a Mac, QuickTime is already pre-installed on your device. Therefore, here are the steps to compress QuickTime video on Mac.
How to compress videos on QuickTime player:
Step 1 QuickTime is pre-installed on Mac devices, so if you are a Mac user, immediately open the app.
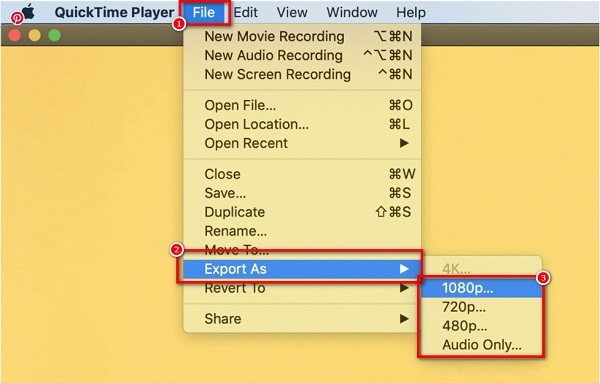
Step 2 And then, open the file you like to compress, and go to File > Export As > Option that you prefer. You can choose between 1080p, 720p, 480p, or Audio only. Then proceed to the next step.
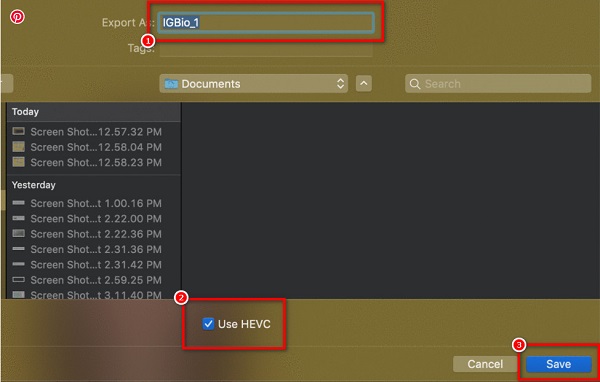
Step 3 Then, type the file name that you prefer. If you selected the 1080p option, click the Use HEVC option (it's a compression method using the codec .h265)
Step 4 Lastly, click the Save button at the lower right corner of the interface to begin compressing your video.
And those are the steps on how to compress videos on QuickTime player. With those simple steps, you can compress your amazing QuickTime videos. You also can use this program to compress MOV files.
Part 2. Best Alternative to QuickTime on Mac
The problem with using a QuickTime player to compress videos is that it reduces the quality of your video when you reduce the size. Also, you cannot edit your video further when compressing videos in QuickTime. Moreover, it does not have a version for Windows devices. That's why we searched for the most popular video compressor application compatible with all media platforms and allows you to compress videos losslessly.
Tipard Video Converter Ultimate is among the most known video editing applications that you can use to compress videos. This offline software comprises many editing features, including a video compressor, video merger, video watermark, video metadata editor, and more. Additionally, you can edit your video's size, format, and resolution to reduce the size of your video. It can compress over 500+ video formats, like MP4, AVI, MOV, MKV, VOB, WMV, WebM, M4V, and more. And with its ultra-fast compression process, you can compress any video in just a second. Furthermore, it allows you to compress two or more videos simultaneously with its batch compression process. What's even great about Tipard Video Converter UItimate is its ability to compress videos quickly without losing/ruining the quality of your video.
How to compress a QuickTime video on Mac using Tipard Video Converter Ultimate:
Step 1 To begin, download the Tipard Video Converter Ultimate on your device by clicking the Download button below for Mac. After installing the app, run it on your device.
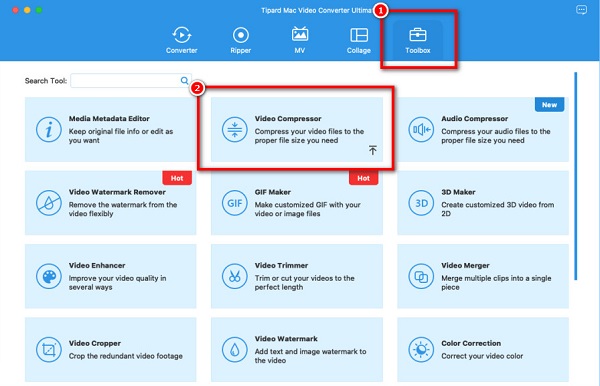
Step 2 After opening the app, go to the Toolbox panel, and select the Video Compressor feature on the first interface.
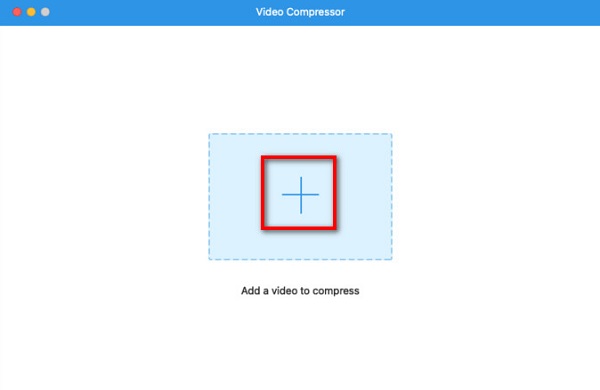
Step 3 Then, click the plus (+) sign button or drag and drop your video from your computer folders to import the file you want to compress.
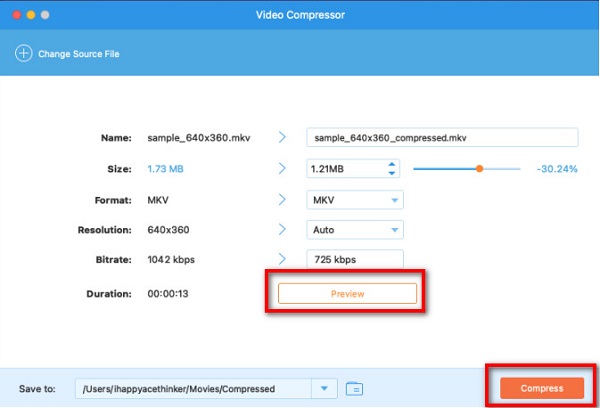
Step 4 Next, you will see that you can adjust your video's size, format, and resolution. To compress your file, we will adjust the size of the video. Click the up/down arrow button or move the slider head to your preferred size percentage.
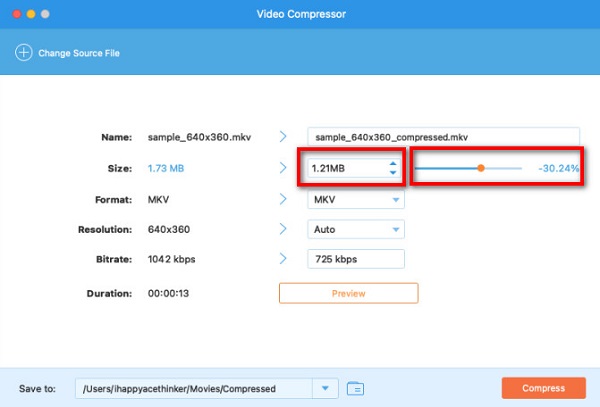
Step 5 Finally, you can preview your video to see the difference between the original file. And when you are satisfied with your video, click the Compress button to start compressing your video.
Easy, right? By using Tipard Video Converter, you can easily shrink QuickTime video size instantly.
Part 3. Tip: How to Compress a QuickTime Video to Email
There are three ways to compress a QuickTime video to send on your email. One option is to zip your video, which we did in the first part. And another method is by using iMovie, which we will use in this part. iMovie is the standard video editing software preloaded on most Mac devices. Furthermore, this editing application has many functions, such as adding transitions, filters, cutting, trimming, and even compressing your videos. With this software, you can compress videos by reducing the length of your video to reduce the size of it. Also, it is easy to use, allowing beginners to compress videos easily.
How to compress a QuickTime video to email using iMovie on Mac:
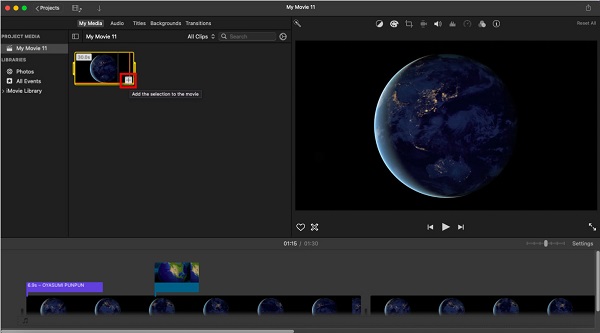
Step 1 Open iMovie on your Mac device, then import the video you want to compress by clicking the import icon button.
Step 2 And then, select the portion of the video you want to use, and then tap the + sign button. By clicking the plus, it will add a section to the Timeline.
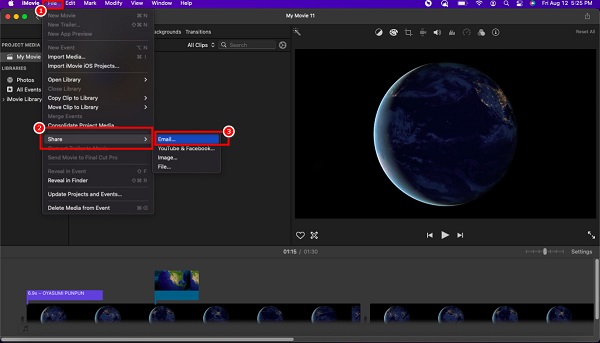
Step 3 And to export your video, click File > Share > Email. Then, select Small to compress your video further. And then, it will open the mail app with a blank email to compose.
And that's how to compress a QuickTime video using the iMovie app. You can now send your compressed file to your email and share it with anyone you like.
Part 4. FAQs about How to Compress Video With QuickTime
Can I play MP4 videos on QuickTime?
Yes. MP4 files are compatible with both Mac OS and Windows OS. Moreover, QuickTime supports MP4 files because of the presence of MPEG-4 format.
Can I add subtitles on QuickTime player pro?
Yes. Using the QuickTime player pro, you can add closed captions and subtitles to your video. Follow the easy steps below to add subtitles using QuickTime player pro.
1. Locate the file on your computer, then right-click the file and click Open with > QuickTime Pro.
2. And then, it will open the different QuickTime windows showing your captions without the video.
3.Lastly, copy the captions on the clipboard. Click Edit > Select All > Edit > Copy.
Does QuickTime ruin the quality of video when compressing?
When compressing files using QuickTime, you need to change the resolution of your video. Therefore, when you reduce the resolution of your video, the quality and size will also reduce.
Conclusion
Finally! You reached the end of the article. We expect that you now know how to compress videos on QuickTime. By doing or following those simple and easy methods, you can compress the videos you are trying to reduce. But if you prefer using the most advantageous tool with many advanced editing features, download Tipard Video Converter Ultimate.