How to Reduce Video File Size on Windows Movie Maker
People often want to upload their amazingly recorded videos on social media platforms. It is easy to upload videos on social media when the size of your video is small. And since many platforms have a video size limit, you need to compress it first if you want to upload a video with a large file size. So, if you are searching for a method to compress your video before uploading, you are probably searching for an app like Windows Movie Maker. Windows Movie Maker is video editing software that you can use to create a movie, compress videos, and add audio effects to your video. Moreover, many beginners prefer using this app to edit their videos because it has an easy-to-use software interface. And in this post, we will teach you how to reduce video file size on Windows Movie Maker.

Part 1. How to Compress Videos on Windows Movie Maker
As mentioned above, Windows Movie Maker is a video editing app with many functions and features. But what others don't know is that it also enables you to compress the size of your video. In addition, it is a popular app to resize your video easily. Also, Windows Movie Maker supports various file formats, such as MP4, AVI, MPG, MPEG, M1V, WMV, and ASF. However, Microsoft already discontinued this app on January 10, 2017. But you can still search for a crack on the internet. Nevertheless, read this part thoroughly to learn how to easily compress your videos with Windows Movie Maker.
How to reduce video file size using Windows Movie Maker:
Step 1Even though Microsoft discontinued Windows Movie Maker, you can still search for a crack on the internet. Download and install the app on your computer. Once it is downloaded, run the app on your device.
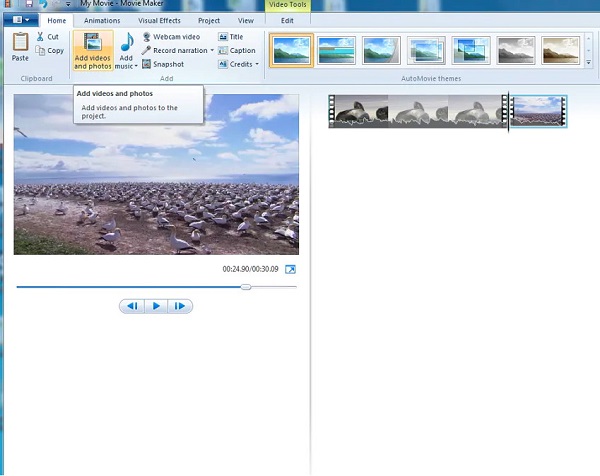
Step 2Then on the main software interface, go to Tasks > Capture > Import Video to import the video you want to compress. On your computer folders, select the video and drag it to the Timeline panel of the app.
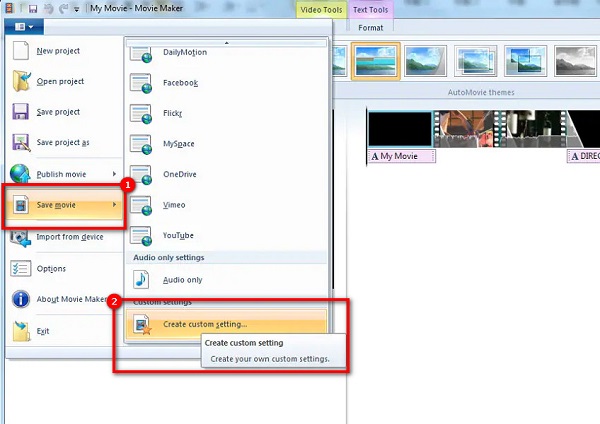
Step 3Next, go to the File panel, then click the Save movie option. Click the Create custom setting on the resulting pop-up panel to open the Settings window.
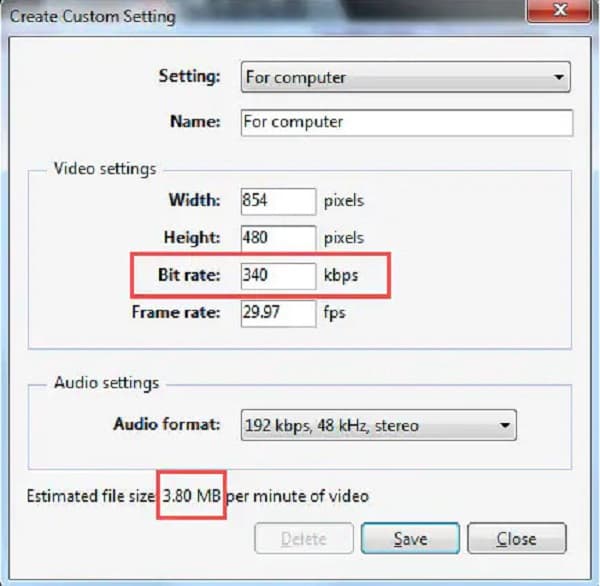
Step 4On the Create Custom Setting window, manually change the file parameters to your preferred size. But in this guide, we will change the Bit rate to reduce the size of your file.
Step 5Finally, click the Save button so Movie Maker can start compressing your video. Then wait for it to finish compressing, and you're done!
And that's how you can compress video using Windows Movie Maker. With those easy steps, you can easily compress any videos that Windows Movie Maker supports.
Part 2. Best Alternatives to Windows Movie Maker
Windows Movie Maker surely is an effective program to compress your videos quickly. However, this app is only available on Windows devices; it supports few file formats and has no advanced editing features. So, in this part, we will present better video compressor tools to compress any file format you want. The video compressor tools we will show are online and offline so that you will have more choices.
1. Tipard Video Converter Ultimate (Offline)
Tipard Video Converter Ultimate is the most powerful program if you are looking for a video compressor tool. This software application can reduce the size of your video by adjusting your video's size, format, resolution, and bitrate. Additionally, it is packed with many advanced editing features, including a video compressor, video watermark remover, color correction, video reverser, and more from the Toolbox. What's more impressive about this tool is that it supports almost all file formats, like MP4, AVI, MOV, MKV, VOB, WebM, WMV, FLV, and 500+ more formats. Beginners will also find it easy to compress videos with Tipard Video Converter Ultimate because it has a simple and clean user interface. Furthermore, it is downloadable on all cross-media platforms, such as Windows, Mac, and Linux.
How to compress videos using Tipard Video Converter Ultimate:
Step 1First, download Tipard Video Converter Ultimate on your PC. Then, follow the installation process then run the app on your device.
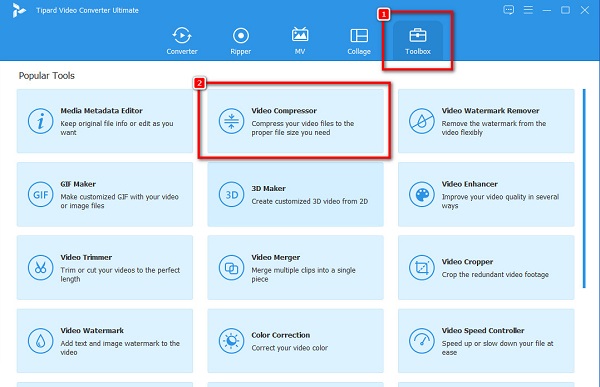
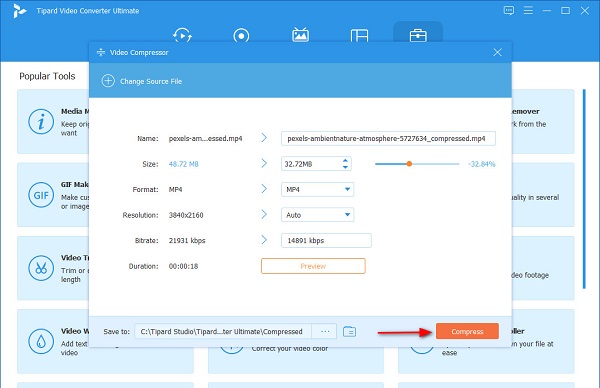
Step 2And on the software's main user interface, go to the Toolbox panel and select the Video Compressor option.
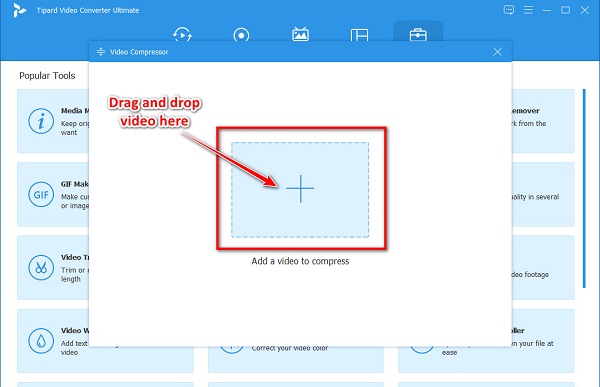
Step 3Next, tick the + sign button to upload the video that you want to compress. You can also open your device folders and drag and drop your video to the + sign box.
Step 4Then on the next interface, you will see the options to adjust to compress your video. You can adjust your video's size, format, and resolution. But in this tutorial, we will adjust the size to compress the video. To do that, click the up/down arrow or move the slider to your preferred size.
Step 5Now, you can preview your video to see the changes from the original. Once you are okay with it, click the Compress button so that Tipard Video Converter Ultimate will start compressing your video.
Then, wait for a few seconds, and that's it! You can now view your compressed video on your computer files.
2. FreeConvert.com (Online)
FreeConvert.com is an online video compressor tool that you can use to compress videos effectively. This online application can compress your video by selecting the target size that you want for your video. In addition, FreeConvert.com has an easy-to-use interface, making it a user-friendly tool. You can also use it for free on almost all web browsers, like Google, Firefox, and Safari. Also, you can choose the Compression method you want to use to compress your videos. However, FreeConvert.com contains many pesky ads that might be disturbing for you, and it has a slow uploading process when your internet connection is slow.
How to compress videos using FreeConvert.com:
Step 1Open your browser, and search FreeConvert.com on the search box. Then on the main user interface, click the Choose Files button to upload the video you want to compress.
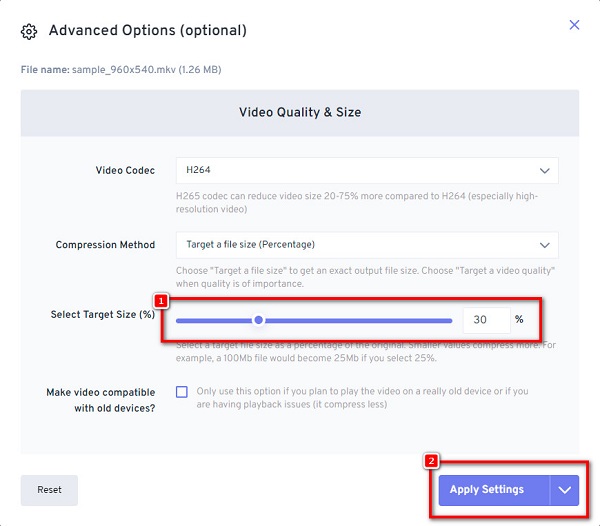
Step 2After uploading your video, click the Gear icon (Advanced settings) to select the Target size for your video.
Step 3Then on the Select Target Size option, hold and drag the slider to a lower percentage, then click the Apply Settings button.
Step 4And then, click the Compress Now! button to compress your video.
Part 3. FAQs about Compressing Videos Using Windows Movie Maker
Can I download Windows Movie Maker on my Windows 10 PC?
Definitely! You can download the Windows Movie Maker program on your Windows 10 PC without having any problems.
Why is Windows Movie Maker no longer available?
Windows Movie Maker, Microsoft's main video editing program, was discontinued because it did not achieve the success that Microsoft wanted.
Is Windows Movie Maker free?
Yes. Windows Movie Maker is free to download on your Windows computer. However, you can only download it on devices with Windows OS.
Conclusion
Simple right? It would be easy to compress videos in Windows Movie Maker by following the simple steps above. The problem is, it will be quite difficult for you to search for a Windows Movie Maker crack on the internet. So, suppose you want to use a video compressor with many advanced editing features that you can download on all media platforms. In that case, Tipard Video Converter Ultimate is the best choice.