How to Trim an Audio File - Get Easy And Reliable Ways
Trimming an audio file means removing some audio portion from the beginning, middle, or end part of your file. You can cut out the redundant parts of the audio so that it will be clear and good to listen to.
And if you want to learn the process of how to trim audio, then we have the solution for you. Read this post further to learn the steps on how to trim an audio file using the best audio trimmers. We will illustrate the most commonly used methods and programs to cut audio in this article so that you can reach them easily.

Part 1. 6 Methods Trim Audio on Windows 11/10 and Mac
Searching for the best software to trim audio using your PC is quite challenging, especially when there are many options that you can choose from. However, not all programs that are downloadable are worth their price and have the most outstanding features to offer. So, in this part, we will show you the best audio trimmers to cut or split an audio file.
Method 1. Use Tipard Video Converter Ultimate
Tipard Video Converter Ultimate is the best video and audio editing software to help you trim your audio file. With this audio trimmer, you can cut out some parts from your audio file in just a few steps.
Key Features:
• Cut sound into audio clips and reserve the parts you want.
• Starfield audio cutting out and end field audio cutting out.
• Split audio evenly by number or time.
• Add, copy, and delete segments.
Furthermore, it supports almost all audio file formats, such as MP3, AAC, OGG, AIFF, WMA, AC3, and many more. It is also packed with many video and audio editing features, including an audio sync, audio compressor, volume booster, video metadata editor, etc. Moreover, Tipard Video Converter Ultimate is easy to use and downloadable on all operating systems, like Windows and macOS.
How to trim an audio file using Tipard Video Converter Ultimate:
Step 1To begin, download Tipard Video Converter Ultimate by clicking the Download button below for Windows or Mac. After, follow the installation procedure and open the app on your device.
Step 2And then, on the main user interface, navigate to the Converter panel. Click the Add Files button to upload the audio file you want to trim.
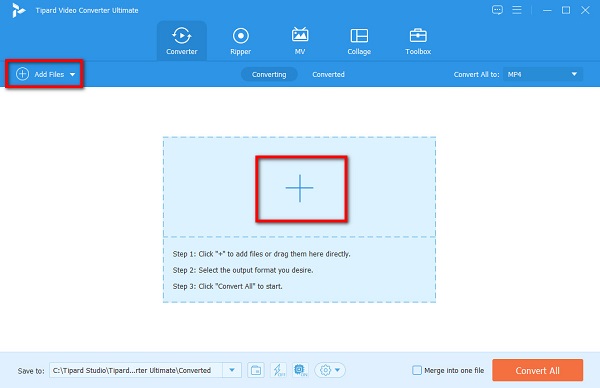
Step 3Once your audio file is uploaded, click the Cut button to start trimming your audio file.
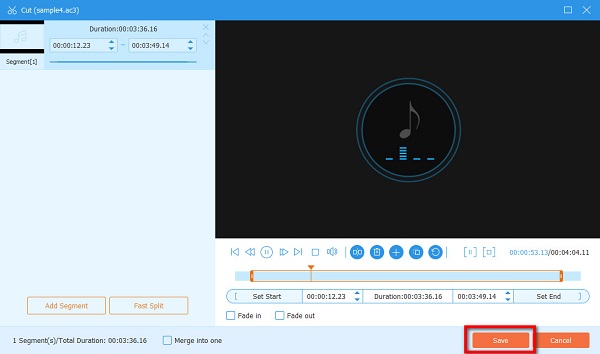
Step 4And on the following user interface, you can see a timeline and a preview of your audio file. On the timeline, drag the slider and click the Set Start and Set End button to cut out parts of the audio file.
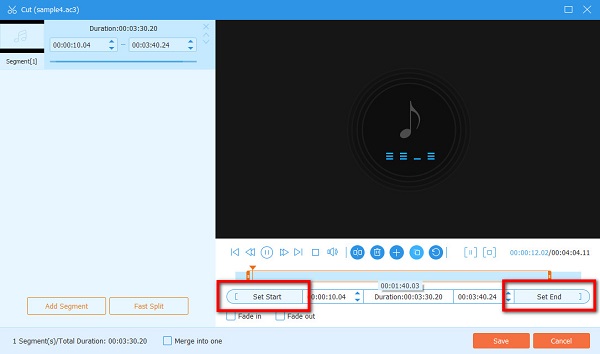
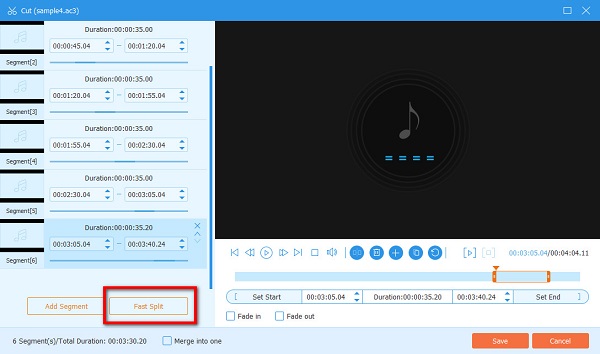
Optional. If you want to split your audio file into equal parts, click the Fast Split button, then you can select how many parts you want to split your audio.
Step 5If you are done trimming your audio file, click the Save button at the lower right corner of the interface. Click the Convert All button to process your file and it will be saved on your device.
Easy, right? With the best audio cutter, you can easily trim, cut, or split your audio file to your preference.
Method 2. How to Trim Audio in Premiere Pro
Another popular audio cutter that you can use to trim audio files is Adobe Premiere Pro. You can trim audio, cut audio, and split videos in Premiere Pro. What's even more impressive with Premiere Pro is that you can also use it to edit your video's audio, like boost the volume. Adobe Premiere Pro supports almost all video and audio file formats and is safe to use. However, this fantastic editing software is not free to use. You must purchase it before you can use it to trim audio files.
How to trim audio in Premiere Pro:
Step 1The first thing that we will do is import the audio clip that you want to split or trim. Create a new project on Premiere Pro, then import the audio file. Or, if you are already editing a project, drag the file to the Timeline.
Step 2Once your audio or video clip is on the Project panel, create a new sequence and add the clip to the existing one. Right-click on the video clip and select the New sequence from the clip button. This will make a new sequence and add the video clip you want to split.
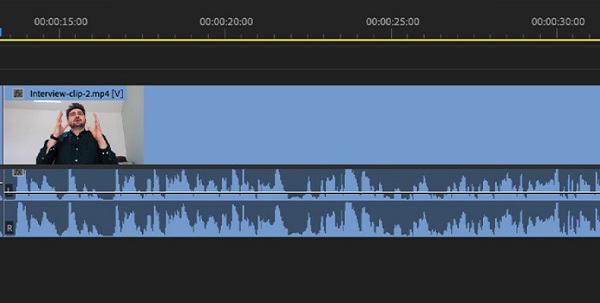
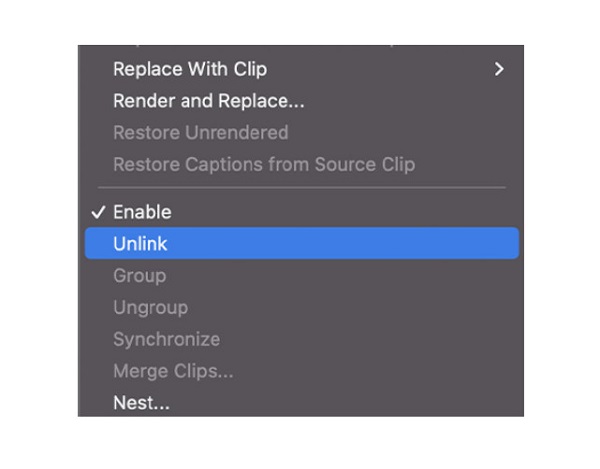
Step 3When you import the video file on the Timeline, you will see that the audio and video have different tracks but are linked together. Therefore, if you want to cut a specific part of your audio, you need to unlink the linked clip.
To do that, select the clip you wish to split, right-click, and select the Unlink option in the pop-up menu. And then, the audio and video files are now split. After splitting the audio and video, the video file will remain selected.
Step 4After splitting the audio from your video, you can move to splitting and cutting the audio. First, split the audio and then remove the unnecessary parts. And that's it!
Method 3. VLC Trim Audio Process
If you are looking for free software to trim or split audio files available on your Windows and Mac devices, then you can use VLC Media Player. Quite surprised? With VLC Media Player, you can do basic editing for your video or audio files. To be more specific, you can use this editing tool to cut and merge audio files and trim video files in VLC.
VLC Media Player is available not only on computers but also on Android, iOS, and iPadOS. Many beginners also love using this software to trim audio because it is free to download and has a simple user interface. So, if you desire to learn how to use VLC to trim audio, follow the instructions below. Using VLC Media Player to trim audio is indeed good.
How to trim audio using the VLC Media Player:
Step 1If VLC is not yet downloaded on your device, download it now and launch it. After opening the application, drag and drop the audio file you want to trim after opening the application. In this tutorial, we will trim an MP3 file. The VLC Media Player will automatically play the audio file.
Step 2Hold and drag the progress bar to select the beginning point of your audio. Click the red Record button and play the audio.
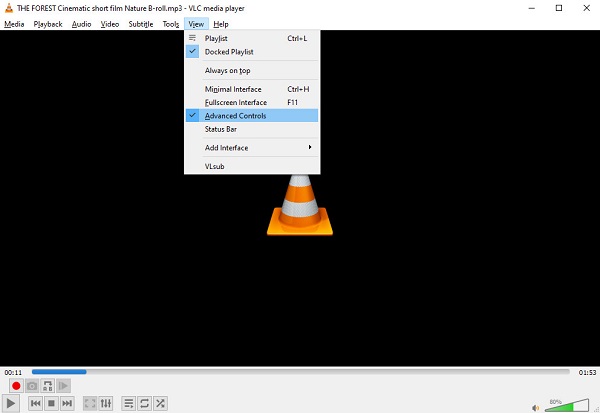
Step 3Pause the playback, and click the View button in the menu bar. Then, check the Advanced Controls option. And now, you will see four new buttons right above the playback button.
Step 4And finally, click the red Record button again once it reaches the point where you want to end the audio file. VLC will then cut and export the audio file on the selected path. You can also specify the output folder where you want to save your output. Navigate to Tools > Preferences > Input/Codec, and hit Browse next to the Record directory or file name to change the output path.
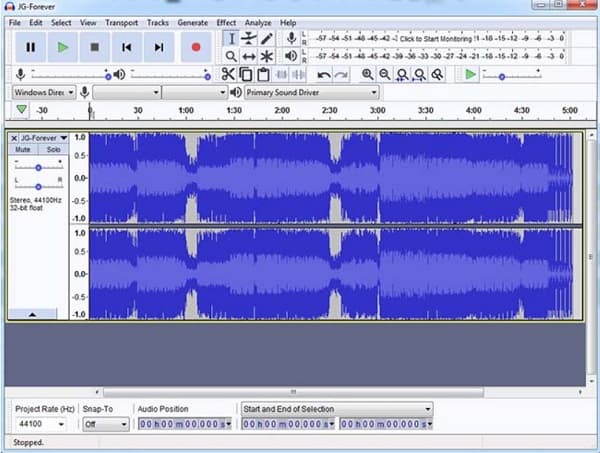
Method 4. How to Split/Cut Audio in Audacity
Splitting audio and cutting an audio file are different. Splitting is usually a process before you cut out a certain part of the audio or video that you are editing. Cutting, on the other hand, is removing a certain part of the audio or video, where you can place it on the other parts or permanently remove the section. In this method, using Audacity, we will show you how to split an audio file and cut it. The drawback of using Audacity to split audio is that there are bugs that exist which cause the program to be unstable.
Audacity is a multi-track audio editor that many professional editors use to edit audio files. This downloadable application can edit and record audio for your Windows, macOS, and Linux devices. Audacity is popular with its users because it is open-source software and it is totally free to use. Moreover, with Audacity, you can export and import recordings in several formats. Indeed, Audacity is a powerful application for trimming and editing your audio, so to use this tool to trim audio files, follow the steps below.
How to cut audio in Audacity:
Step 1Download and install Audacity on your device, and open it once it is installed. Then, on the software's main user interface, go to the File menu and click Open. Locate your audio file, then upload it on Audacity. You can also upload audio files by dragging and dropping files over the Audacity window.
Step 2Now, we will place a marker on the section you want to cut on your audio file. This process will split your audio clip. Click a spot on your audio clip near where you want to split your music. You will then see a vertical black line passing through the audio clip, indicating the cursor's position. Before proceeding to the next step, ensure that your cursor (Selection Tool) is placed where you want to split your audio.
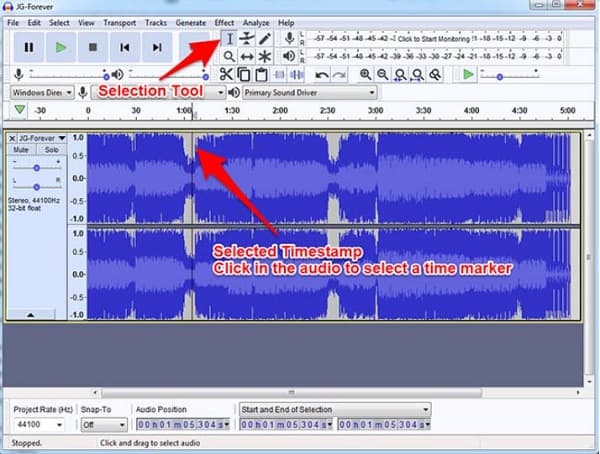
Step 3Next, split the audio file by going to Edit > Clip Boundaries > Split. You can also split an audio file by pressing CTRL + I on your keyboard. Your audio file will now split.
Step 4After splitting your audio, you can remove the part you want to cut out. You have two options on what you will do on the split part. Either delete it or move it to another location of your audio clip.
If you want to delete it, here's what you need to do:
1. Enable the Selection Tool (F1) and double-click on your audio's middle part. You will see that it is highlighted in white, meaning the section is deleted. After selecting the section, click the Delete key, and it will be deleted.
2. If you want to move the clip that you split, use the Time Shift Tool (F5), then move it to the location where you want to put it.
And that's all there is to it! You can now export your output and save it on your device.
Method 5. How to Split Cut/Split Audio in iMovie
When it comes to using Mac devices, one of the most popular applications is to trim audio or videos in iMovie. iMovie is among the most popular video editing software for Apple devices, like Mac, iPhone, and iPad.
This software is not just video editing software. You can also trim, cut, or split an audio file. iMovie features a basic user interface, which makes it easy for beginner editors to use this tool. Additionally, iMovie guarantees that there will be no quality loss when you edit your audio file with it.
However, most users find it hard to upload other audio and video files because it does not support numerous audio and video files. Nonetheless, it's still a practical application for trimming, cutting, or splitting an audio clip.
Steps on how to cut audio in iMovie:
In this tutorial, we will present to you how to trim and cut audio using the iMovie application.
How to trim audio in iMovie
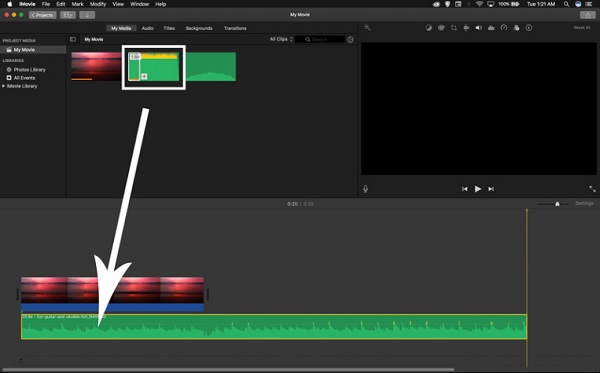
Step 1First and foremost, download iMovie if it is not yet downloaded on your device. Then, open the application. On the first interface, import your audio file on the interface, then drag the file to the Timeline.
Step 2Once your audio clip is in the timeline, select it by left-clicking it, then drag the left edge to where you want to set the Start, then the right edge to set the End. Click and drag the selection to the timeline, then release.
Tip. You can also trim clips more precisely by adjusting the playhead to an exact frame, then clicking the Trim to Playhead option.
How to cut audio in iMovie
Cutting an audio clip is similar to trimming audio in iMovie.
Step 1After uploading an audio clip, you wish to cut, drag it to the Timeline. Then, drag the playhead to the exact frame where you like to split the audio clip.
Step 2Right-click the audio clip on the Timeline and select the Split Clip option from the pop-up menu.
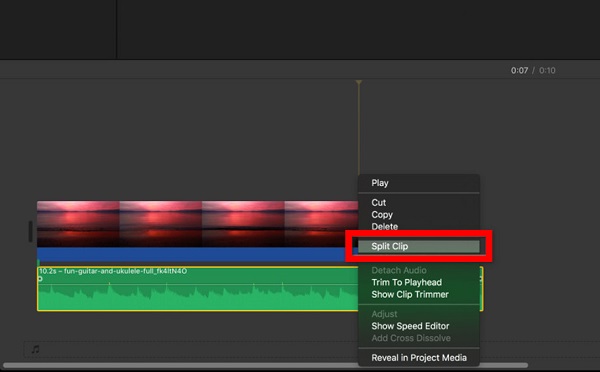
Step 3After selecting the split clip option, your audio clip will cut at the position of the playhead. Now, you have two clips. Delete the unnecessary clip, and save your output on your device.
And that's the whole process of how to split and cut audio in iMovie.
Method 6. How to Split Audio in OBS
Another software that you can use to split audio files is OBS Studio or the Open Broadcaster Software. OBS Studio is free and open-source video recording and live streaming software. But since there is a lot of demand for audio editing, it can now split or cut your audio. Moreover, OBS Studio is a high-performance real-time video and audio editing tool for capturing and mixing. You can also use it to make scenes that are made up of multiple sources. What's even better about this application is that it has an audio mixer with per-source filters that you can use, like noise gate, noise suppression, and gain. Without further ado, here are the steps on how to split audio in OBS studio. The downside of using OBS Studio is that it has a complex user interface.
Step 1To begin, download and install the OBS Studio on your device. Then, import and select a scene in OBS. Go to the OBS output settings, and set the output mode to advanced.
Step 2And then, switch to the recording options, and set the audio tracks you want to record. You can now apply and close the settings.
Step 3Next, open the Advanced Audio Properties using the audio mixer. Set the audio sources you wish to be heard on every track. Click the OK button to confirm your selections.

Part 2. How to Trim Audio in Mobile Phone
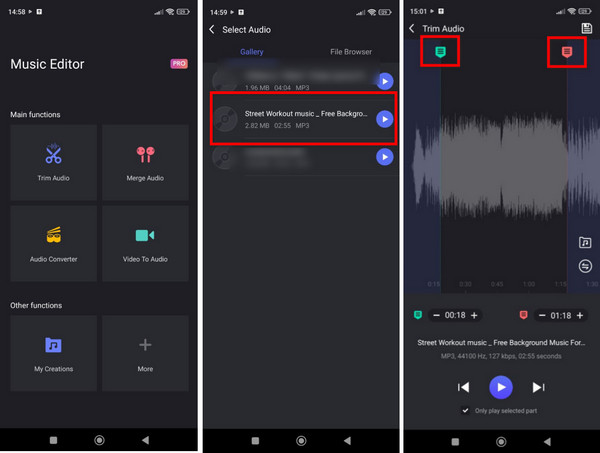
If you are using a mobile phone, you can download Music Editor to trim music or audio. Music Editor is easy to use and can trim, merge, and convert audio files. In addition, it has a simple user interface, which makes it a beginner-friendly app. However, Music Editor contains many ads that might distract you.
How to trim audio in Android:
Step 1Install Music Editor on your Android device. On the app's main interface, tap the Trim Audio option.
Step 2Select the Audio file that you want to trim. Then on the following screen interface, you will see a green (start) and a red (end) slider. Adjust the slider to indicate the start and end of your trimmed audio clip.
Step 3Tap the Save button at the top right corner of your screen to save your output.
Part 3. How to Trim Audio Online
Want to cut audio online? You can trim an audio clip online using Clideo - Audio Cutter Online. Clideo is an online audio cutter accessible on almost all browsers, like Google and Safari. This online application lets you trim your audio by moving the play-in and play-out buttons. You can also fade in and fade out your audio file with Clideo. The problem that many people encounter with this tool is that it only supports MP3 audio formats, which is quite inconvenient for many.
How to trim audio online using Clideo:
Step 1Access Clideo on your browser. On the first interface, click the Choose file button and upload the audio file you want to trim.
Step 2Then, adjust the play-in and play-out on the slider to select the part you want to remain.
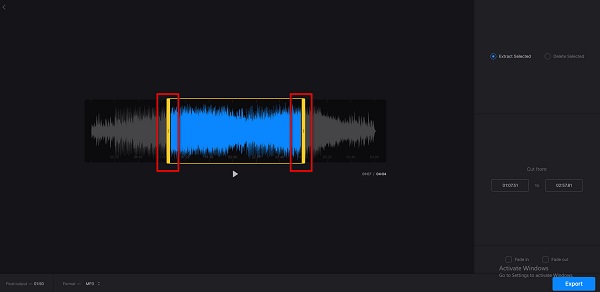
Step 3Finally, click the Export button to save your output.
Extended Reading
8 Fantastic Audio Booster Applications [Online and Offline]
How to Edit Audio Using the Best Audio Editing Software
Part 4. FAQs about How to Trim Audio
What is the best audio format for promotional videos?
MP3 is the most used and best audio file format for creating promotional videos because it is the most common audio file. Therefore, setting MP3 as the audio format for promotional videos makes the video easy to transfer.
Can I cut or trim a WAV file?
Yes. WAV is a common audio file format like MP3. You can trim any audio file that you want using Tipard Video Converter Ultimate, including WAV files.
Can I trim an audio file on my iphone device?
Of course! There are tons of audio trimming applications that you can download from the App Store and install on your iPhone device. You can also do audio trim in Apple's default editing tool: iMovie.
Conclusion
It is easy to trim, cut or split an audio file when you have the right audio editing tool downloaded on your device. You can follow any of the methods that we presented to you above to trim audio. Thus, you need to consider the features it offers and its accessibility. Therefore, if you want to use the most accessible audio editing software, which contains tons of advanced editing features, use Tipard Video Converter Ultimate on your device.