
- Part 1. Why Use Photoshop for Video Editing
- Part 2. Set Up Photoshop Before Video Editing
- Part 3. How to Edit Videos in Photoshop
- Part 4. Pro Tips for Success Video Editing in Photoshop
- Part 5. Major Bottlenecks of Photoshop Video Editing
- Part 6. Easy and Professional Photoshop Alternative to Edit Video
- Part 7. FAQs of Photoshop Video Editing
Do you want to edit videos, but all you have is Photoshop? No problem! Photoshop video editing lets you create and manage videos right inside the program.
In this guide, we will cover how to edit videos in Photoshop. We will also present tips for success and explain the main limits of using Photoshop for video. If you are ready to learn and explore, please keep reading.

- Part 1. Why Use Photoshop for Video Editing
- Part 2. Set Up Photoshop Before Video Editing
- Part 3. How to Edit Videos in Photoshop
- Part 4. Pro Tips for Success Video Editing in Photoshop
- Part 5. Major Bottlenecks of Photoshop Video Editing
- Part 6. Easy and Professional Photoshop Alternative to Edit Video
- Part 7. FAQs of Photoshop Video Editing
Part 1. Why Use Photoshop for Video Editing
Photoshop is useful for video editing because the tools look familiar if you already edit photos there. Using Photoshop for video editing, you can trim clips, arrange them on a timeline, add text, use adjustment layers, and place music in one workspace. It is a good starting point for beginners because the steps are easy to follow. It also helps you learn editing basics before moving to advanced editors like Adobe Premiere Pro.
Part 2. Set Up Photoshop Before Video Editing
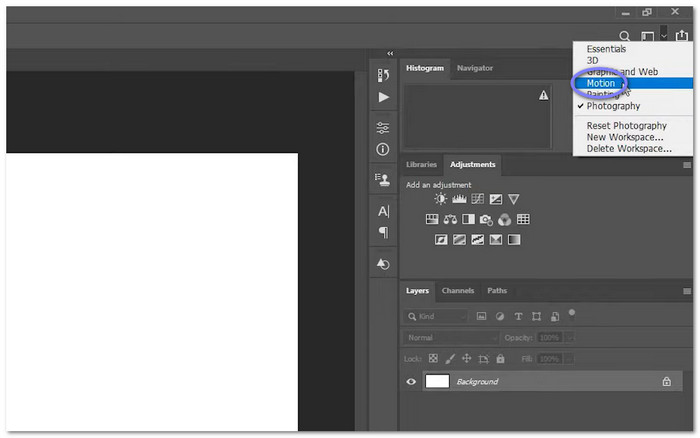
Before you start, make sure you use a newer Photoshop version. Older releases do not include full video timeline tools. Then, open Photoshop and switch the workspace to Motion from the top right menu. It will open the timeline panel at the bottom. Next, click Create Video Timeline so the editing area becomes active. It also helps to save your project first. Keep your video files in one folder so importing clips is faster and easier.
Part 3. How to Edit Videos in Photoshop
Adobe Photoshop is a surprising tool for video editing. Learning how to edit video in Photoshop lets you cut clips. You can arrange them on a timeline. You can add color adjustments, text, and simple animations all in one workspace.
It may not be as powerful as dedicated video editors. But it works well for short projects and learning the basics. With a little practice, you can turn raw footage into polished videos. You can do this without leaving Photoshop.
Step 1 Open Photoshop and change the workspace to Motion from the top right menu. It will show the timeline at the bottom. Click Create Video Timeline so Photoshop can prepare the editing area for your clips.
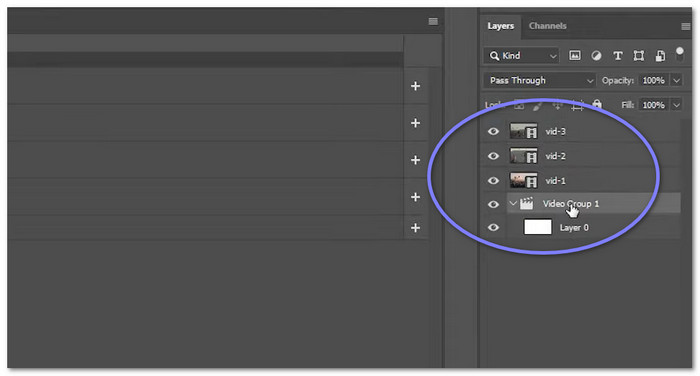
Step 2 Click the Plus button in the timeline and import your video files. If you add many clips, Photoshop may place them inside one video group. Go to the Layers panel, drag each clip out of the folder, then delete the folder so every clip stays separate.

Step 3 Move each clip into the order you want on the timeline. When dragging clips, please wait for the single line before you release them. It helps keep clips separate and stops them from grouping again. Made a mistake? Press Ctrl + Z to fix it.
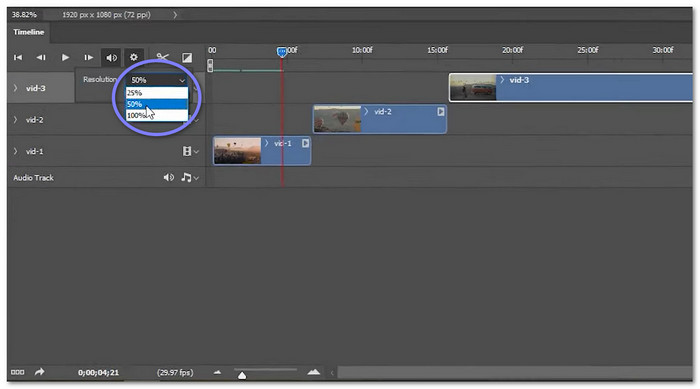
Step 4 Lower preview quality to 50% or 25% if playback is slow. Add a Curves adjustment layer for color changes. Put it above one clip for a single edit or above all clips for a full video effect. You can also add text and keyframe its position to make it move on screen.
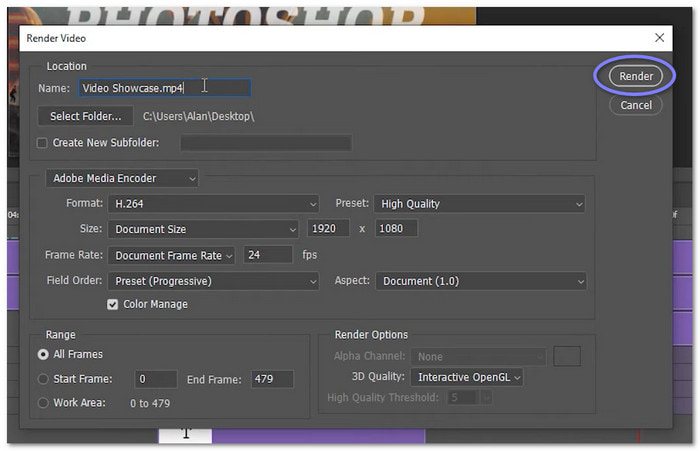
Step 5 Play your video and check every edit. Once you are done, go to File > Export > Render Video. Choose a name and save location. Keep H.264 because it works well for most video platforms and devices.
Part 4. Pro Tips for Success Video Editing in Photoshop
Good results in video editing using Adobe Photoshop often come from small editing habits. Since Photoshop was first made for images, using its video tools the right way helps you work faster. It also helps keep your video clean.
1. Prepare the workspace first.
Open Window > Workspace > Motion and create a video timeline. If the preview becomes slow, lower the playback quality to 25% or 50%.
2. Edit without harming the original file.
Convert clips into Smart Objects before adding filters. Use adjustment layers like Curves or Hue/Saturation for easy color changes.
3. Make cuts clean and smooth.
Use the Scissor tool to split clips. Add fades or cross-dissolves when you need softer scene changes.
4. Add simple motion with keyframes.
Use keyframes for Position or Opacity so text and objects move smoothly.
5. Export using the appropriate settings.
Use File > Export > Render Video to render. For smooth video, select H.264 and maintain the same frame rate as the original clip.
Part 5. Major Bottlenecks of Photoshop Video Editing
Adobe Photoshop works well for short projects. But Photoshop video editing can become tricky with longer or more complex videos. These limits can slow you down. Understanding them early helps you work smarter and keep your edits running smoothly.
- Large video files use a lot of RAM. When memory fills up, Photoshop uses the scratch disk, which makes editing slower.
- Many layers or high-resolution clips, especially 4K, can cause long render times.
- Long timelines and layered clips often make preview playback stutter or freeze.
- Photoshop uses GPU support. However, video performance is still weaker than Adobe Premiere Pro.
- Advanced video work becomes hard. Timeline tools, audio controls, and project handling remain basic.
Part 6. Easy and Professional Photoshop Alternative to Edit Video
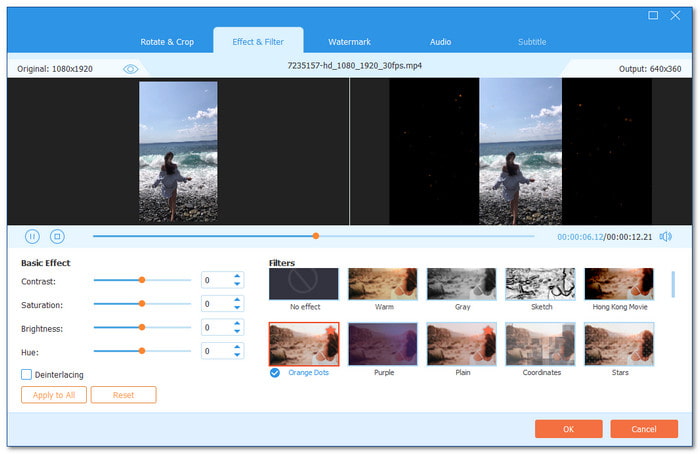
Adobe Photoshop can edit video. However, it often feels slow, has limited timeline controls, and is not ideal for long projects. A better Photoshop alternative to edit video is Tipard Video Converter Ultimate. It offers dedicated tools for trimming, cropping, merging, filters, and subtitles. It also has AI features that sharpen video, reduce noise, and improve brightness.
- Lets you create compilation videos easily.
- Offers 51 creative themes for video projects.
- Includes a collage maker with 45 ready-to-use templates.
- Supports multiple aspect ratios, including 16:9, 4:3, 21:9, 1:1, 9:16, etc.
- You can change the format, frame rate, and resolution before export.

It supports many input and output formats. It keeps your videos compatible with phones, desktops, and online platforms. You can also convert many videos at once because it supports batch conversion. Plus, it is lightweight but powerful. It runs smoothly without putting a heavy load on your system.
Part 7. FAQs of Photoshop Video Editing
Is Adobe Photoshop good for video editing?
Photoshop works for simple and short video projects. You can trim clips, add effects, and use text. It is best for beginners or quick edits, but it is not ideal for complex videos.
Is Adobe Photoshop video editing free?
No, Photoshop requires a paid subscription. There is no free version with full video editing tools.
Is Canva better than Photoshop?
Canva is easier for simple videos with templates and ready-made effects. Photoshop gives more control over layers, color, and animations. Which is better depends on what you want to create.
Conclusion
How was your experience learning how to edit video using Photoshop? Do you like it? Do you find it easy or useful?
But if you ever need an easy and professional Photoshop alternative to edit video, you can count on Tipard Video Converter Ultimate. So, please download it now. Explore its editing features and AI enhancements to make your videos eye-catching.
More Reading
About the Author
