How to Record a Join Me Meeting without Notification – 2 Efficient Methods You Should Know
It is not difficult to record a Join.me meeting with a hosting account. Join.me is a favorite online meeting and screen-sharing program that includes audio and video conferencing by phone or Internet (VoIP). But you should find lots of restrictions for capturing Join.me meetings, such as the notification, host account, and the recorded contents. What are the best methods to capture everything for the online meetings? Just learn more details from the article and choose the desired one accordingly.

Part 1: How to Record a Join.me Meeting without Notification
Tipard Screen Capture is an all-in-one Join.me recorder that enables you to capture screen video, record audio files, and get webcam footage. It records all onscreen activities, adds annotations, adds watermark, edits the captured online meetings, and even sets up schedule recording for Join.me meetings according to your requirement.
- 1. Capture videos, record audio files, and get webcam footage for Join.me.
- 2. Adjust the video format, resolution, audio volume, and more settings.
- 3. Preview the recorded videos from Join.me and make further editing.
- 4. Add annotations, watermark, callouts, and more shapes to the recording.
Step 1Once you have installed Tipard Screen Capture, you can launch the program on your computer. Click the Video Recorder option to record a conference call on Join.me. You can adjust the recording area according to the window of Join.me.
Step 2Enable both the System Sound option and the Microphone option to capture the audio files from the host and all participants. Of course, you can also enable the Webcam option to capture the webcam footage. After that, you can click the REC button to start recording without notification.
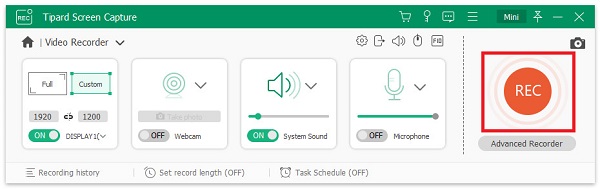
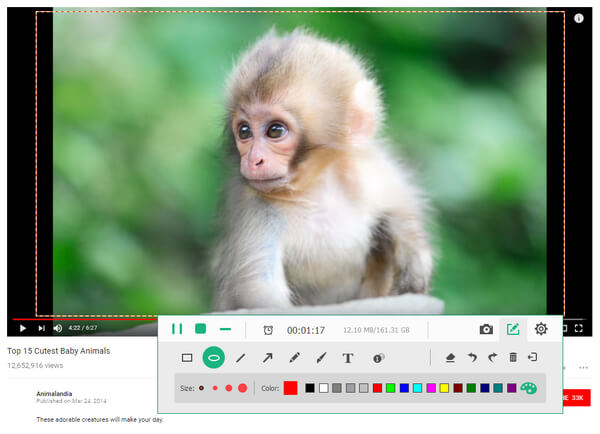
Step 3During the recording process, you can take some snapshots for the key point, or even add annotations to the videos. Click the red square button to stop recording a conference call on join.me, and then you can preview the video and save it on your computer.
Step 4Go to the recording history, you can preview the recorded Join.me videos and trim the desired part. Once you have recorded the desired files, you can save them to the destination folder on your computer, or share them with others on social media websites.
You can find more free video editor here if you want to edit the meeting recording.
Part 2: Useful Tips about Recording Meetings on Join.me
Can I record a Join.me meeting for free?
No. It requires a subscribed account for Join.me Pro and Business. Moreover, you have to use the hosting account to record a Join.me meeting and save the recorded video to the cloud service. If you are a participant, you have to use the professional screen recorder instead.
Why cannot I get the recorded Join.me meeting videos?
Once you have captured the Join.me meeting videos, it will arrive just within few minutes. But if your meeting has a bad or choppy Internet, it might take up to 20 minutes to process the recording. When someone fails to hang up, you have to wait about 24 hours.
Can Join.me record everything for the meeting?
No. The default method only records the shared contents and the conference audio files. It cannot record participant bubbles, sound play on your device, as well as the Join.me videos. Moreover, there will be a notification displayed that the Join.me meeting is recorded.
Part 3: The Default Method to Record Join.Me Meetings as Host
If you still want to use the built-in method of the program to capture Join.me meetings, you can log in to the hosting account with the Pro version or the Business version, and then follow the steps to keep track of everything that happens in your meetings.
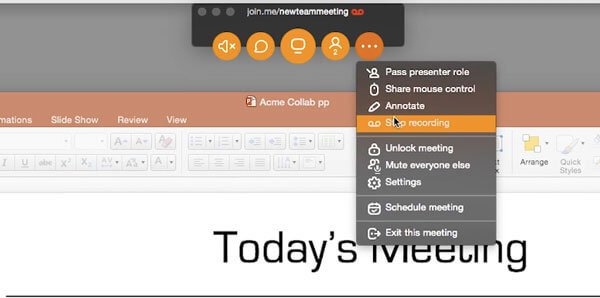
Step 1Once you have launched the Join.me, you can click the More button and select the Record button to capture the desired files. There is a red icon to remind you that the meeting is being recorded.

2. How to take notes in the process of recording a webinar
In the process of recording a webinar, you can also edit the recording in real time including highlighting, adding shapes, words, and lines with different colors. It is very helpful to take notes and highlight the key points.
Step 1After start recording, there will be a toolbox at the bottom of the computer screen. Click the Edit button to choose the editing tools.
Step 2It only enables you to record the shared contents. Moreover, your attendees will be alerted that the recording has begun. When you are done, you can click the Stop recording button to save the file.
Step 3After that, you can go to the My Meetings tab of your host account and click the Recordings tab to find all your recorded meetings. You can download the files or share them accordingly.
Also, you can find the best free conference call service here.
Conclusion
The article shares 2 workable ways to record audio and screen with Joinme. When you want to want to keep the records for the online meetings, you can use the default method. Tipard Screen Capture is a professional screen recorder that captures Join.me online meetings within clicks.