
Virtual reality games are now more popular than ever, and many players want to save their best moments. Knowing how to record VR gameplay helps you capture exciting scenes and share them online. There are simple ways to do it using built-in tools, free apps, or professional recorders. Learn the best methods below!
Part 1. How to Record PC VR Gameplay
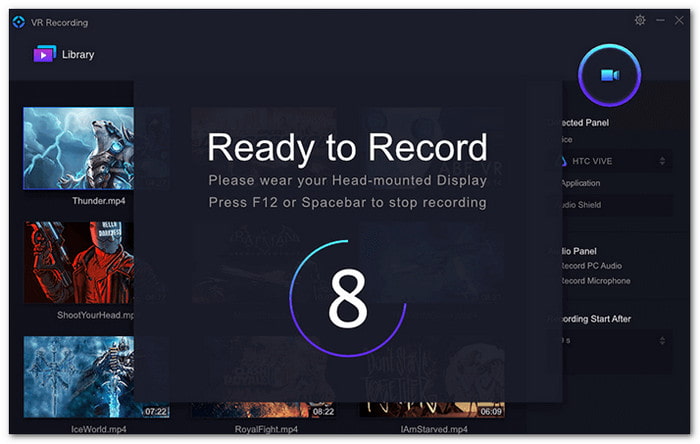
1. Tipard Screen Capture
Playing VR games on your computer feels more exciting when you can keep your best moments with Tipard Screen Capture. This best VR recording software lets you record your full or custom screen, including system audio, microphone, and even your face. After recording, you can use the trim option to cut out the dull parts at the start or end.
- Capture long gameplay sessions with ease.
- Manage recordings neatly by file type and history.
- Record smoothly without lag in full screen or custom regions
- Support multiple output formats: MP4, MKV, MP3, FLAC, GIF, etc.

Here is how to record VR gameplay using Tipard Screen Capture:
Step 1 Acquire and run Tipard Screen Capture on your computer. On the main screen, choose the Screen Recorder option.

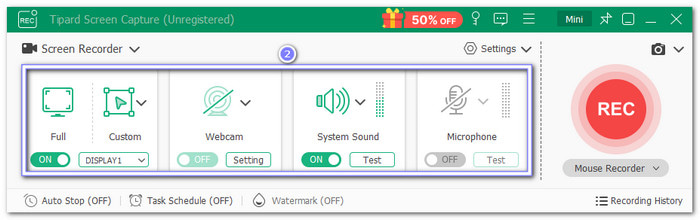
Step 2 Before recording, select the screen area you want to capture. You can record the full screen or a custom region. Choose your audio source, too: System Sound, Microphone, or both. You can also turn on the Webcam to show your face while playing.
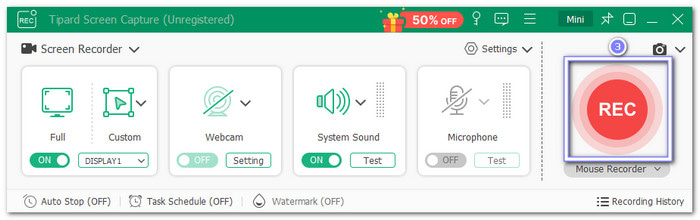
Step 3 Hit the REC button once you are ready. Play your VR game as normal, and Tipard Screen Capture will record everything. You have full control to pause or stop the recording anytime.
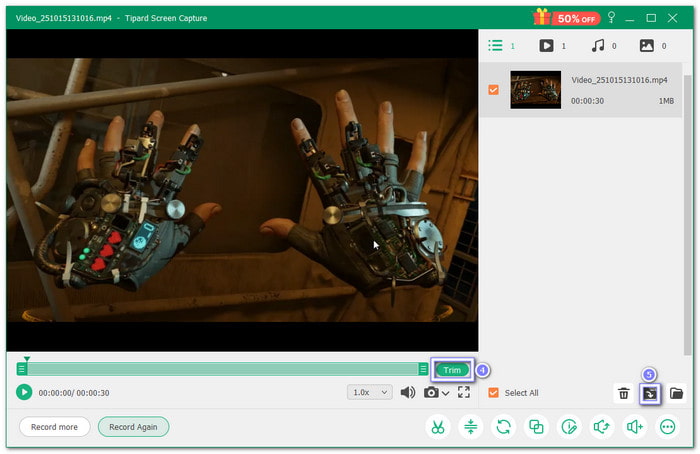
Step 4 Once done, preview your video in the pop-up window. If you want to remove unwanted parts, open the Trim option and do your thing. If it looks good, click Save to keep it on your computer.
2. OBS
Recording VR gameplay on a computer feels easier with OBS Studio, an open-source and free screen recorder used by many gamers. It captures both eyes' views through SteamVR's mirror display. With its simple setup and real-time control, it lets you record your full VR experience without needing an extra paid program.
Here is how to capture VR gameplay using OBS:
Step 1 Open SteamVR, click Settings, and turn on the Display Mirror. Then, go to the Main menu and pick Both Eyes. It lets OBS show both views from your headset. Without this, it will not record what you see.
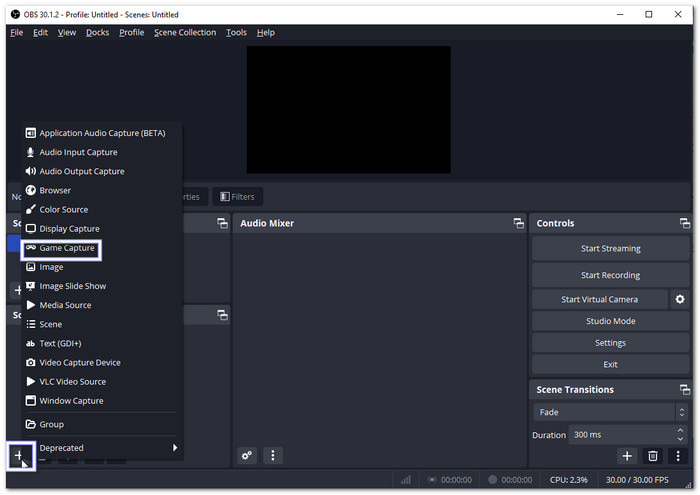
Step 2 Open OBS Studio and click the Add button under Sources. Pick Display Capture from the list. When the window appears, select Create New, then press OK. Choose your display or VR view and click OK again.
Step 3 You can now see your VR screen in the OBS preview. Move or resize it if needed. Go to Settings >> Output if you want to change your video clarity or file type before recording.
Step 4 Click Start Recording on the right side of OBS. Start playing your VR game, and OBS will capture everything you see inside your headset.
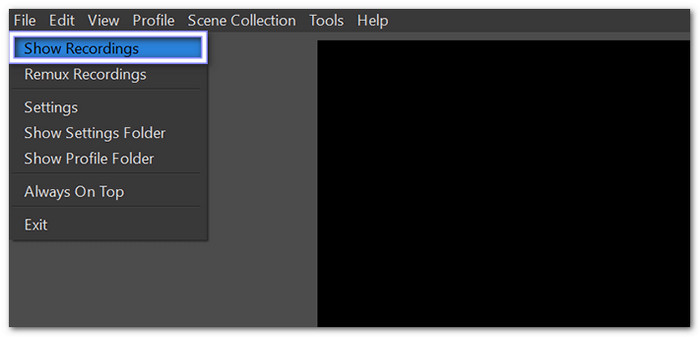
Step 5 Once done, click Stop Recording. Then, open the File menu and choose Show Recordings. It will take you to the folder where OBS saves your VR gameplay videos.
3. Graphics Card Software (ShadowPlay/ReLive)
Most VR players use graphics card software like ShadowPlay and ReLive to record smooth and clear gameplay. Learn how virtual reality recording works using them below!
1. For NVIDIA Users (ShadowPlay)
NVIDIA users can rely on ShadowPlay to record VR gameplay without hurting performance. It works inside GeForce Experience and uses your GPU to capture high-quality videos. The built-in overlay makes starting, stopping, or saving gameplay quick and easy, even while you are still inside your VR headset.
Step 1 Open GeForce Experience on your computer.
Step 2 Press Alt + Z on your keyboard to run the ShadowPlay overlay.
Step 3 Click Record, then choose Start to begin recording your VR game. Make sure your headset and SteamVR are already running.
Step 4 Once you finish, press Alt + F9 to stop. Your recorded VR clips will be saved automatically in the Videos folder.

Note: If you are experiencing the ShadowPlay not recording issue, you can just configure your desktop capture settings, update your display and graphics drivers, check game compatibility, and more to make it work again.
2. For AMD Users (ReLive)
If you have an AMD graphics card, ReLive gives you a fast and smooth way to record VR games. It is built right into AMD Radeon Software and only needs one shortcut to start capturing. You can save clips automatically in high quality and keep your frame rate steady while playing in virtual reality.
Step 1 Launch AMD Radeon Software from your desktop or taskbar.
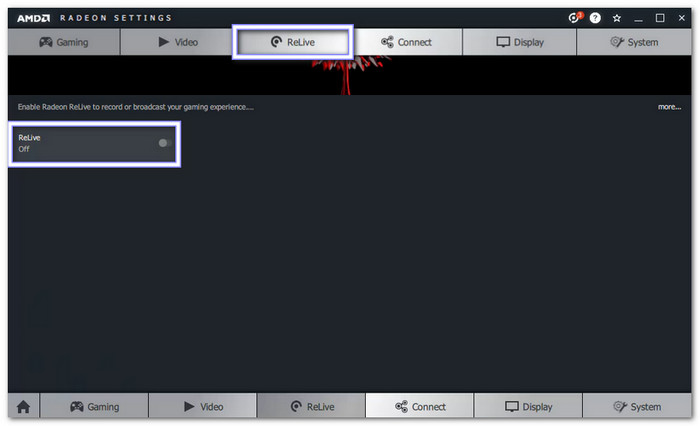
Step 2 Click the ReLive tab inside Radeon Software and turn it on.
Step 3 Once your VR setup is ready, press Ctrl + Shift + R to start recording your gameplay.
Step 4 Once you are done playing, press Ctrl + Shift + R again to stop the recording.
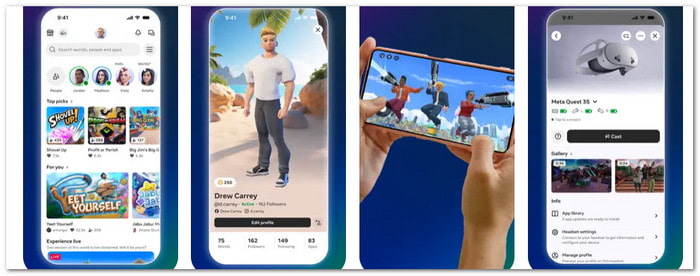
Part 2. How to Record VR Gameplay on Meta Quest (Standalone)
Method 1: Built-in Screen Recording
The built-in screen recording on Meta Quest is the best way to record your VR gameplay. It records directly from the headset without using extra devices or cables. You can include mic audio, see a red dot when recording starts, and access your saved videos anytime in the Files app after you stop playing.
Step 1 Put on your Meta Quest headset and press the Meta button on your right controller. It opens the universal menu at the bottom of your view.
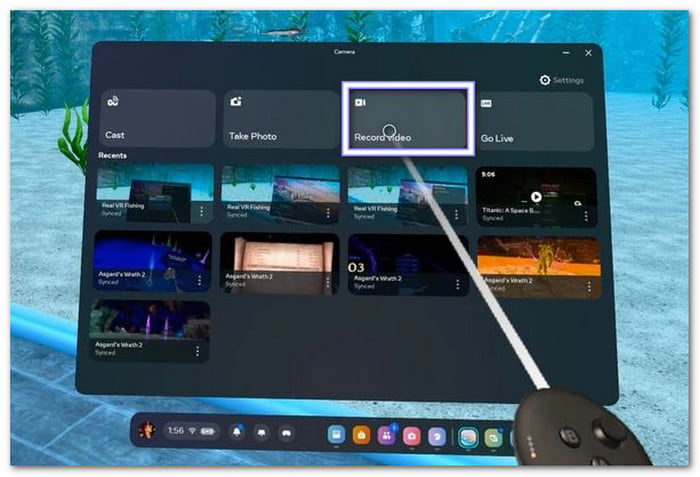
Step 2 On the menu, select the Camera button. Then, choose Record Video to begin recording your gameplay.
Step 3 Once recording starts, you will see a Red dot in your view. It means the headset is now capturing your gameplay.
Step 4 Before you start recording, you can switch on the Include Mic Audio toggle. It lets you record your voice while playing.
Step 5 To stop, press the Meta button again, open the Camera button, and click the Red button. The video is automatically saved to your headset's Files app.
Method 2: Using a Phone App
Another simple way to save your VR clips is through the Meta Horizon mobile app. It connects to your headset and lets you sync, view, and download your recordings straight to your phone. This method helps you share your best VR moments faster and keeps all your clips safe and easy to manage.
Step 1 Open the Files app from your Quest home screen. Head to the video you just recorded.
Step 2 Click the More button (with three dots) on your video and choose Sync.
Step 3 On your phone, launch the Meta Horizon app. Press the Menu button and then go to Gallery to find your synced videos.
Step 4 Tap your video and press the Download button. The VR gameplay video will save directly to your phone's photo library, ready to share or edit anytime.
Part 3. How to Record VR Gameplay on Steam
Steam users can easily capture their VR gameplay with VRCapture, a free VR recorder available on the Steam Store. It lets you start or stop recording with one click or a simple shortcut. You can also set your own save folder and fine-tune settings for smoother results. Follow the steps below to begin recording!
Step 1 Go to the Steam Store and search for VRCapture. Download and install it on your computer.
Step 2 Open VRCapture first, then start your VR game. Once you are in the game, click the Record button in VRCapture to start. It captures everything you see in VR, including both eyes' views, for a full experience.
Step 3 To finish, press the Stop button or press Ctrl + F12 on your keyboard. The program will save your gameplay clip automatically in the default folder.
Step 4 If you want to save your recordings elsewhere, click Settings and choose a new folder.
Conclusion
No matter which VR platform you use, this guide shows you how to capture VR gameplay easily. Tipard Screen Capture is a great choice for hassle-free recording. It lets you capture your full screen, game audio, mic, and even your face, giving you high-quality VR gameplay videos ready to share or edit.
More Reading


About the Author
