
Arrange your clips, change the color, and click the play button, to be brought to a screeching halt by an error message that has interrupted your run. Few things break momentum like a file that refuses to load, especially when you get hit with an unsupported compression type in Premiere Pro. Being a novice or an editor with years under the belt, it is easy to say this issue is like a puzzle without its piece. In this guide, we will unravel the causes of this mistake to help you identify it before it damages your project. Gaining insight into what lies behind it is the initial step in getting back on track.

Part 1. Causes of the Unsupported Compression Type Premiere Pro Issue
It becomes frustrating when you get import errors whenever dragging video files into Premiere Pro. You are geared up to edit, and the next thing you find yourself killing time waiting to see a warning. Among the most common issues is that the file has an unsupported compression type, which results in an error in Premiere Pro. However, what is it that makes this happen?
1. Unsupported or Missing Codec
Each of the video files is coded with a given codec. In case Premiere Pro cannot open your file due to the failure to decode that codec, you will need to alter the codec used during encoding to one that Premiere Pro can decode. For example, when the Premiere Pro file uses an unsupported compression type, such as VP09, it means the program does not support that VP9 codec, which is commonly found in videos downloaded from YouTube. What is to remedy for this? Transcode to a format such as H.264, HEVC, or ProRes to make the MP4 import in Premiere easier.
2. Wrong File Location or Permissions
At times, the file itself does not matter; it is the location where it is saved that is important. Documents saved within unstable network drivers, external devices, or set directories with lesser privileges may not load. Premiere Pro requires a seamless input and output to operate.
3. Limitations of the Free Version
A part of the features and codecs is behind the paywall. If you are using the free version, you may find that high-end formats like AVCHD or camera-specific MP4s throw up the Premiere Pro file uses unsupported video compression type VP09 message. Pro workflow codec expansion is available with a full subscription.
4. Deceptive File Names
Renaming a file without converting it to a different file type, e.g., renaming a file with the .mov extension to .mp4, will confuse Premiere Pro. It attempts to decipher it using incorrect settings, which is why the frequent occurrence of compression type errors is observed. Confirm your file extension with a true format.
5. Older Software or Drivers
The program may not support newer formats or experience playback issues when your Premiere Pro or graphics drivers are out of date. It is one of the muted reasons that contribute to import problems, which are often neglected. Keeping both the app and your drivers updated can often prevent errors, such as the file having an unsupported compression type in Premiere Pro.
Part 2. How to Fix the Unsupported Compression Type Problem on Premiere Pro
1. Convert Video Files Compatible with Premiere Pro
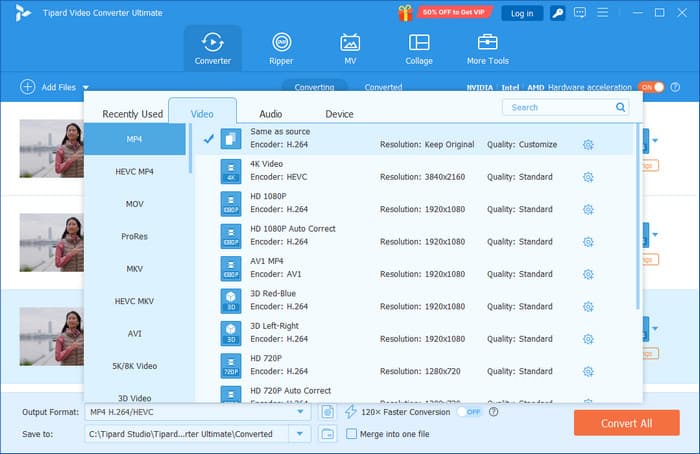
One of the most effective ways to fix the Adobe Premiere MP4 unsupported compression type issue is to convert your video using Tipard Video Converter Ultimate. The types of video compression that this tool supports are numerous, and it can easily convert your file into formats friendly to Premiere Pro, such as H.264, HEVC, or ProRes. This approach is the best practice in the case of your clip supporting a similar codec, such as VP9 or AV1, to become smoothly playable in Premiere Pro.
Putting the file in any other format obviates the compression mistake, but it also grants you additional authority over how your video is edited in the editing phase. Rather than trying the best codec that might not work, Tipard provides a guaranteed output adjustment specifically designed for Adobe Premiere. This small trick costs you no time, no mistakes, and it allows you to concentrate on the creative aspect of the procedure.
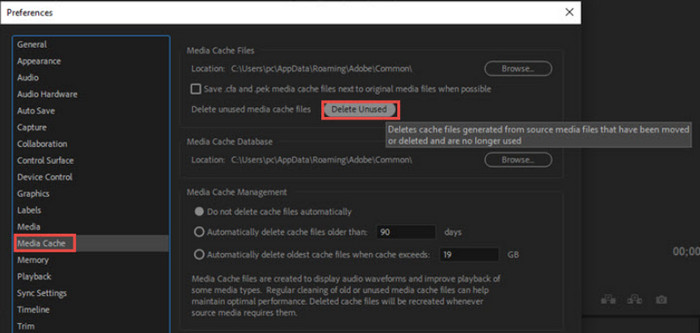
2. Empty the Cache in Media
Another common fix for the file has an unsupported compression type Premiere issue is clearing the media cache. Such cache files assist in accelerating the playback and load time; however, after some time, they may create mistranslation. To purge them, in Premiere Pro, go to Preferences > Media Cache and press Delete or select Delete Unused. This update helps Premiere reprocess files efficiently. In case this is required, you may also delete cache files manually and in your system folders. It is worth keeping in mind that Premiere can also recreate cache files, and thus it will not help to resolve the problem in all situations.
3. Alter Video File Location
If the problem persists, try changing the location of your video. Files stored in protected system folders or network drives may trigger an error message stating that Premiere Pro does not support the compression type. It can assist in relocating the work file to a local drive with complete access, and re-import the file. You can also attempt to create a new project or re-link media in the new location.
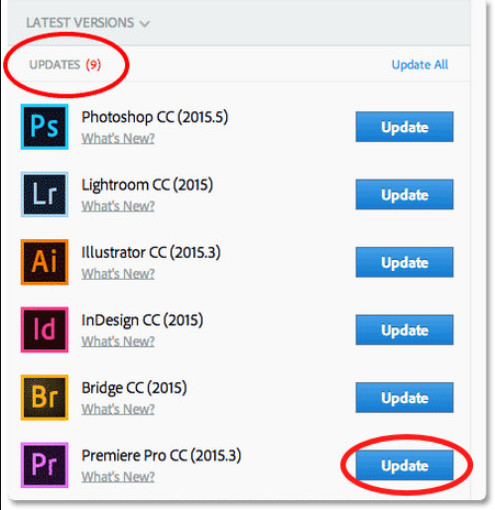
4. Update Premiere Pro CC
It is also essential to keep your software up to date. Older versions of Premiere Pro may not support the newer codecs, particularly in the MKV format. To fix Adobe Premiere Pro's unsupported compression type MKV issues, update the software by going to Help > Updates. Ensure that your system corresponds to the latest version, and then install it.
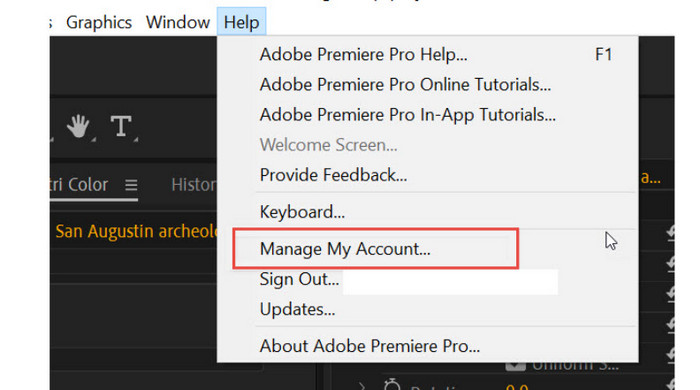
5. Get Premiere Pro CC License Registered
Lastly, it is important to ensure that the use of Premiere Pro is completely licensed. Some codecs, in particular, HEVC, need an adequately activated version of the application. Free versions do not always support all critical formats, which may be a reason why the error occurred. You should check your status using Help > Manage My Account. Consider switching to a subscription if you are using a time-limited or expired copy, if you want full codec support, and do not want to face these import issues in the future.
Part 3. What Compression Type Does Premiere Pro Support?
Premiere Pro is compatible with various types of video compression, also known as codecs. The most trustworthy among them are H.264, HEVC or H.265, Apple ProRes, DNxHD, and CineForm. Importing as well as exporting are optimized in these formats, and therefore, most editing can be done with them.
Nonetheless, not all of them, such as VP9 or AV1, or particular types of MKV files, can be played, in particular, the free version or older versions of Premiere Pro. The conversion should be done in simple formats, such as H.264 or ProRes, to ensure that mistakes are avoided during importation. And when you are finally prepared with your project, you can export Premiere Pro to MP4 to ensure your final video is in a well-supported type of compression. This helps content play better, share more easily, and also increases the chances of compatibility between various devices.
Conclusion
When Adobe Premiere MP4's unsupported compression type became a huge problem for you, these are the solutions you need to take, and with a single swoop, everything is switched. From error to enabled one. If the error persists even after you have purchased the Pro version, you can try converting the video file into a Premiere-compatible format.

All-in-one video toolbox: convert, edit, upscale, enhance, and compress your videos easily
100% Clean & Safe
100% Clean & Safe
More Reading


About the Author
