
Ever wondered how to slow down a video in Premiere Pro without losing quality or making it look choppy? Users can create professional results through various built-in tools that Adobe Premiere Pro provides. Understanding which tools to apply between Speed/Duration, Time Remapping, and Optical Flow will result in significant speed adjustments in your videos. We will illustrate the most effective techniques for video speed adjustment within the Premiere Pro environment, which results in professional movie-quality transitions.

Part 1. How to Slow Down a Video in Premiere Pro with Speed/Duration
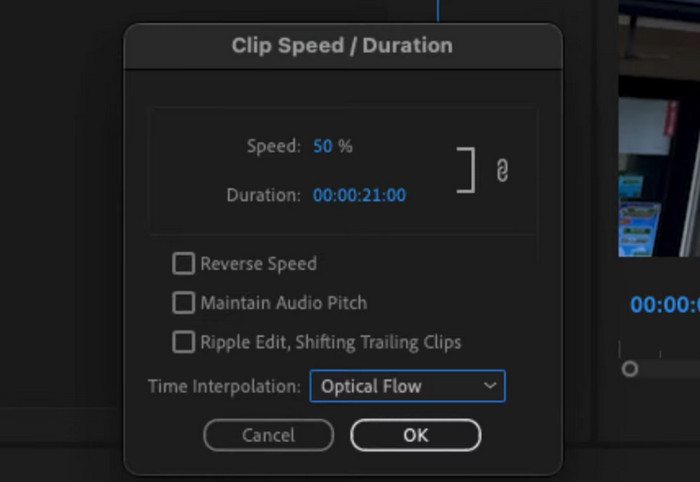
Adobe Premiere Pro grants users access to smooth high-frame-rate video speed reduction through its Speed/Duration tool. If you are wondering about Premiere Pro and how to slow down 60FPS video, this tool allows you to adjust the speed percentage for cinematic slow motion without choppy playback. Frame distribution remains even through this feature while providing the Frame Blending and Optical Flow tools for improved motion quality, which suits action sequences, creative transitions, and storytelling.
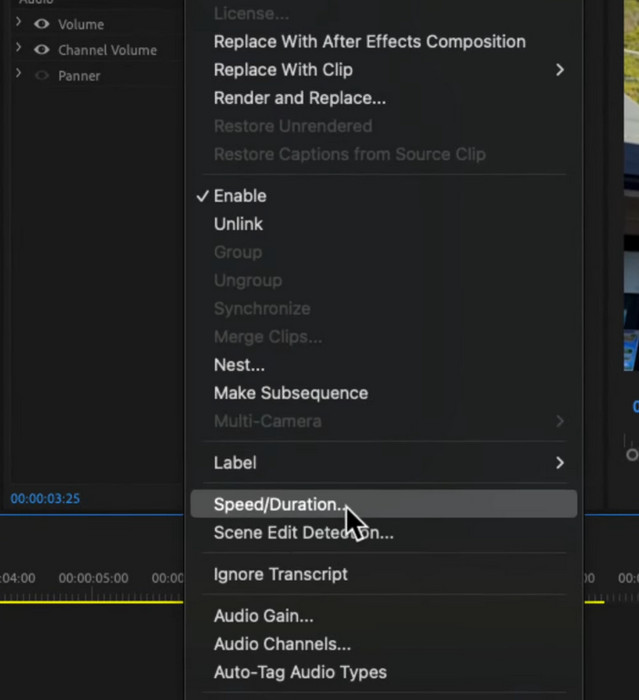
Step 1 After uploading the video here, go to the Timeline and right-click the video clip. Then, pick the Speed/Duration from the list of options that appears on your screen.
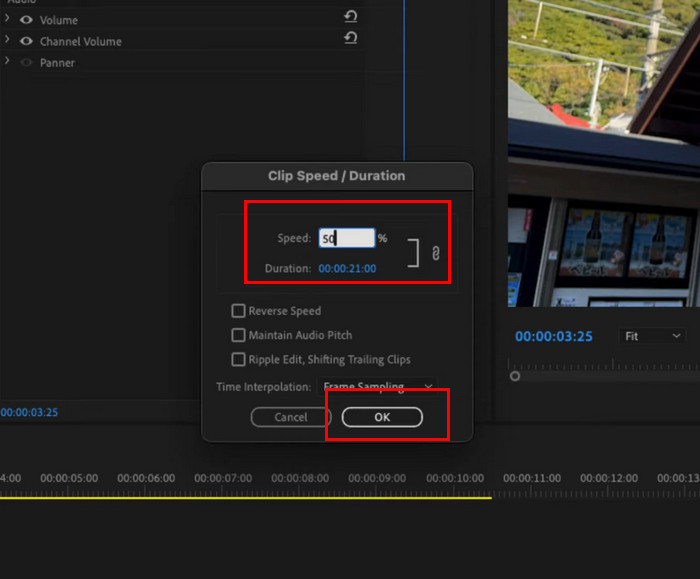
Step 2 Here, you can change the value of the speed of your video by dictating what percentage and clicking OK to save the changes.
Part 2. How to Make a Slow Motion in Premiere Pro with Time Remapping
Premiere Pro users have access to the Time Remapping tool, which enables them to create fluid, slow-motion effects for their projects. You can achieve complete speed control of clips through keyframes with this feature to produce natural slow-motion effects. If you need to slow down a video in Premiere Pro, Time Remapping helps you achieve a more natural, cinematic effect without sudden jumps in speed. Users can implement Time Remapping particularly well for both dramatic storytelling and action sequences or to enhance their recordings with creative speed timing.
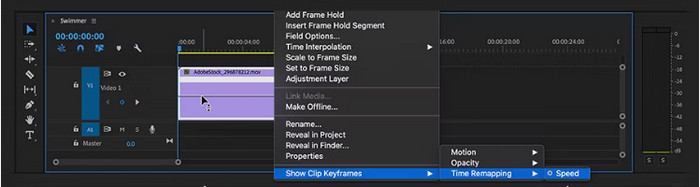
Step 1 Right-click your clip in the Timeline panel, then go to Show Clip Keyframes > Time Remapping > Speed. Hover over the horizontal line in the middle of the clip until your cursor changes to a black arrowhead with a small double arrow.
Step 2 Click and drag the horizontal line downward to reduce the speed. A tooltip will show the speed percentage. When you release the mouse, the clip will get longer since slowing it down increases playback time.
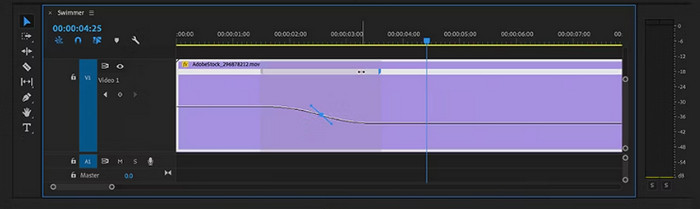
Step 3 Hold the Command or Control button to turn the cursor into a pointer with a plus. Click on the line that appears on the video on the timeline, marking where the slow-mo will begin.
Step 4 Drag the line down to slow the video clip, and to make it smoother, spread the keyframes and adjust the Bezier handle.
Part 3. How to Enhance Slow Motion in Premiere Pro with Optical Flow
Adobe Premiere Pro uses its Optical Flow function to create supplementary frames between source frames for slow-motion videos and video speed up on Premiere that results in continuous playback. Premiere users seek natural smooth braking effects in their edited videos, so they should enable Optical Flow from Time Interpolation over traditional keyframing methods because this choice produces superior transitions. The algorithm uses motion analysis across frames to generate extra information, which minimizes stutters and stutter-like movements. Learn how to slow down a video in Premiere Pro 60 FPS using the guide below and achieve professional-quality slow motion with enhanced fluidity.
How to Use Optical Flow on Speed/Duration:
Before clicking OK in the Speed/Duration settings, go to the Time Interpolation section. By default, it is set to Frame Sampling, but you can click on it to view other options. Scroll down to the bottom and select Optical Flow, which enhances slow-motion effects by creating smoother transitions between frames. Once selected, click OK to apply the changes and achieve a more fluid slow-motion effect.
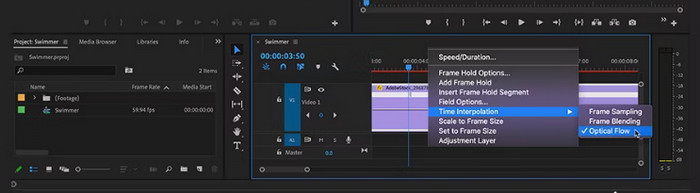
How to Use Optical Flow on Time Remapping:
When you reduce the speed of the video to 10% or even lower, you will see that it becomes choppy when you apply the slow-down effect. To fix it, right-click the clip and select the Time Interpolation, then click the Optical Flow to activate this feature and have a smoother speed change on the video.
Part 4. Not Satisfied with Premiere Pro? Slow Down a Video with This Alternative
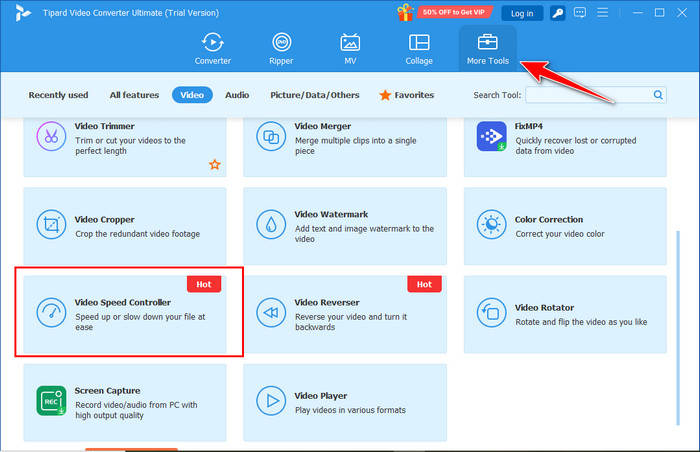
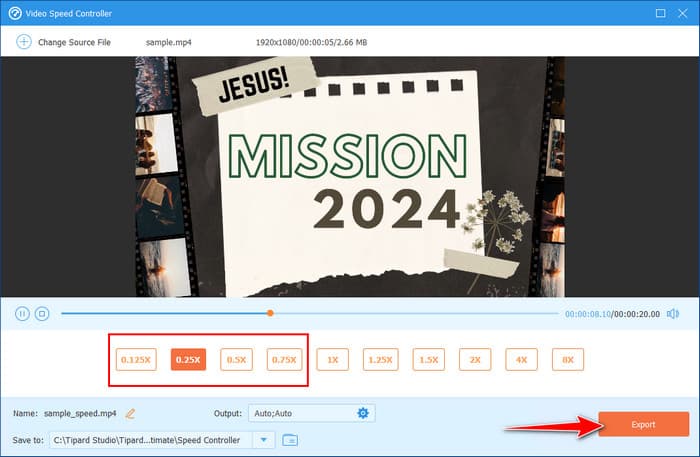
Tipard Video Converter Ultimate provides users with an instinctive option to modify video speed through its Video Speed Controller while maintaining high video quality, which is a less complex method than Premiere Pro. The Video Speed Controller tool in this software enables users to modify speed effortlessly while ensuring smooth playback at high quality.
Tipard Video Converter Ultimate runs a built-in optical clarity maintenance system without requiring users to adjust inputs, unlike the Premiere Pro. This program includes video editing tools that enable users to trim videos and enhance them through customization features for creating professional-looking slow-motion effects.
Step 1 First, download the Tipard tool on your Windows or Mac by clicking the appropriate button that we have here. Follow the instructions for setup, installation, and getting it ready to use.
Step 2 Go to the More Tools section and find the Video Speed Controler from the features available here.
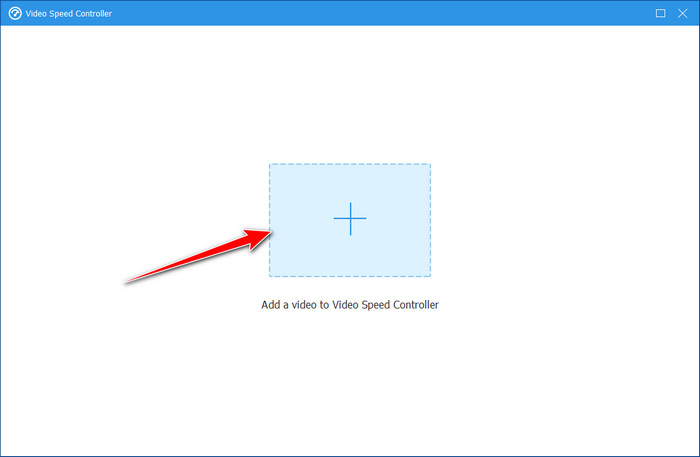
Step 3 Before you start using it, you will need to import the video file you want to slow down by clicking the + button here. Then, a file folder on your PC will appear that allows you to search or find the video clip. Click it, and press Open.
Step 4 Here, select the speed you want to achieve. Since you want to slow it down, choose from these options. After selecting it, it will automatically preview the slow version, which will allow you to check it from your screen. Then, click Export to render the file and finally have it on your PC.
Conclusion
A crucial video editing technique that produces dramatic effects and highlights essential details is video reduction since it creates a cinematic look during playback. Premiere Pro's how to slow down 60FPS video can be done through Speed/Duration, Time Remapping, and Optical Flow tools, which provide multiple control and smoothness capabilities. The built-in tools allow users to maintain smooth and visually pleasing footage during slow-motion effects.
The alternative tool, Tipard Video Converter Ultimate, operates as a more straightforward solution to manage video speed reductions for users who find Premiere Pro overwhelming. Selecting a video editing tool between Premiere Pro and Tipard that fits your needs enables you to produce high-quality slow-motion effects that perfectly enhance your video content.
More Reading


About the Author
