
Video speed can make your clips more exciting or help show details clearly. You can make a video faster to add energy or slow it down to focus on important moments. Did you know that iMovie is a great platform for this?
Right in this article, you will master how to speed up or slow down a video in iMovie step-by- step. We will also introduce some easy-to-use alternatives that offer more control over video speed.

Part 1. Why Adjust Video Speed in iMovie
Adjusting the speed of your video in iMovie helps make your stories more interesting. You can slow down clips to create drama or fast-forward them to save time. It lets you highlight important moments, skip boring parts, match action to music, and create smooth transitions between scenes.
Part 2. Steps to Speed Up or Slow Down Video in iMovie
Speeding up or slowing down the footage can change how your story feels. Fast clips make action exciting and help you skip slow parts. Slow clips add drama and let viewers notice details. Knowing how to control video speed lets you create the effect you want and makes your project more fun and creative.
Without further discussion, learn how to speed up video in iMovie, and also slow down below:
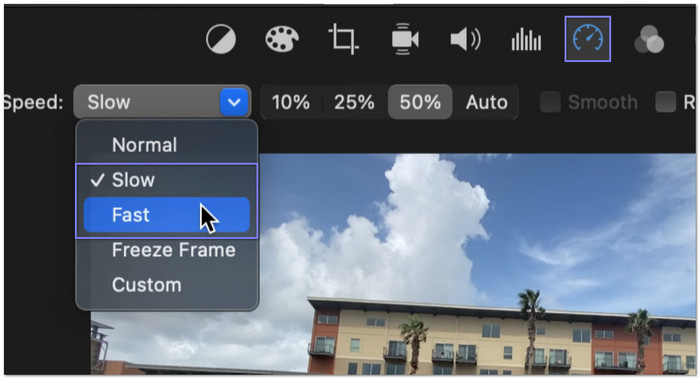
Step 1 Open your iMovie project. Click on the video clip you want to adjust. You will know it is selected when it is highlighted in yellow.
Step 2 Look at the top right of your screen. You will see a small Timer button. Click it to open the speed options.
Step 3 In the Speed menu, you can pick Slow to make your video play slower. You will see a little Turtle symbol on your clip. If you pick Fast, your video speeds up and shows a Bunny symbol.
Step 4 You can also control how much faster or slower your clip goes. For example, make it 2× faster or 4× faster. iMovie updates your clip instantly.
Step 5 Play your clip to see how it looks. If it is too fast or slow, go back and adjust the speed again until it feels right.
Part 3. The Limitations of Speed Control in iMovie
Speeding up and slowing down a video in iMovie feels simple at first, but it still has some limits you should know. Not every clip can be adjusted the way you want, and some changes may not look smooth.
1. Mobile Speed Limits: On iPhone or iPad, you can only make clips up to 2× faster. It is not enough for long timelapses.
2. No Gradual Speed Changes: Smooth transitions between speeds are not supported. You must split clips manually, which can look jerky.
3. Pre-recorded Slow or Fast Clips Restrictions: Videos already in slow-motion or time-lapse may not allow speed changes.
4. Cinematic Mode Speed Limitations: Using speed control on Cinematic Mode clips removes the ability to adjust focus.
5. Basic Smooth Option: The Mac "Smooth" option helps a little but can still make fast clips look stuttery.
6. Audio Pitch Issues: If you do not preserve pitch, audio can sound weird, like chipmunks when fast or deep when slow.
Part 4. Easier iMovie Alternatives to Control Video Speed
If you are having a hard time using iMovie, especially when learning how to slow down video in iMovie or speed up clips, you can rely on the easier alternatives below.
1. Tipard Video Converter Ultimate
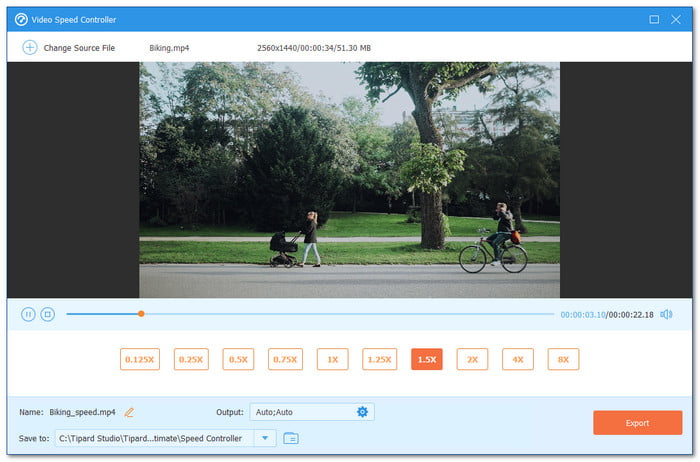
If you are looking for the number one easiest iMovie alternative to control video speed, Tipard Video Converter Ultimate is the best choice. It offers a dedicated video speed changer feature, which makes speeding up or slowing down your clips simple and precise.
You can also modify the video frame rate after changing the speed, keeping your video smooth and preventing choppy playback. Furthermore, it supports a large number of input and output formats like MP4, MOV, AVI, MKV, and more. With that being said, you can edit almost any video without worrying about compatibility.
The things it is good at:
- Increase video speed with options like 1.25×, 2×, 4×, or 8×.
- Make a video slow-motion with choices such as 0.75×, 0.5×, 0.25×, or 0.125×.
- Access more features like trimming, reversing, cropping, and enhancing videos.
- Adjust video settings, including format, resolution, and frame rate for smooth playback.
2. CapCut
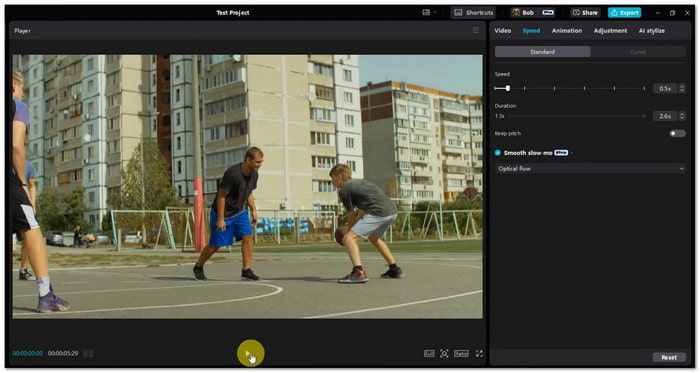
If you want a simple tool that works on both Mac and mobile, this one is perfect. It helps you make your videos faster or slower without watermarks. You can create smooth slow-motion or fast-forward effects. The interface is clean, so even beginners can change video speed and make fun edits immediately.
The things it is good at:
- Keep the original audio pitch or mute it.
- Curve speed for dynamic speed ramping.
- Standard speed for uniform speed changes.
- Smooth slow-motion using optical flow for less blur.
3. Clideo
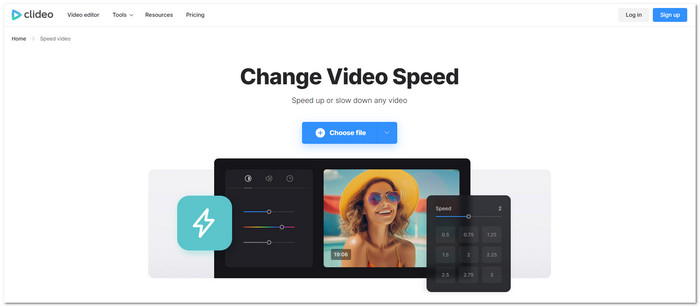
Clideo - Video Speed Controller works completely online, so it is a simple choice if you want to slow down or speed up videos online without installing anything. Just upload your video, change the speed, and download it. It supports many video formats and keeps your files safe. It is recommended for immediate edits when you want to speed up or slow down clips for social media posts.
The things it is good at:
- Fully online with secure file handling.
- Works with MP4, AVI, MOV, and more.
- Mute audio or keep the original sound.
- Six common speed presets or a custom slider.
Part 5. FAQs of Adjusting Video Speed in iMovie
1. How do I speed up videos I have already recorded?
Open your iMovie project and select the clip you want to change. Click the Speed option at the top right. Choose Fast and pick how much faster you want it. Play the clip to check if it looks right.
2. How to 2x speed up a video on an iPhone?
Open iMovie on your iPhone and press the clip in your timeline. Tap the Speed button. Slide the speed control to 2×. Your video will now play twice as fast.
3. What video speed changer is easiest to use?
For simple and fast editing, Tipard Video Converter Ultimate is very beginner-friendly. It has a dedicated speed changer, lets you keep videos smooth, and supports almost all video formats. You can speed up or slow down your footage in just a few clicks.
Conclusion
So, how do you speed up videos on iMovie? As you have learned above, all you need to do is click the Timer button, choose Fast or Slow, and pick the speed you want for your clip. If you want an easier alternative, you can count on Tipard Video Converter Ultimate. It has a built-in video speed controller that enables you to speed up or slow down videos with ease. You can also watch the result in the preview screen before saving, which helps you check if the speed looks right.
More Reading


About the Author
