
You know quite well that GoPro cameras are made for adventures; the excitement of getting shot action often comes with the disadvantage of having such thrilling recordings be shaky and hard to stand; mountain biking, skydiving, or any adventure or moment with recordings-in motion results, most times, in videos that are less clear vision due to blur, jitter, or distracting motion followed. Finally, we shall show you how to produce safe footage best using built-in features, proper mounting, and smart shooting techniques. Are you geared up to turn your GoPro Hero 10 shaky video into something that can wow your audience? Let's get started.

Part 1. Why Does My GoPro Footage Look Shaky
GoPro cameras are designed for capturing dynamic, fast-paced action, but their compact and lightweight build can also be a major contributor to shaky footage. One of the most common reasons your GoPro produces shaky videos is due to camera movement caused by vibrations, impact, or unsteady hands or mounts. Whether you're attaching it to a helmet or bike handle or even holding it manually, the lack of weight and resistance makes every small motion much more noticeable.
Another key factor is inadequate stabilization technology. While newer GoPro models come equipped with HyperSmooth or similar electronic stabilization, older versions rely solely on user techniques or external gear for steadiness. If you're using a GoPro without these features or if the feature isn't turned on, you'll likely experience jarring shakes, especially in high-motion scenes.
Additionally, frame rate settings can impact the perceived smoothness of your footage. Lower frame rates (24fps or 30fps, for instance) will record fewer frames per second, leading to faster motion exhibiting more blur and making shakes worse. Higher frame rates (let's say 60fps or 120fps) can improve the overall smoothness of the motion and ease of post-production correction.
When talking about mounts, even the way mounts are mounted and where they are mounted will add to the overall stability of the footage. Loose mounts can cause some wobble. Some materials or surfaces (i.e., thin plastic, flexible mounts) can produce "shock absorption" from the vibration instead of stabilization. Do environmental conditions like wind and speed differences in movement cause the problem? For instance, if one is to ski under rough terrain or is confronted with strong wind, there will be external uncontrollable motion.
Test all these as causes before fixing the footage. Once you pinpoint what's causing your videos to be shaky - whether it's gear, settings, or technique - you'll be in a better position to apply the right solutions and achieve closer to cinematic-quality results.
Part 2. How to Fix Shaky GoPro Video
If you're dealing with shaky GoPro footage, Tipard Video Converter Ultimate offers a fast and simple solution. Designed for Windows and Mac platforms, it is a powerful tool that stabilizes videos with just a click using the built-in Reduce Video Shaking feature under the Video Enhancer. Action-packed adventures or more relaxed moments can be smoothed with a few easy steps, minus the complications of advanced skills.
Simply import your video, choose the video deshaker option and preview the output before saving. You will see a difference in the clips as they transform to become much more stable and watchable. Tipard also supports high-resolution formats up to 4K and works with most major video file types, making it the perfect option for serious content creators, vloggers, or casual users who want to perform a quick, easy, and effective edit of their GoPro footage.
Step 1 Install and Launch the Software
The first thing you want to do is download the software. You can do that by clicking the download buttons below. After downloading, install the software. Launch it after the installation.
Step 2 Import Shaky Videos
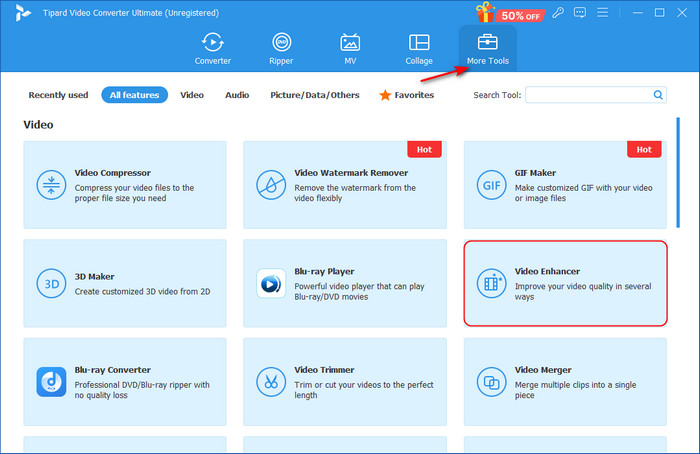
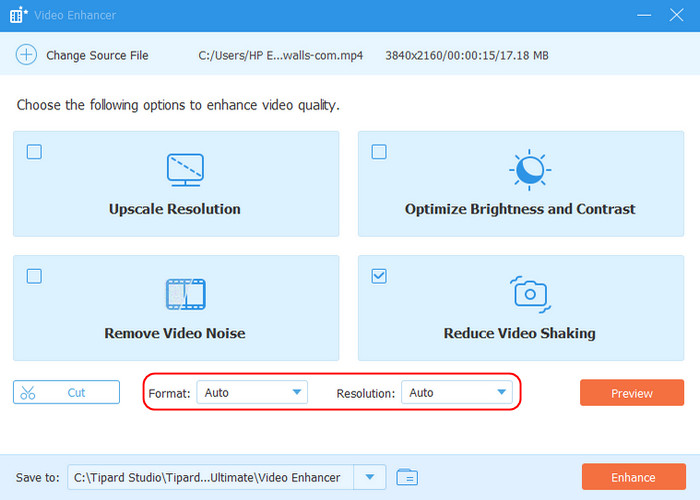
After launching, you will see the home interface. Click on More Tools and then click on Video Enhancer. A big + button will appear after; clicking this button will let you import your shaky videos. After importing, select the option Reduce Video Shaking.
Step 3 Toggle Video Settings
After you have selected the option, toggle and alter the file settings to your liking. We recommend leaving it on Auto, as the app will choose the best options for your videos.
Step 4 Enhance Video
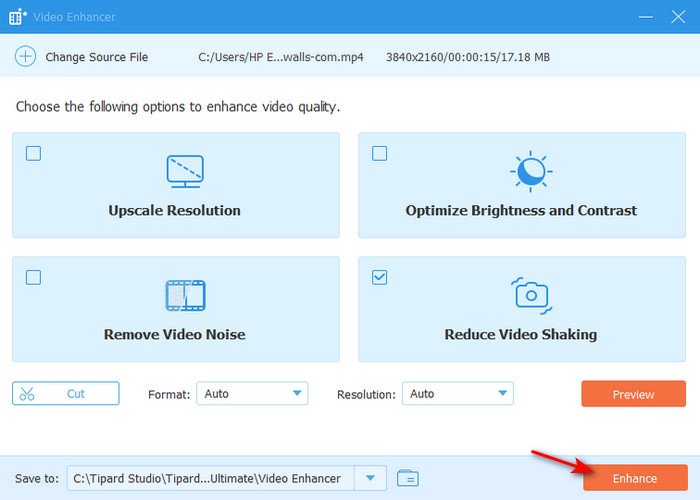
After setting and toggling the best format for your video, you can now enhance your video by simply clicking the Enhance button on the bottom-right screen of the app interface.
Part 3. How to Take Stable GoPro Videos
Capturing smooth and stable footage with a GoPro may seem challenging, especially during high-action scenes, but it's entirely possible with the right techniques, settings, and gear.
1. Use GoPro's Built-In Stabilization Features
Contemporary GoPro models, starting with the HERO7, are equipped with HyperSmooth, GoPro's preeminent electronic image stabilization system. HyperSmooth accomplishes stabilization by slightly cropping the footage to ensure that the extra margin is used for compensating motion. To get the most out of it:
- Enable HyperSmooth or Boost Mode in your camera's settings before recording.
- Be mindful that Boost provides the most stability, but with more aggressive cropping.
- Use higher frame rates (60fps or higher) to enhance stabilization and enable smoother slow-motion playback.
2. Choose the Right Mount and Keep It Secure
The type of mount you use - and how well it's secured - plays a massive role in the stability of your footage. A loose or poorly attached mount can magnify even the smallest vibrations. For smoother video:
- Use chest mounts, helmet mounts, or handlebar mounts for more consistent and centered perspectives.
- Avoid mounts with flexible arms or suction cups in high-action situations.
- Add anti-vibration pads or foam inserts to reduce micro-shakes.
Chest mounts are ideal for activities like biking or running because your body naturally absorbs some of the impact. Meanwhile, helmet mounts offer a first-person view, but they can wobble if not tightened properly.
3. Use a Gimbal or Handheld Stabilizer
For maximum stability, especially in walking or handheld shots, consider investing in a gimbal stabilizer. A 3-axis gimbal uses motors to compensate for movement in real-time, delivering buttery-smooth footage that feels cinematic.
- Look for GoPro-compatible gimbals such as the FeiyuTech G6, Hohem iSteady Pro, or GoPro Karma Grip.
- Gimbals are especially useful in environments where HyperSmooth may not be enough, like uneven trails or when shooting from a vehicle.
Though they add bulk, gimbals are unbeatable for serious content creators who demand the highest quality video.
4. Control Your Movement
Even with stabilization features turned on, your movement plays a significant role in determining how steady the footage appears. Try to:
- Walk with a soft, fluid motion - bend your knees slightly and avoid sudden jerks.
- Use two hands when holding the camera manually.
- Minimize wrist flicks or arm swings during filming.
Whenever you are doing shots that require movements, practice the movement to ensure that it creates a smooth path. If you are filming while gliding, skating, or using a motorized dolly, this will also help you keep your shot stabilized.
5. Adjust Camera Settings for Better Stability
GoPro has some small configuration settings that can increase the stabilization factor:
- Use Linear or Wide FOV (Field of View) instead of SuperView for more natural stabilization.
- Choose higher frame rates (such as 60fps or 120fps) to capture more motion data and allow for slow motion that minimizes shakes.
- Use higher resolutions (2.7K or 4K) to make the video clearer when possible. Even if you don't keep the resolution in post, the extra detail gives you room to crop and stabilize the image.
6. Shoot in Short Bursts
Don't just record long, unbroken clips. Instead, shoot short clips! It's better for battery and storage usage, allowing you to be more intentional about the shots you take. It's easier to keep something steady for a few seconds than for a few minutes, and shorter clips are typically easier to stabilize in post-production.
Conclusion
Learning how to fix shaky GoPro video is simple with the right tools and techniques. Using the recommended tools, alongside proper shooting methods, ensures smoother, more professional footage, helping you capture every adventure with clarity, stability, and cinematic quality from start to finish.
More Reading


About the Author
