
- Part 1. Why FFmpeg is the Gold Standard for Video Compression
- Part 2. Basic Ways to Compress Video in FFmpeg
- Part 3. Advanced Techniques to Compress Video in FFmpeg
- Part 4. Challenges of Using FFmpeg to Compress Videos
- Part 5. GUI Alternatives to FFmpeg to Compress Videos
- Part 6. FAQs of FFmpeg Video Compression
Video compression is a useful skill for content creators, filmmakers, and anyone who handles digital videos. High-quality videos usually have large file sizes. That makes them difficult to store, share, and stream.
That is where powerful tools like FFmpeg come in. It helps reduce file size while keeping good visual clarity using FFmpeg compress video techniques. You will master both basic and advanced approaches in this guide!

- Part 1. Why FFmpeg is the Gold Standard for Video Compression
- Part 2. Basic Ways to Compress Video in FFmpeg
- Part 3. Advanced Techniques to Compress Video in FFmpeg
- Part 4. Challenges of Using FFmpeg to Compress Videos
- Part 5. GUI Alternatives to FFmpeg to Compress Videos
- Part 6. FAQs of FFmpeg Video Compression
Part 1. Why FFmpeg is the Gold Standard for Video Compression
Are you curious why FFmpeg is called the gold standard for video compression? Below are the main reasons:
- FFmpeg supports almost all video and audio formats. It works with old and new codecs like H.264, H.265, VP9, and AV1.
- It gives high compression while keeping good quality. Tools like CRF help reduce file size without losing much detail.
- It gives full control over video settings. You can decrease video resolution, bitrate, frame rate, and encoding speed.
- It supports hardware acceleration like NVIDIA NVENC, AMD AMF, and Intel QSV for faster processing.
- It can be automated. It works well in scripts and large systems for video processing at scale.
In short, FFmpeg is trusted because it is flexible, efficient, and used in major streaming platforms and tools.
Part 2. Basic Ways to Compress Video in FFmpeg
FFmpeg can reduce video size in a few simple ways. The most common method is using CRF with H.264 or H.265. You can also lower the resolution to make files much smaller.
1. CRF with H.264 (Most Used Method)
CRF means Constant Rate Factor. It controls quality and file size. It is also part of a common FFmpeg command to compress video.
- Lower CRF = better quality, bigger file
- Higher CRF = smaller file, lower quality
- Default value is 23
- The good range is 18 to 28
- CRF 18 looks almost lossless
It is a safe choice for most videos.
Command:
ffmpeg -i input.mp4 -vcodec libx264 -crf 23 output.mp4
2. CRF with H.265 (Better Compression)
H.265 is newer and more efficient than H.264.
- Up to 50% smaller file size at similar quality
- Uses more CPU power
- Not supported on all older devices
Use this when you need smaller files, and modern compatibility is fine.
Command:
ffmpeg -i input.mp4 -vcodec libx265 -crf 28 output.mp4
3. Reduce Video Resolution
Lowering resolution is one of the fastest ways to shrink file size when using FFmpeg to compress video.
Example:
- 1080p → 720p gives a big size drop
- Good for web, mobile, and sharing
Command:
ffmpeg -i input.mp4 -vf scale=1280:720 -vcodec libx264 -crf 23 output.mp4
Part 3. Advanced Techniques to Compress Video in FFmpeg
These methods give you more control over file size, quality, and speed. They are best for web videos, storage limits, or professional output.
1. Two-Pass Encoding (Best for Target File Size)
FFmpeg compressing video to a specific size is best done using two-pass encoding.
- First pass scans the video
- The second pass applies the best compression
- Gives a more accurate final size
It is very useful for uploads and streaming.
Pass 1:
ffmpeg -i input.mp4 -vcodec libx264 -b:v 1M -pass 1 -an -f mp4 /dev/null
Pass 2:
ffmpeg -i input.mp4 -vcodec libx264 -b:v 1M -pass 2 -acodec aac -b:a 128k output.mp4
2. Use Encoding Presets (Speed vs. Compression)
FFmpeg presets change how fast or efficient encoding is, especially when you need FFmpeg to compress video for web use cases, where file size and loading speed matter.
- fast preset = quicker encoding, bigger file
- slow preset = better compression, smaller file
- veryslow = best size, but takes time
Command example:
ffmpeg -i input.mp4 -vcodec libx264 -crf 23 -preset slow output.mp4
Use slower presets when file size matters more than speed.
3. Compress Audio for Extra Savings
Video takes up most space, but audio still matters. You can reduce audio size using AAC or Opus.
- AAC at 128 kbps is standard
- Lower bitrate saves more space
- Opus is even more efficient for web use
Example:
ffmpeg -i input.mp4 -vcodec libx264 -crf 23 -acodec aac -b:a 128k output.mp4
4. Use AV1 for Maximum Compression
AV1 is a modern codec with very strong compression.
- Smaller files than H.265
- Best for long-term storage and streaming
- Very slow encoding time
- Not all devices support it yet
Command example:
ffmpeg -i input.mp4 -vcodec libx264 -crf 23 -acodec aac -b:a 128k output.mp4
Part 4. Challenges of Using FFmpeg to Compress Videos
FFmpeg is powerful for video compression. But it is not easy for beginners. It also needs practice, time, and a strong computer.
1. Steep Learning Curve
FFmpeg has no GUI. It only uses the command line. Commands can be long and confusing. A small typo can cause errors. Users must also learn codec, bitrate, and CRF. The official guide is also hard to understand.
2. Performance & Resource Use
Video compression can take a long time. It may take minutes or hours. Strong codecs like H.265 and VP9 are slower than H.264. FFmpeg also uses a lot of CPU power. GPU acceleration can help, but it is hard to set up. It can also increase app size for mobile use.
3. Quality vs. File Size
It is hard to get perfect results. CRF gives good quality, but the file size is not fixed. Bitrate controls size, but quality may change in scenes. Two-pass encoding helps but takes more time. Re-compressing a video can reduce quality.
4. Technical Issues
Some metadata, like timestamps, may not be saved. H.265 may not work on older devices. Some formats need extra support. Resolution changes must follow rules like even numbers, or FFmpeg may fail.
Overall, FFmpeg is very powerful. However, it needs patience, testing, and basic skills to use well.
Part 5. GUI Alternatives to FFmpeg to Compress Videos
FFmpeg compresses video is powerful but hard to use. It has no GUI and relies on command lines. It makes it difficult for beginners. Because of that, many users switch to easier tools. One good option is Tipard Video Converter Ultimate.
It offers a dedicated video compressor with AI techniques for smart compression. It can compress videos while keeping high quality. In addition, it supports level-3 hardware acceleration for faster processing and quick video editing.
Key Features:
- Supports GPU acceleration for faster video processing.
- Offers a wide range of formats and ready-to-use presets.
- Provides strong customization options for compression settings.
- Converts 8K, 5K, 4K, and HD videos to various formats.
- Includes editing tools like crop, rotate, trim, watermark, collage, and filters.
Step 1 First, download and install Tipard Video Converter Ultimate by clicking the Download button below.
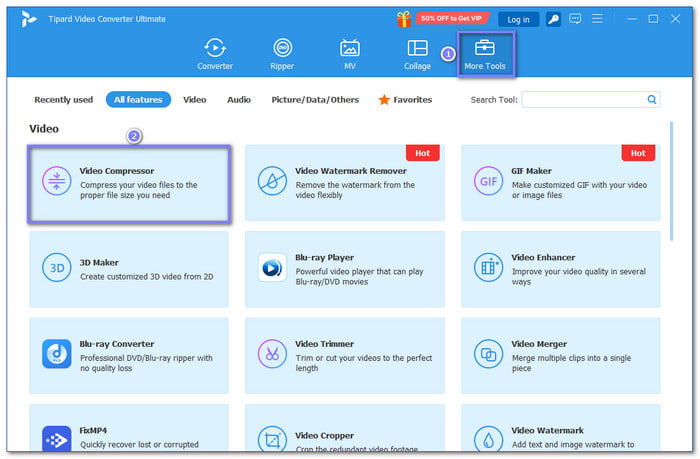
Step 2 On the main screen, click the More Tools tab. Then, choose the Video Compressor feature.
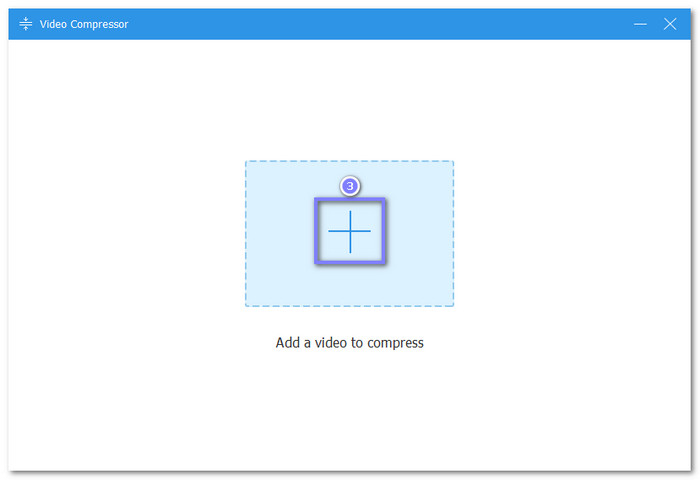
Step 3 Next, click Add to upload your video. You can select the file from your local folder and open it.
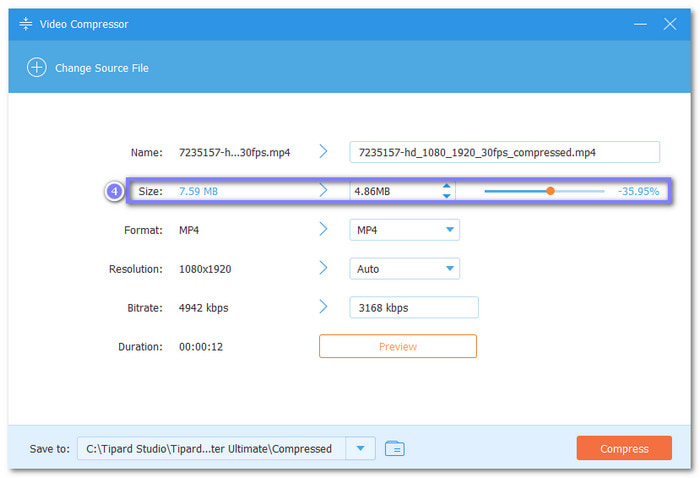
Step 4 To reduce the file size, click the Down Arrow button or drag the Slider toward the left side. You can also change the file name, format, and resolution if you need to.
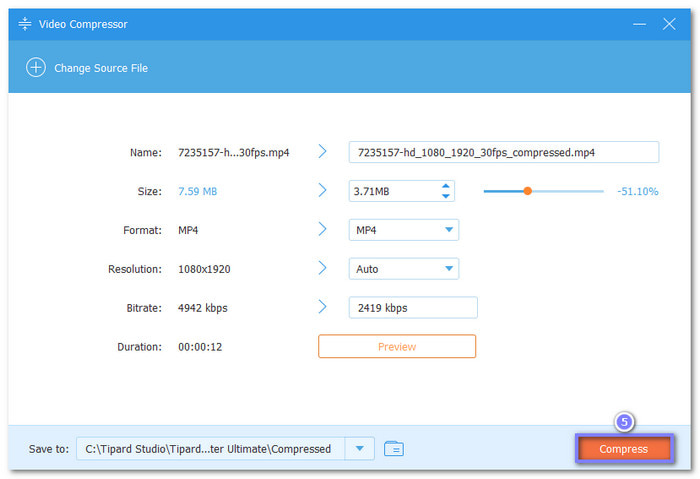
Step 5 Once set the size you want, click the Compress button. Tipard Video Converter Ultimate will start compressing your video and save it to your computer.
Part 6. FAQs of FFmpeg Video Compression
How to lower video resolution in FFmpeg?
You can lower the resolution using the scale filter. It reduces video size by changing dimensions, like 1080p to 720p. For example, ffmpeg -i input.mp4 -vf scale=1280:720 output.mp4.
Is it better to zip or compress a video?
It is better to compress the video, not zip it. ZIP does not reduce video size much. FFmpeg compression reduces size by re-encoding the video. It saves more space.
Can I compress an MP4 without losing quality?
Not fully. Some quality loss always happens. But you can reduce loss using CRF around 18 to 23. Lower CRF gives better quality but larger files.
Conclusion
How's your experience with compressing video with FFmpeg? If it feels hard for you, you can switch to Tipard Video Converter Ultimate. You can resize your file by just clicking the arrow-down or by using the slider. That is more easy, right? No command lines needed!
More Reading

About the Author
