Windows has many built-in tools to make work easier, and one of the most useful is the Windows Snipping Tool, which we will talk about in this write-up. These include features, performance, advantages, and disadvantages.
Not only that, but this write-up will also list common problems users face and provide the best solutions. You will also see some alternatives, which you can freely try if you are open to trying other tools.
Part 1. Features & In-Depth Review of Windows Snipping Tool
You probably know the Windows Snipping Tool as a handy way to take screenshots. But do you know its full potential? If not, please read on to discover its core features and learn how they can help you capture and edit screenshots more efficiently.
1. Modes of Capture
The Snipping Tool has four main ways to capture your screen, and you need to be aware that each one fits different needs.
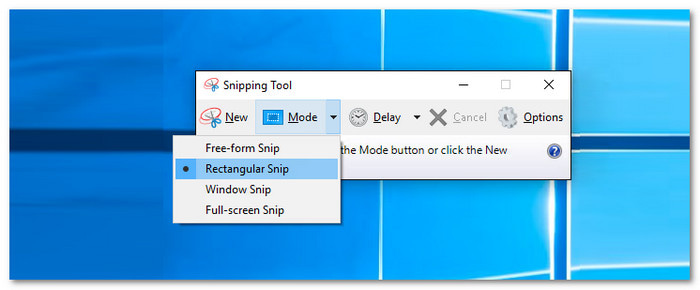
- Rectangular Snip: It is the most common mode. You draw a rectangle around what you want to capture. It is perfect for capturing a part of a webpage or document.
- Free-form Snip: Free-form lets you draw any shape you like. It is good when you do not need a perfect rectangle. For example, you can cut out an image with a weird shape.
- Window Snip: This mode captures a full window. You just click on the window, and it saves everything inside it. It is helpful for apps, games, or chat windows.
- Fullscreen Snip: Fullscreen takes a screenshot of your whole screen. It is the fastest way to capture everything on your display. It is recommended for tutorials or sharing full views.
2. The Game-Changer: Text Actions (OCR) in Windows 11
Windows 11 added a smart feature in the Snipping Tool called Text Actions. This OCR (Optical Character Recognition) function lets you capture text directly from your screenshots in Windows 11. It makes it easy to extract and use text from any image quickly.
How it works:
After you take a screenshot, you can click the text button. It automatically finds any text in your image. You can then copy, search, or translate it.
Accuracy & Performance:
The OCR (Optical Character Recognition) works well with clear text. Printed text is almost always correct. Handwriting or blurry text might be harder to read. Overall, it is fast and reliable.
Use Case:
It is great for students, teachers, readers, or anyone who wants to save text quickly. You can grab text from a book, webpage, or image without typing it yourself.
3. Editing and Annotating Capabilities
The Snipping Tool is not just for screenshots. It also lets you edit and annotate your captures easily. You can highlight parts of the image, draw lines, or add text. You can even crop the image to focus on what matters.
Part 2. Usability, Performance & Verdict
The Snipping Tool is built for simple screenshots, but does it really help in daily work? Let us look at its usability, performance and see if it is worth using.
1. Speed, Shortcuts, and Workflow
The Snipping Tool runs and responds fast. You can open it from the Start menu or use the Windows Snipping Tool shortcut (Windows + Shift + S). Once open, you can instantly choose your capture mode. You can switch between Rectangular, Free-form, Window, and Full screen, which is so fast and simple to do. The tool fits nicely into a daily workflow. You can take a screenshot, edit it, copy the text with OCR (Optical Character Recognition), and save or share; all in a few clicks.
2. Snipping Tool: Windows 10 vs. Windows 11
| Feature | Windows 10 | Windows 11 |
|---|---|---|
| User Interface | It only has a simple and old-fashioned interface. | It has a Modern design with dark mode support and rounded edges. |
| Modes of Capture | These are Rectangular, Free-form, Window, and Fullscreen. | These are Rectangular, Free-form, Window, and Fullscreen. |
| Text Recognition | It is not supported. | It can recognize and copy text from images using OCR (Optical Character Recognition). |
| Annotation Tools | It only offers a basic pen and a highlighter. | It offers more tools, including lines, arrows, shapes, and fill/outline options. |
| Auto-Save | You must save manually unless using Win + PrtSc. | The screenshots save automatically to a default folder. |
3. Pros and Cons
Without a doubt, the Snipping Tool on Windows 11/10 is simple, fast, and reliable. It lets you take screenshots in different ways and edit them easily. The OCR (Optical Character Recognition) feature in Windows 11 is really helpful for copying text from images. It also uses shortcuts on your keyboard that save time.
However, it is still basic compared to advanced screenshot programs. Some users may want more drawing or annotation tools. Handwriting recognition with OCR (Optical Character Recognition) is not always perfect. Also, it is only available on Windows, so Mac or Linux users cannot use it.
Part 3. Snipping Tool Not Working: Problems & Solutions
We understand that when the Windows Snipping Tool is not working, it can really be annoying, especially when you need a quick screenshot. But most issues have simple fixes. Below are the two common problems and how you can solve them.
Problem 1: The App won't open or is missing.
It can happen when Windows glitches or the app files get broken. It may also happen after a big Windows update.
Solutions:
• Open Settings > Apps > Apps & Features. Find Snipping Tool, click Advanced Options, and press Reset. It puts the app back to its default state.

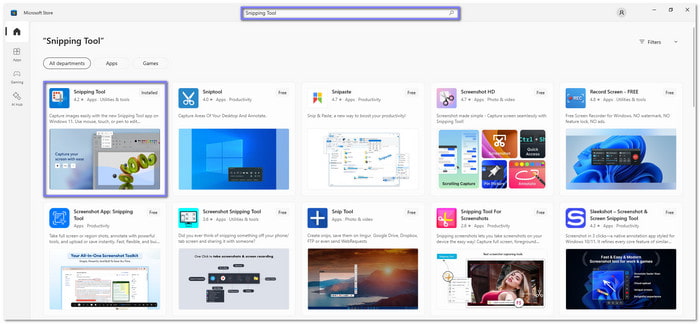
• If it still does not open, you can uninstall and download Snipping Tool for Windows from the Microsoft Store again.
Problem 2: Shortcut (Win + Shift + S) does nothing.
This shortcut is the fastest way to take screenshots. Once it stops working, the issue is usually tied to Windows settings, background processes, or the Snip & Sketch link inside Windows.
Solutions:
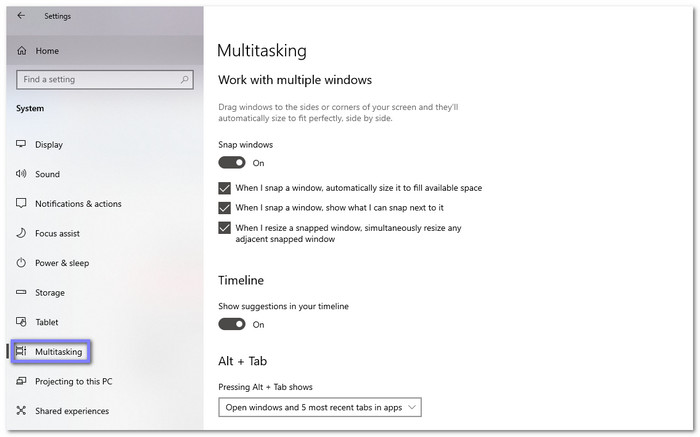
• First, check if the shortcut is turned on. To do that, go to Settings > System > Multitasking, and look for Snipping Tool shortcut settings. Make sure screenshot shortcuts are enabled.
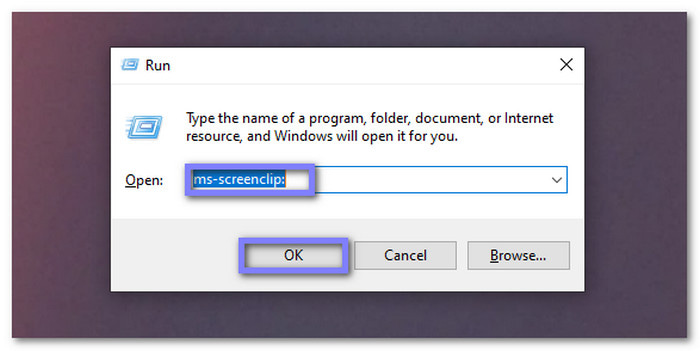
• Another easy fix is to press Win + R, type: ms-screenclip: and hit Enter. It often wakes up the screenshot overlay and makes the shortcut work again.
Part 4. Best Alternatives to Windows Snipping Tool
If the Windows Snipping Tool is still not working or showing up, do not worry. There are other great options ready for you. So, please explore these alternatives now!
1. Tipard Screen Capture
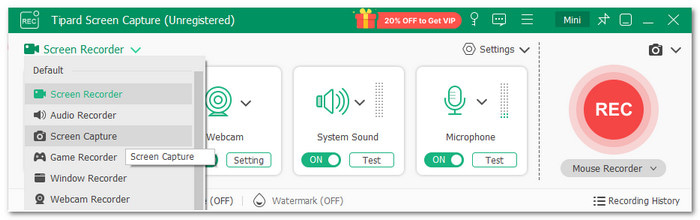
OS: Windows & Mac
The best alternative to the Windows Snipping Tool sits at the top spot, and that is Tipard Screen Capture. It does more than record your screen or sound; it also has a built-in screen capture that lets you grab anything you see.
You can manually set the area you want to capture, whether it is a small section or the entire screen. After you capture it, you can use the annotation tools to add lines, marks, or notes, so your screenshot looks clear and ready to share.
Upsides:
- Save images in multiple formats like PNG, JPG/JPEG, BMP, etc.
- Capture scrolling screenshots easily, even for long webpages or documents.
- Built-in annotation tools let you add text, shapes, and highlights after capturing.
- Pin screenshots to your screen for quick reference or comparison while working.
Downsides:
- The paid license is required for unlimited use and to unlock all advanced screen recording features.
2. Greenshot

OS: Windows
If you are one of the users who prefer light but still work faster, Greenshot might be for you. It is a free Snipping tool alternative on Windows that makes screen capture simple. It is recommended for busy users who deal with images each day. In addition, it helps you stay organized by letting you choose what to capture and where to send your screenshots immediately.
Upsides:
- Export screenshots in multiple formats, including PNG, JPG, BMP, GIF, etc.
- Multiple capture options let you grab specific regions, full windows, or the entire screen.
- Handy annotation tools let you highlight, mark, or blur parts of your screenshot for clarity or privacy.
- Lightweight and easy to use, making it suitable for daily tasks without slowing down your computer.
Downsides:
- No full scrolling screenshot feature, so long webpages or documents require multiple captures.
- Cannot use to screenshot on Mac, and cannot record video, limiting its use for screen recording tasks.
3. ShareX
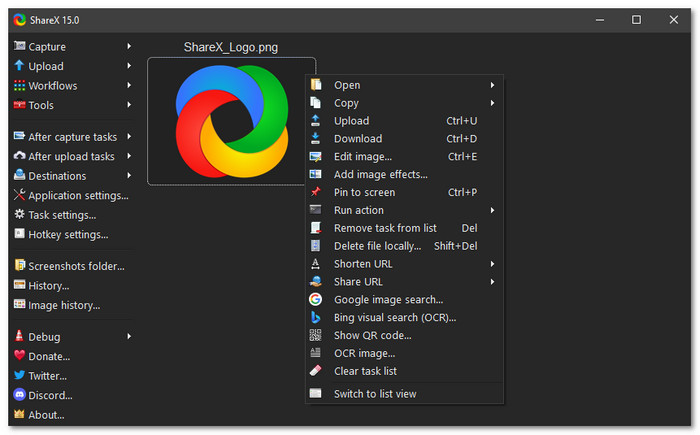
OS: Windows
You may want a tool that feels like it does the work for you, and ShareX comes close. This alternative to the Snipping tool on Windows 10 captures the screen, records it, and even sends your files where you want with one key. It feels like you are pressing a button and watching the tool handle the rest without slowing you down.
Upsides:
- Free and open-source, giving users access to powerful tools without cost.
- Supports scrolling screenshots and can capture regions, windows, or the full screen.
- Supports many upload destinations for files, including cloud services, social media, and email.
Downsides:
- It can feel complex if you only need simple screenshots or quick captures.
- Many menus, options, and settings can be overwhelming for new users at first.
Conclusion
If the Snipping tool still is not showing up, maybe it is the perfect time to consider the alternatives. Tools like Tipard Screen Capture, Greenshot, and ShareX can help.
Among these, Tipard Screen Capture really stands out. It not only has a built-in screen capture, but also records screen, audio, webcam, and even your phone. You can use it for many needs, making it a reliable all-in-one tool.
More Reading


About the Author