
There are various reasons why you need to record your computer screen. It can be:
- To record meetings for more review and clarification.
- To record gameplay.
- To have a copy of a particular discussion.
- For creating engaging tutorials.
- To have a backup file.
If you are interested in learning how to record your screen, then you must read all the content in this tutorial. We will teach you all the most effective methods of recording your computer screen using Windows and Mac. We will also give the recorder's pros and cons. With that, you can get more insights about the screen recorders you will use. Without anything else, start reading this informative guidepost and explore all the feasible instructions for recording your screen.

Part 1. Straightforward Way to Screen Record on Windows and Mac
Do you want to learn how to record your screen on Windows 10, 11, and on Mac computers? In that case, we recommend using Tipard Screen Capture. This screen recording software is perfect if you want to record various content from your screen. It can record videos, gameplays, tutorials, meetings, and more. The best part here is that the recorder has a simple user interface. You can record anything in just a few clicks. You can even record/capture both audio and video, allowing you to have a smooth viewing and listening experience.
What's more, during the recording process, you can also use some functions that can improve your content. You can use the pen functions to write any text or elements on the screen. You can also modify the font color, style, size, and more. You can even insert your logo, making the program ideal. Additionally, Tipard Screen Capture ensures that it gives you a high-quality video, which makes it more reliable. Lastly, you can save your recorded video to various output formats. You can save it as MP4, MKV, WMV, AVI, FLV, M4V, and more. Thus, if you need a powerful video and screen recorder, there is no doubt that Tipard Screen Capture is the best software to utilize.
- The recorder has an intuitive user interface.
- It supports various features to enhance recorded video.
- The program can record the whole screen or a portion of the screen.
- It can produce high-quality videos.
- It can record various content, such as videos, gameplays, tutorials, meetings, etc.

Step 1 Download Tipard Screen Capture
First, you have to download Tipard Screen Capture on your Windows or Mac computers. After that, run it to begin the screen recording procedure.
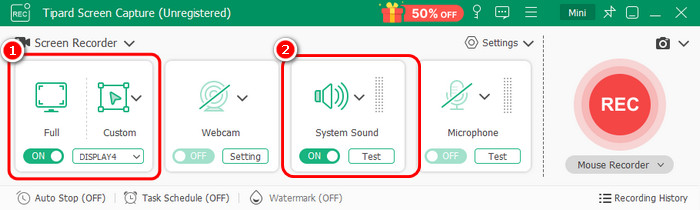
Step 2 Record in Full-Screen or Customize
After opening the main interface, you can now choose whether you want to record your screen in Full mode or record a portion of your screen. You can also turn on the System Sound section to record the audio of your content.
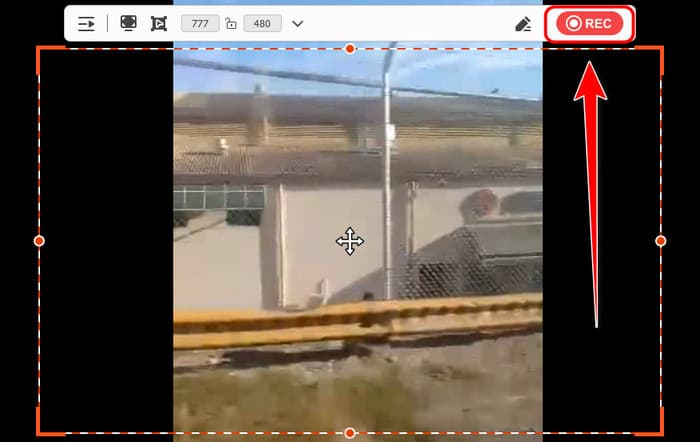
Step 3 Start the Recording Process
Prepare the content you want to record. Then, tap the REC button to start the recording process. Tick the Stop button to finish the screen recording process.
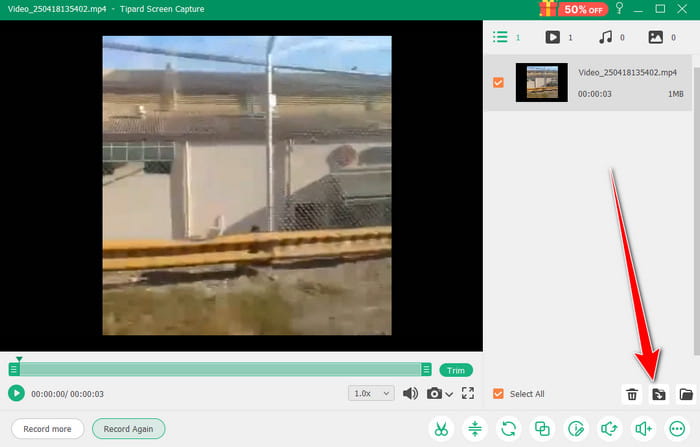
Step 4 Save the Recorded Video
After the recording process, you can now begin saving your recorded media. Go to the bottom left corner of the interface and hit the Import option.
Part 2. How to Record Your Screen on Windows
How to Screen Record on OBS Studio
How to screen record on Windows? Well, for Windows users, there are various screen recorders you can utilize to record your screen, like OBS Studio. This is one of the open-source video screen recorders you can rely on to record any content from your screen. It can even record both audio and video on Windows, which makes it more remarkable. Additionally, OBS has a simple layout, allowing you to get your preferred outcome after the recording process. Aside from that, you can also utilize various features. You can add transitions, fade effects, cuts, and more. You can also live stream your video to different social media platforms. You can also rely on this software to record gameplays, tutorials, meetings, interviews, and more.
However, there are also some drawbacks you must learn about the software. OBS Studio lacks advanced video editing tools. It can't let you improve your video after the recording process. It is also a resource-intensive program. Even though it is open-source, always ensure you have enough storage so you can access it smoothly. But still, if you need a practical screen recorder, you can use this software.
- The screen recorder is open-source and free.
- It is simple to navigate.
- It can record both video and audio.
- The recorder can also save high-quality recorded video.
- The software required a high-spec computer.
- Some features are hard to locate.
- Recorded content takes significant storage space.
- There are no cloud uploads.
To learn how to record the screen on Windows using OBS Studio, see the steps below.
Step 1 Download and install OBS Studio on your Windows. After that, start launching it to begin the recording process.
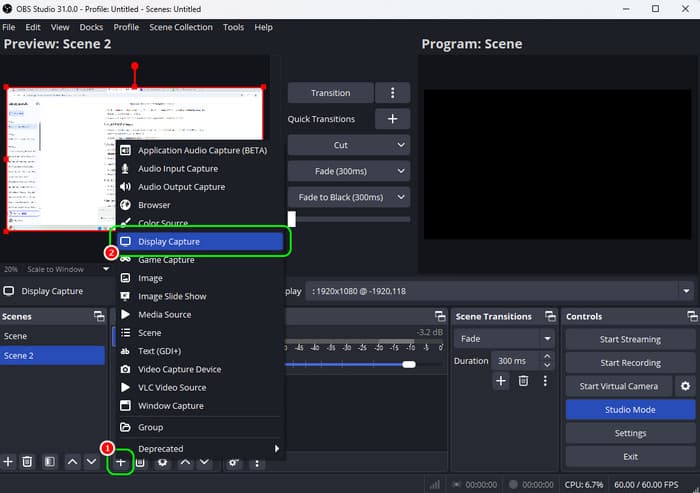
Step 2 From the interface, click the Plus button under the Sources section. Then, click the Display Capture. With that, the content you want to record will appear in the software's Preview section.
Step 3 Click the Audio symbol to ensure that your audio is turned on. You can turn on the audio under the Audio Mixer section.
Step 4 You can now begin the main recording process. Hit the Transition option above to insert your content into the Program section. Then, tick the Start Recording button to begin recording your screen.
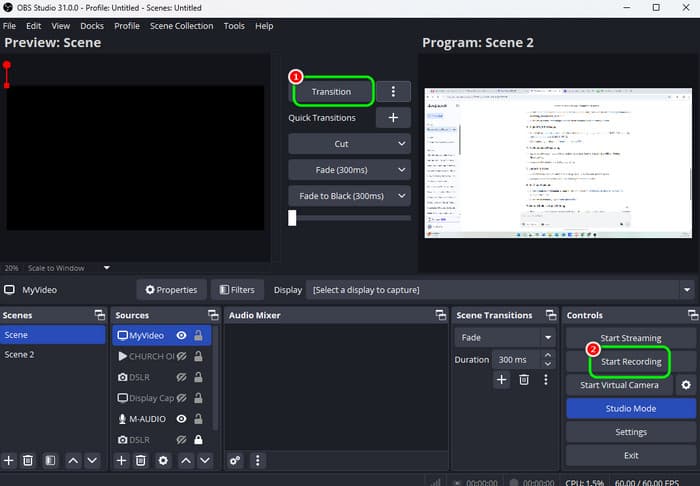
To stop the recording, hit the Stop Recording button.
How to Screen Record on Snipping Tool
If you don't want to download any third-party software, you can use the Snipping Tool. It is among the pre-built software that Windows can offer. This program is not just reliable for taking screenshots. You can also use it to record any video on your screen. It can even record tutorials, gameplays, webcam, and more. The process of recording your screen is also simple, thanks to its comprehensive user interface. In addition to that, it is also capable of recording streaming videos, making it more powerful. The good thing here is that the Snipping Tool can also give its trimming feature. This feature allows you to cut and trim unwanted parts from your recorded video. The only drawback here is that the software is incapable of providing more basic and advanced editing tools. So, if you need to improve your recorded video, you have to use a separate video editing program.
- The tool has a simple user interface.
- It supports shortcut keys to record the screen easily.
- It can give the user a satisfying video quality.
- The program can offer its trimmer feature to trim and cut unnecessary parts from the video.
- The recorder has limited editing features.
- There are times when the recorder is not performing well.
- It can only save the recorded video in MP4 format.
- The program can only record short clips.
To learn how to video record your screen, follow the methods below.
Step 1 Launch the Snipping Tool on your Windows. After that, go to the top interface and hit the Video button. After that, ensure that the video you want to record is already prepared.
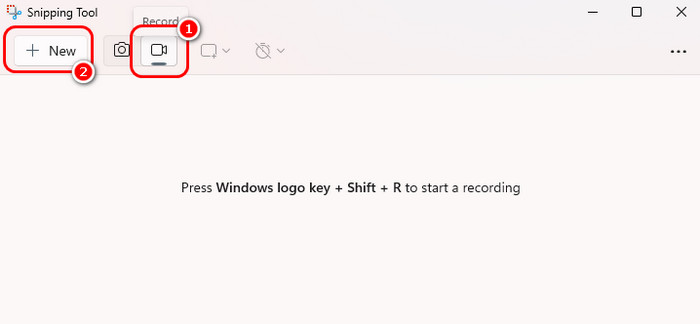
After that, click the New button to proceed to the video you want to record. Then, hit Start to begin the recording process.
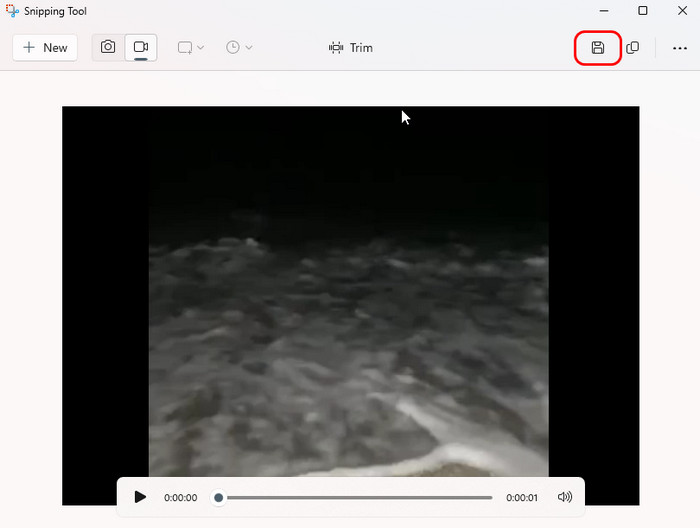
Step 2 With that, you can now record the content from your screen. To stop the recording process, you have to click the Stop button. You can also utilize the Trim feature to trim and cut the unwanted parts from your videos.
Step 3 For the last process, you have to save your recorded video. Go to the top interface and click the Save button. Once done, you can now play your video from your folder.
Part 3. How to Record Your Screen on Mac
If you want to learn how to screen record on Mac, we suggest using the QuickTime Player. As we all know, it is an excellent multimedia player you can access on a Mac. But if you are going to explore its features more, you will find out that it is also capable of recording videos from the screen. What we like here is that you can navigate all the functions you need from this software since it has an easy-to-navigate user interface, perfect for non-professional users. Plus, it can also offer its trimmer tool. With the help of this tool, you can effectively remove unnecessary parts from your video. The only disadvantage of this software is that it doesn't have numerous editing features. So, if you want to enhance your recorded file, it would be better to look for excellent video editing software.
- The software is pre-built, so you don't have to download any third-party program on your Mac.
- Its user interface is simple to follow.
- It lets you record your whole screen or a portion of your screen.
- The software doesn't have enough editing tools to tweak and improve the recorded video.
- It is an unsuitable recorder if you want to produce a professional-grade recorded video.
If you want to start learning how to record screens on a Mac, follow the steps below.
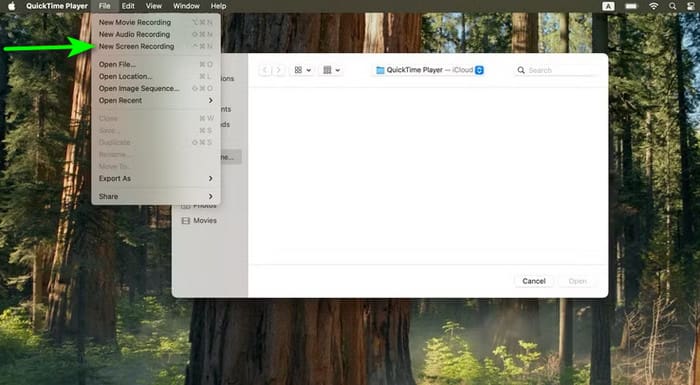
Step 1 Launch the QuickTime Player on your Mac. After that, go to the File menu and hit the New Screen Recording option. With that, you will have various functions on your screen.
Step 2 Then, you can now choose if you want to record your whole screen or customize it. After that, hit Record to begin the process.
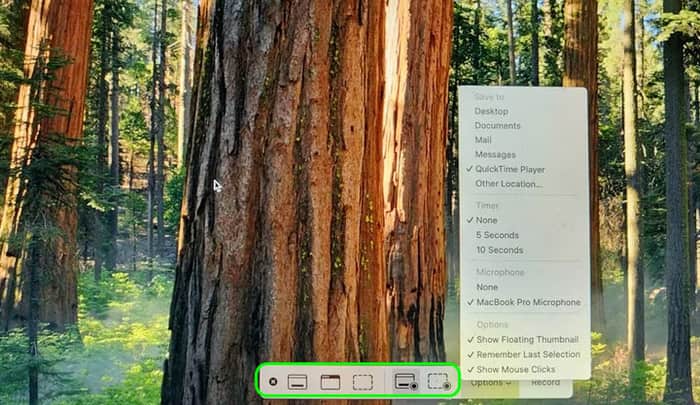
Hit the Stop symbol to finish the recording process.
Conclusion
If you want to learn how to screen record on Windows and Mac, you can rely on this tutorial. We provided various instructions you can follow to achieve your preferred result. Also, if you want the most powerful recorder with the easiest way to record your screen, use Tipard Screen Capture. It can give you a smooth and straightforward recording procedure, making it an ideal program for users.
More Reading


About the Author
