
Knowing how to screenshot on a Mac helps you save what you see on your screen fast. You can snap a full screen, a window, or a small part. It is useful for work, school, or daily use. The Mac has built-in tools that make this task simple. You can also use apps that give more features and control. There is no need for long steps or extra setup.
Part 1: Built-in Method to Screenshot on Mac
It is fast and easy to take a screenshot on a Mac when you understand the correct shortcuts. You have options to take the entire screen, a window, or even a section of the screen without having to install any other software. All the methods are useful, and you should be aware of them all to be able to take screenshots more quicker and more accurately.
Method 1: Full Screen Capture
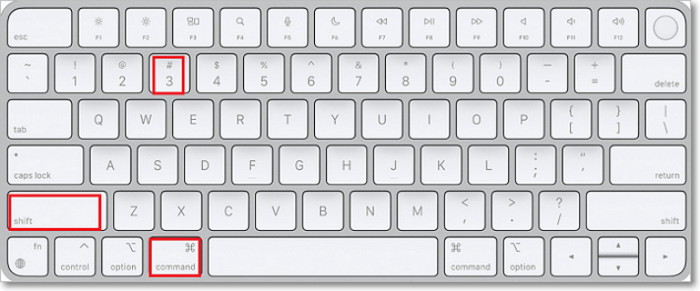
To take a snapshot of your entire screen, press Command, Shift, and 3 together. This Mac screenshot shortcut instantly saves a copy of everything on your display. You will get to hear the clicking of a camera, and the image will show on your desktop. It is the quickest method to take a picture of your entire screen in cases you wish to show or store what you are viewing.
Method 2: Selective Screen Capture
Step 1 If you want to capture only a part of your screen, press Command, Shift, and 4 at the same time.
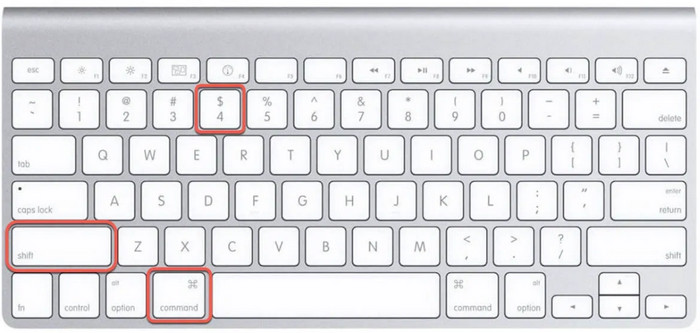
Step 2 Your pointer will turn into a crosshair. Click and drag to highlight the area you want, then release to take the shot. You can also use extra options with this shortcut.
Tapping the Spacebar changes the crosshair into a camera icon, which lets you click on any open window to capture it neatly with a white border and drop shadow. If you hold the Spacebar after dragging, you can move your selected area without changing its size.
Holding the Shift key after dragging lets you adjust one side of your selection at a time for better precision.
Method 3: Screenshot Toolbar
For those who want more features, learning how to take a screenshot on Mac with the Command, Shift, and 5 shortcut is very useful. When you press these keys, a small panel appears at the bottom of your screen. It lets you capture your full display, a specific window, or a custom area.

You can also record your screen from this same panel. Under the Options menu, you can choose where to save the screenshot, add a short delay, or decide whether to show the mouse pointer. You can even turn off the floating thumbnail preview if you prefer. If the toolbar gets in the way, simply drag it to another spot on your screen.
Part 2: The Easiest Way to Screenshot on Mac
If you want to know how to take a screenshot on a Mac computer, Tipard Screen Capture is the best tool to try. It helps you take clear pictures of your screen with one click. You can grab the entire screen, a window or any area that you desire. Once a shot is taken, you are able to edit the shot by adding text, arrows or other shapes to highlight important sections.
The tool also keeps all your screenshots in one place so that you can find them fast. You can save your images as JPG, PNG, BMP, or GIF. With Tipard Screen Capture, taking and editing screenshots on Mac is quick and easy.
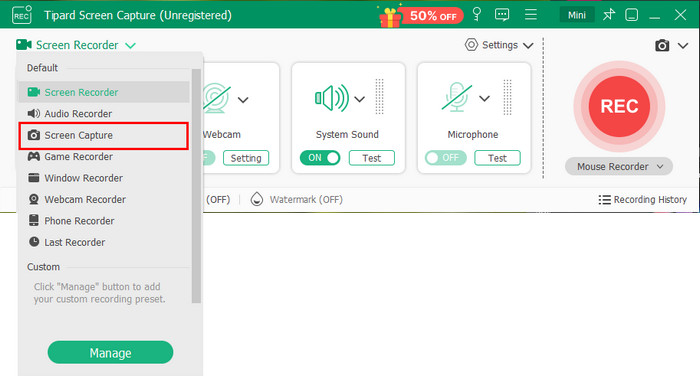
Step 1 Visit the official Tipard site and install Tipard Screen Capture on the Mac. The download button will also be available above to open more quickly. After downloading, use the setup guide to install it on your device. Once installed, open the software and use it to gain access to its main interface.
Step 2 On the main screen, click the Screen Capture option. Your cursor will turn into a crosshair, which means the snipping tool is ready. Move your cursor to the area you want to capture, then click and drag to highlight it. When you discharge your mouse, the screenshot will be taken automatically.
Step 3 After taking the shot, you can use the built-in editor to improve your image. You can add text, arrows, or highlights to draw attention to important parts. You may also crop or resize the image before saving it.
Step 4 Once you are happy with your screenshot, click the Save button.
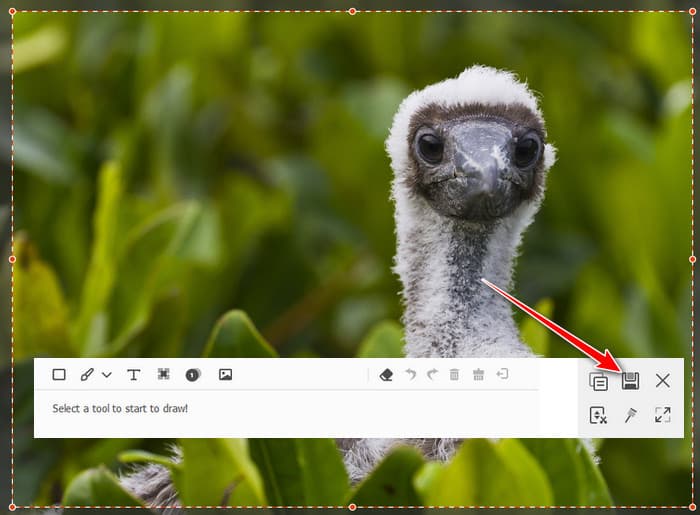
Tipard Screen Capture allows you to select the file location and format for saving. You can export your screenshot as JPG, PNG, BMP, or GIF. This gives you full control over image quality and file type for easy sharing or storage, making it the best snipping tool for Mac.
Part 3: How to Screenshot on Mac with Snagit
If you want a powerful macOS screenshot app that does more than just take pictures, Snagit is a great option. It helps you capture your screen in many ways - full screen, a window, or a selected area. What makes Snagit stand out is its built-in editor, which lets you add notes, shapes, and effects immediately after taking the shot. You can also capture scrolling screens, which is useful for web pages or long documents. It is simple to use but strong enough for both work and school tasks.
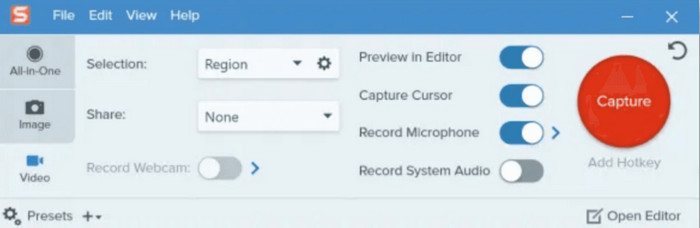
Step 1 Click the Capture button. You can select whether to take a screenshot or record your screen. To take a screenshot, click the camera button. You can decide to take a snap of the entire screen, a window, or a specified area by dragging your mouse.
Step 2 After capturing, the image will open in Snagit Editor. Here, you can add arrows, shapes, text, or highlights to mark key details. You can also crop, resize, or blur parts of the image to fit your needs.
Step 3 When finished, click File and select Save As to save your screenshot.
Snagit supports different formats, including PNG and JPG, making the printscreen on Mac and Windows effective. You can also share your screenshot directly to apps like Slack, Email, or Google Drive right from Snagit's menu.
Part 4: How to Screenshot on Mac with Zight
Zight is one of the best tools if you want more control over your screenshots. It is simple, fast, and made for people who need to capture and share images every day. You can take a full-screen shot or focus on one part of your screen. It also lets you edit, mark, and organize your captures right away. This makes it a great choice for those who want to learn how to print a screenshot on a Mac without using many apps.
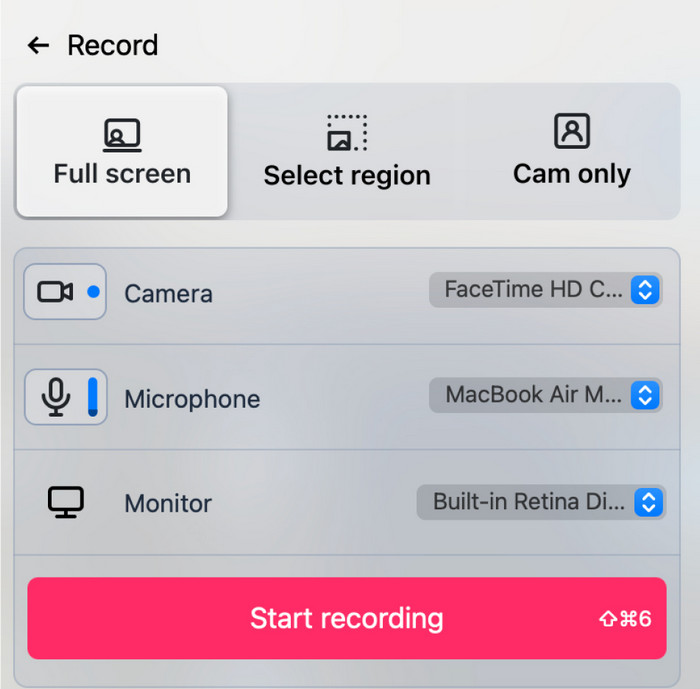
Step 1 On the main screen, click the Screenshot button. You can also press Command + Shift + 5 to start capturing. Choose whether to take a full-screen shot or just a selected area.
Step 2 Once the screenshot is taken, Zight will open the editor. Here, you can add text, arrows, or shapes to highlight details. You can even crop or resize the image before saving it.
Step 3 Click Save or Share to export your screenshot. You can duplicate it to the clipboard, download it, or upload it to your Zight account for quick sharing.
Part 5: How to Screenshot on Mac with Screen Studio
Screen Studio is an advanced tool for Mac users who often record their screen and want professional-looking results. It is known for smooth motion, clean visuals, and easy editing options. You can also use it to capture high-quality frames from your videos, which works great if you need detailed screenshots. Plus, it lets you refine your image by trimming unwanted parts, ideal if you want to learn how to crop a screenshot on Mac without extra tools.
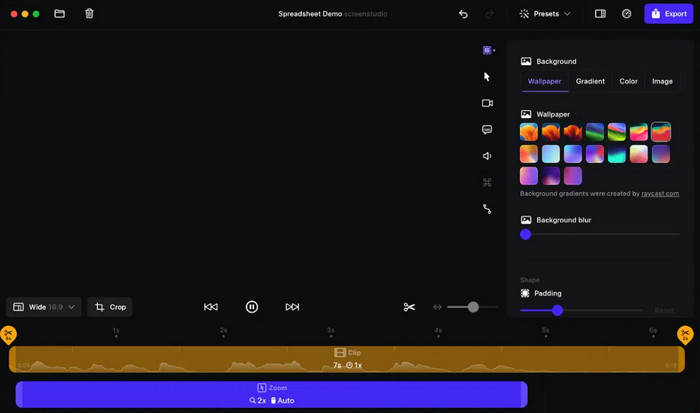
Step 1 Record your screen or a specific window you want to capture.
Step 2 Pause the video at the frame you wish to save as an image.
Step 3 The frame can be exported and edited in Screen Studio, which offers a default editor to crop and adjust the frame and finally save.
Conclusion
Taking screenshots on a Mac is simple when you know the right tools. You can use built-in shortcuts or apps like Tipard Screen Capture, Snagit, Zight, and Screen Studio. Each one makes it easy to capture your full screen, a window, or a part of it. After taking a screenshot, you may ask, Where do screenshots go on Mac? By default, they are saved on your Desktop. With these methods, you can capture, edit, and find your screenshots quickly and easily.
More Reading


About the Author
