Record Your iOS: How to Screen Record on iPad and iPhone with Complete Steps
Everyone has an idea of the functionalities of Apple devices, particularly the iPad and iPhone. These two devices are actually one of the high-ends or, should we say, the aces of the Apple company. It is why many Apple patronages see their need to possess both, for they gain extra confidence in their mobile tasks to fulfill excellently. Bloggers are the perfect examples of this. Aside from their professional cameras for their video recording, they also pick iPhones as their top choice to be their extra camera. Nobody can argue with that since everyone knows the clarity of iPhone cameras and their high-definition screen display. In line with this, we want to give you the extra feature of iOS, which is screen recording. This is why we prepared the complete guidelines on how to record screens on iPhones and iPads. Thus, get ready and seek this perfect guide when reading the entire article below.

Part 1. How to Screen Record on iPhone the Default Way
You can use two different methods to record your screen on your iPhone. Firstly, you can undergo the default way using the built-in recording tool, or the second option is by acquiring and utilizing a third-party tool. However, we are quite sure you will more or less choose to use the built-in screen recorder for your iPhone. Why not? No one would want to install anything on their precious phone if, in the first place, it is not needed. And, after all, this built-in screen recorder is safe enough to convince you to be satisfied. Furthermore, to assist you in utilizing the screen recorder, we prepared the guidelines for iOS 18 version. Hence, here are the steps you need to learn for your screen recording task.
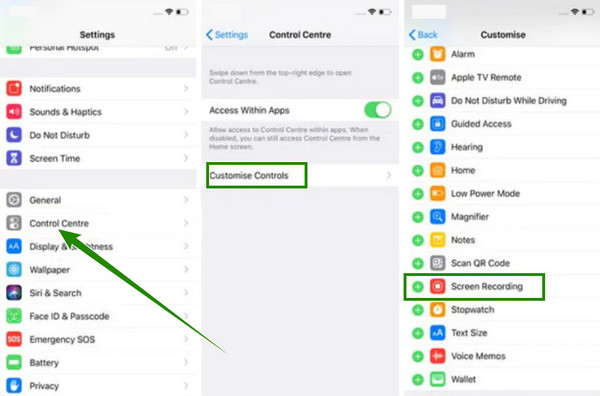
Step 1First and foremost, you have to make sure that the screen recorder is already added to your Control Center. To check, you can go to the Settings app and look for the Control center tab. Then, tap the Customize Controls option on the next screen page to go directly to the Customize page. From there, tap the Plus icon of the Screen Recording tool.
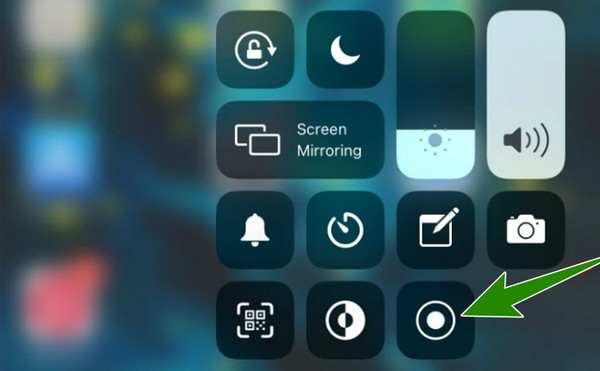
Step 2Once the iPhone's screen capture tool is added, you can now access it easily. On your home screen, swipe your finger from the top to bottom to access the Control Center. Then, when you see the icon of the Screen Recording tool, tap it. After that, a prompt will appear, where you can turn on the Mic and tap the Start Recording button. You will know it is recording because of the red time icon on top of your screen.
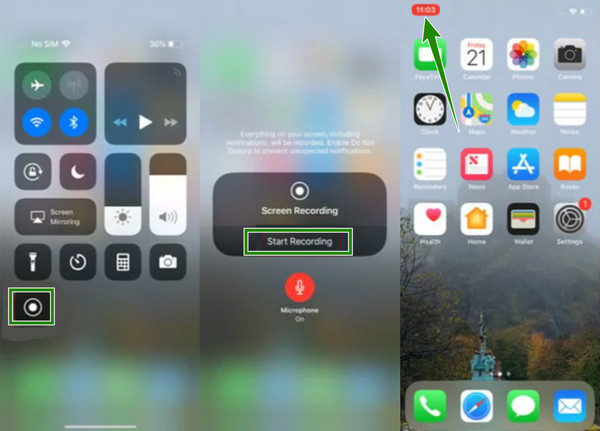
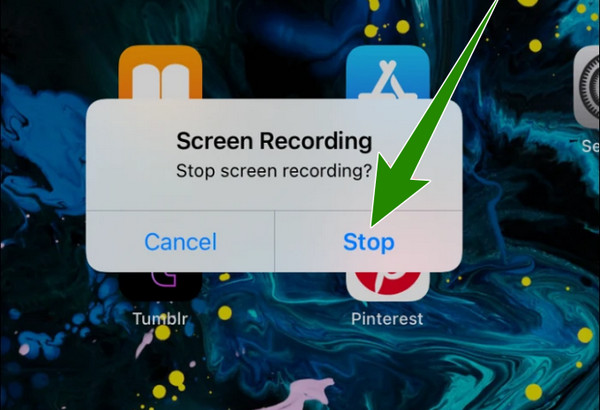
Step 3If you want to stop the recording, tap the red icon and then tap the Stop button on the popped-up window. Afterward, a prompt will say that your recorded file is saved to your Photos app. Feel free to check it.
Part 2. Default Way of Recording Screen on iPad
Just like on iPhones, iPads also come with the same built-in screen recorder that you can use for free. What makes it more special is that the iPad's screen capture has additional features that are rarely seen on iPhones. Such additional features include the integrations that you can choose when you are about to record your screen. For example, in the recorder of an iPad, you can choose the location where you want to save your recordings, such as in Photos, Meet, etc. Likewise, you can also decide to turn on your device's built-in Mic to be included in the screen recording. In addition, as part of the advantages of the iPad's built-in recorder, it helps you capture the best scenes and grab them with its screenshots.
However, you won't be happy when you try to upscale or shrink the screen recording, for it will lose its quality. Although the process of iPad is identical on the iPhone, still, allow us to present you with the complete steps on how to screen record on iPad below.
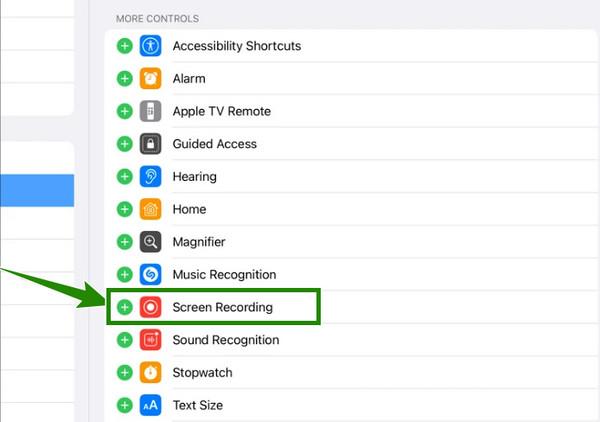
Step 1Launch the Settings app of your iPad, and tap the Control center option to access. After that, the menu of the said option will appear on the screen's right side. Now, scroll down to see the More Controls option, then on the next screen, look for the Screen Recording tool and tap it to include it in the Control Center.
Step 2After that, you can now begin recording the screen. First, be sure that your iPad is not locked, then swipe the screen down or pull the screen down to access the Control Center. Once accessed, tap the Screen Recording tool added there, just how to do screen recording on iPhone. This will prompt you for the recording countdown to begin once you start it.
Step 3Likewise, while the screen is on record, a red icon indicator will appear at the top part of your screen. Now, tap it if you want to finish the recording already, then on the small window, tap the Stop button, and see the saved recorded file in your gallery.
Part 3. App to Add Music to Video
Believe it or not, there will be times when you won't be able to use the built-in recorder due to some technical reasons. However, we know how important it is to protect your iOS device from the unprotected apps that you can acquire if not handled properly. Therefore, what will you do if you still don't want to install a third-party app on your iPhone?
Tipard Screen Capture
In that case, we want to introduce you to this Tipard Screen Capture. It is a screen recording software you can acquire on Windows or Mac and be used as an iOS screen recorder. Yes, you can use this software to record your iPhone screen while it is installed on your computer. How? That's with the help of your iPhone's Screen Mirroring built-in feature. Tipard Screen Capture holds many recording tools, such as a recorder for video, audio, game, webcam, window, phone, and others. And you are thinking it right. Through the phone recorder, you can do all the magic regarding your task on your iPhone. What makes it ahead of the other programs is that it is super easy to manage due to its simple yet intuitive interface. In addition, it has no technical process. So, if you are wondering how to put this screen recorder on your iPhone, you can already run it by connecting your iPhone to the same WiFi as your computer.
What's more? While recording the screen, you can also record the system sound and your voice with a noise-canceling feature for the Mic. Not to mention the high quality of outputs for the video display and the sound it produces. On top of that, you can customize the format of the output according to your needs, for it supports numerous kinds. Meanwhile, below are the steps you can follow using the Tipard Screen Capture for this task.
Step 1On your computer device, install Tipard Screen Capture. To do this step quickly, you can click the Download buttons of this iOS screen capture below. Just make sure you click the proper button applicable to your computer's OS./
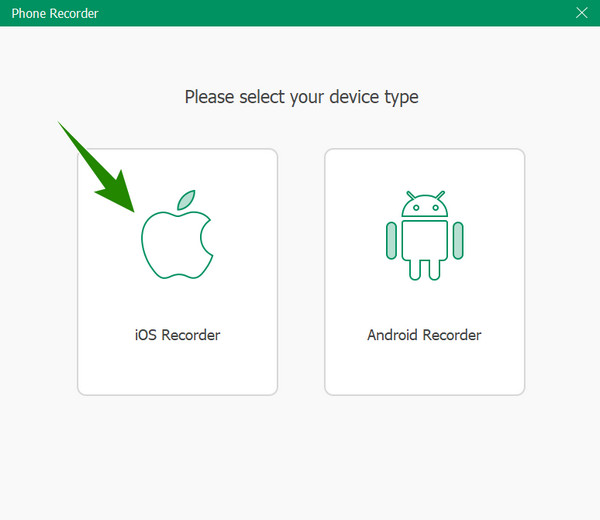
Step 2Once installed, launch the software and click the Phone option among the recorders in the interface. Then, on the next window, click the iOS Recorder option. Then make sure that your iPhone and computer are connected to the same internet.
Step 3Now your iPhone, drag the screen down to access the Control Center. Then, tap the Screen Mirroring tool there that depicts two squares intertwining. Then, tap the Tipard Screen Capture on the popped-up window to connect. Then, proceed to how to do screen recording on the iPhone below.

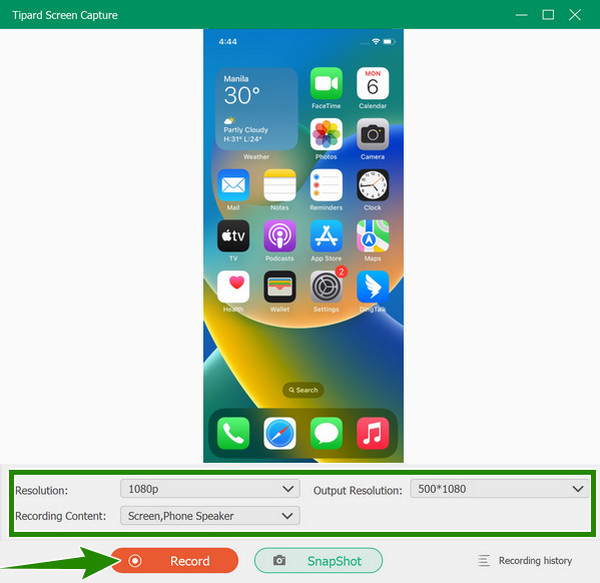
Step 4Going back to the computer software, you can now see on the window that your iPhone is connected to the software. Now, you can modify the presets first before recording. You can adjust the Resolution, Recording Content, and other. After that, you can hit the Record button to begin the screen recording, and you can now open or do anything on your iphone that you want to capture. To finish the recording, you may hit the Stop button from the floating bar you see on your computer screen.
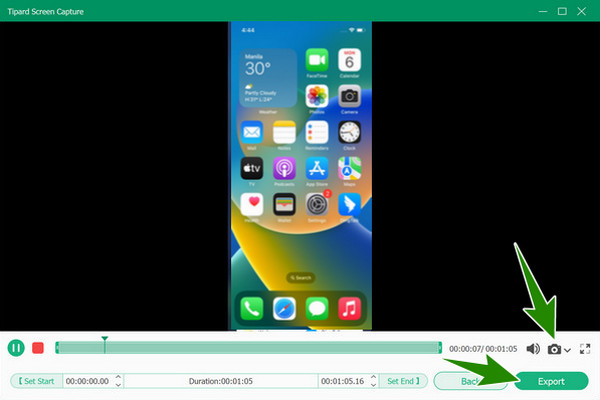
Step 5After that, it will direct you to the exportation window. From there, you can trim the video to eliminate the unwanted parts of it. Also, you can screenshot the parts of the recording you need by clicking the Camera icon. Otherwise, click the Export button to save the video screen captured on your iPhone.
Part 4. FAQs about Screen Recording on iPhone
Can I use iMovie to record the screen of my iPhone?
Unfortunately, iMovie cannot do the screen recording for you. This app is exclusive to video editing and movie creation but lacks the screen recording function.
Can I use the built-in screen recorder of the iPhone to record phone calls?
No. The screen recorder only applies to recording your screen; recording phone calls is a different situation. If you want to record phone calls on your iPhone, you must install a third-party app.
How to get the screen-recorded files from an iPhone?
If you need to transfer the screen-recorded files from your iPhone to another device, you need to transfer them as if you are transferring a regular video. Transferring them via Google Drive or a USB port would be best if you have bulk videos.
Conclusion
The ways to screen record on iPhone and iPad are not that so challenging, but they are kind of demanding to perform. Also, we have proven that the default way or the built-in tool sometimes crashes, leading users to an inconvenient situation. For this reason, Tipard Screen Capture is indeed the problem solver here, which will help you to record your screen in the most convenient, smooth, and safest ways. We hope you see the importance of this screen recorder, its flexibility, robustness, and reliability in recording your different kinds of screens.