
Sometimes, a screenshot is not enough. For example, you want to share a tutorial for a program, create a digital course, or capture a memorable moment from a streaming video. For Dell users, there are a few built-in screen recording features. This tutorial will walk you through several ways to screen record on a Dell computer, laptop, or Chromebook, ensuring you can confidently record your screen and share your experience.

Part 1: How to Screen Record on Dell with Game Bar
Game Bar is the built-in screen recorder on Windows 11/10. By default, it is the Xbox Game Recorder. Currently, Microsoft has migrated it to PCs. If your Dell has been updated to Windows 11 or 10, you can quickly screen-record on your desktop.
- Completely free.
- Run fast.
- Capture system sound and microphone.
- Integrate hardware acceleration.
- Only save recordings in MP4.
- Lack editing features.
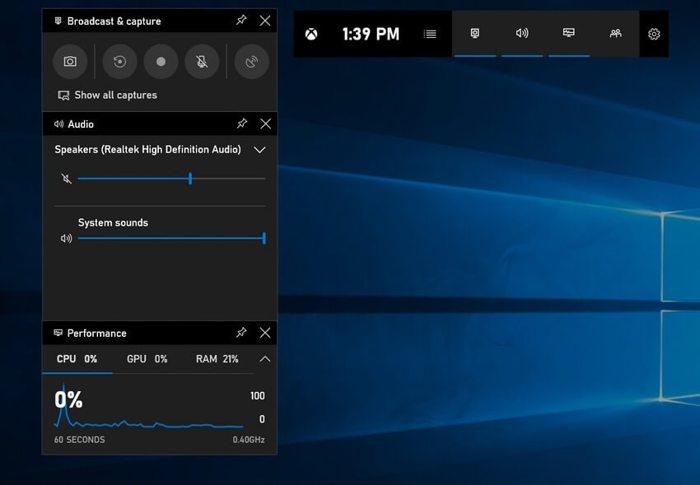
Step 1 Press Windows + G keys on your keyboard to trigger Game Bar.
Step 2 Set the audio settings on the Audio panel.
Step 3 Put everything you want to record on your desktop.
Step 4 Click the Record button to initiate screen recording.
Step 5 To stop recording, click the Stop button in the widget.
Step 6 Navigate to the Captures subfolder in the Videos folder to find the recording.
Part 2: How to Screen Record on a Dell with Snipping Tool
Currently, Microsoft is bringing the Snipping Tool app back to Windows 11. In other words, you can record the screen on a Dell laptop or computer running Windows 11. Ensure the Snipping Tool is updated to version 11.2211.35.0 or later.
- Capture any area on your desktop.
- Lightweight and smooth.
- No limit on recording length.
- Support shortcuts.
- Only available on Windows 11.
- Limited features.
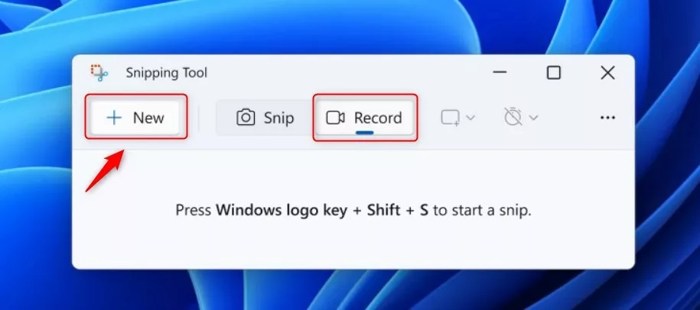
Step 1 Go to the Start menu and open the Snipping Tool app. Or press Windows + Shift + S keys together.
Step 2 Select the Record tool.
Step 3 Click the New button.
Step 4 Select the recording area with your mouse.
Step 5 Next, click the Start button.
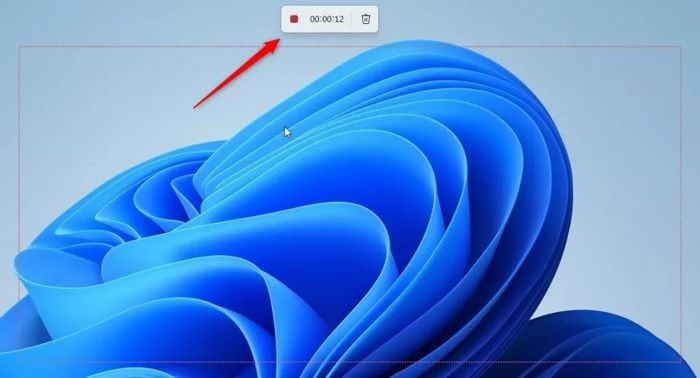
Step 6 When finished, click the Stop recording button on the bar.
Part 3: How to Screen Record on a Dell via PowerPoint
If you are using an old device, MS PowerPoint allows you to screen record on a Dell computer or laptop. Of course, it only offers basic features. Furthermore, this way is available if you record a presentation on a Dell.
- Record the selected area on the Dell.
- Not require extra software.
- Insert screen recordings into presentations.
- Add voiceover.
- Not for long recordings.
- Lack advanced features.
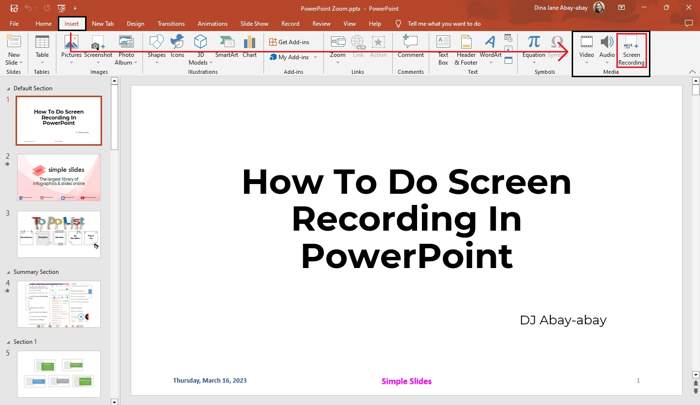
Step 1 Open MS PowerPoint and create or load a presentation.
Step 2 Switch to the Insert tab on the menu bar.
Step 3 Click the Screen Recording button.
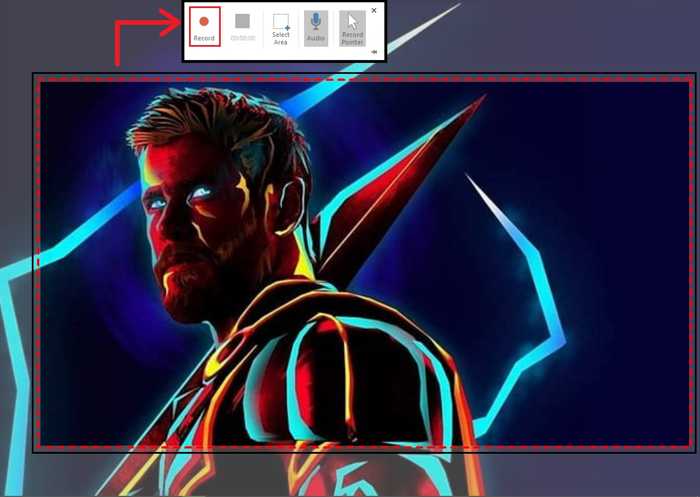
Step 4 Press Select Area on the recording bar and select the desired area.
Step 5 To add voiceover, enable Audio.
Step 6 Click the Record button to start screen recording.
Step 7 To stop recording, press Windows + Shift + Q keys together.
Step 8 The recording will be inserted into the current slide.
Part 4: How to Screen Record on a Dell Chromebook
Dell Chromebooks have built-in screen recording features, too. The preinstalled Screenshot tool lets you capture a partial or full desktop. Plus, Chromebook Screen Capture is available on ChromeOS 89 and newer.
How to Screen Record on a Dell Chromebook
- Record the entire or partial desktop.
- Built into all Dell Chromebooks.
- Work with shortcuts.
- Limited output format.
- Lack of video editing.
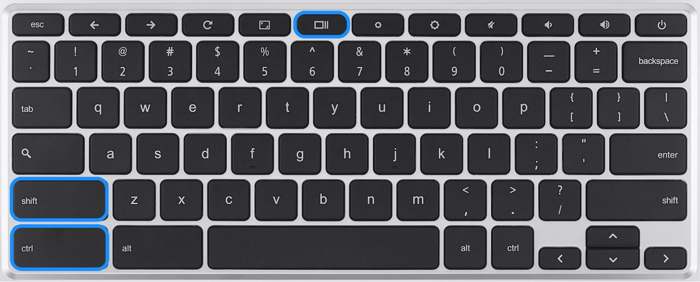
Step 1 Press Shift + Ctrl + Show windows keys together.
Step 2 Click the Screen Record button.
Step 3 Choose a recording mode to initiate recording.
Step 4 When you are finished recording, click Stop recording.
How to Screen Record on a Dell Chromebook
- Preinstalled on ChromeOS.
- Offer options and settings.
- Add voiceover.
- Only work on ChromeOS 89 and newer.
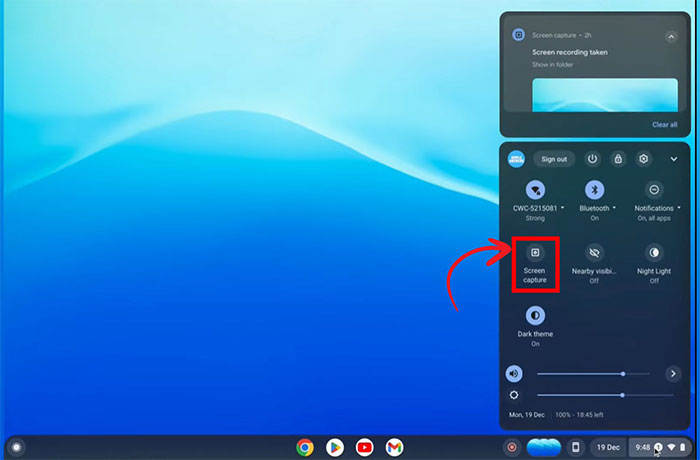
Step 1 Click the Clock button in Quick Settings.
Step 2 Press the Screen Capture button.
Step 3 Choose a mode.
Step 4 Click the Settings button and configure them.
Step 5 Click the Record button to start screen recording on a Dell Chromebook.
Step 6 When finished, click Stop.
Part 5: How to Screen Record on a Dell Without Quality Loss
Another way to screen record on a Dell computer is Tipard Screen Capture. It offers more custom options, flexible settings, advanced features, and video editing. If the built-in tools cannot meet your needs, try the software instead.

- Screen record a Dell desktop without delay or lag.
- Support multiple recording sources, including webcam.
- Export screen recordings in popular video formats.
- Enhance recording quality with AI.
- Preview and edit screen recordings.

How to Screen Record on Your Dell
Step 1 Install the Dell screen recorder
Run the Dell screen recorder after installing it on your PC. There is another version for Mac. Choose the Screen Recorder mode.
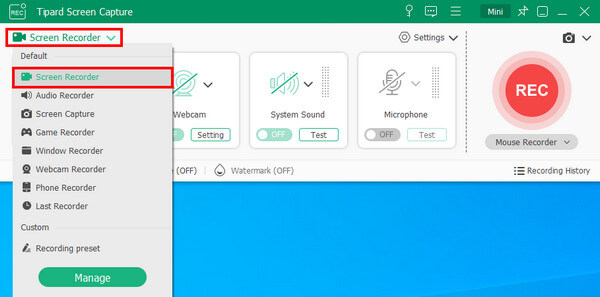
Step 2 Record the Dell screen
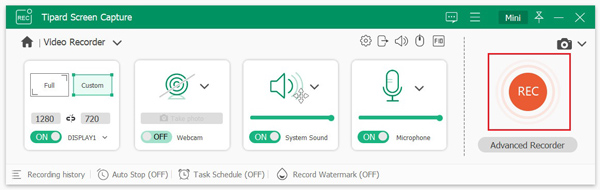
Turn on the Recording Area and set it. Enable System Sound and adjust the volume. To add your reactions to the recording, enable Webcam and Microphone. Click the REC button to start recording the screen on the Dell.
Step 3 Preview screen recording
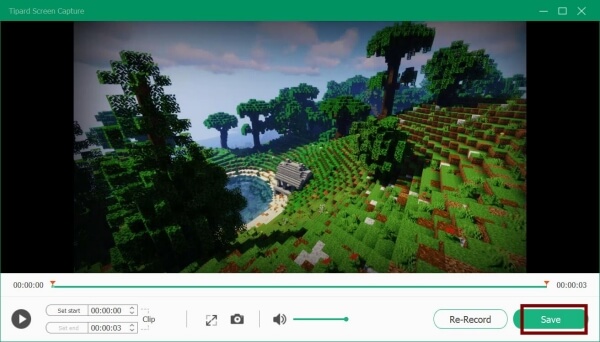
During the process, you can draw on the recording in real time with the toolbar. When it finishes, click the Stop button. Preview the recording. If you are satisfied, click the Save button to export it.
Conclusion
This guide shared six ways to screen record on a Dell laptop, computer, or Chromebook. We explained the available scenarios for each way, including the operating system versions. You can choose an appropriate method and follow the steps to capture a window, a partial screen, or the entire screen on your Dell. If you need more advanced features, we recommend Tipard Screen Capture. It can record your desktop and save it as a video up to 4K resolution.

Record full screen, portion, window, game, and phone seamlessly without lag
100% Clean & Safe
100% Clean & Safe

More Reading



About the Author

 Click here to join the discussion and share your comments