
DVDs hold many great movies and shows, but they are not easy to play on all devices. A good way to fix this is to add a DVD to iTunes. This lets you keep your videos in digital form. Once stored, you can watch them on your Mac, iPhone, or iPad with ease. The task may sound complex, but it is simple with the right steps. In this guide, we will show why you may need it, what tools to prepare, and how to move your DVD files into iTunes.
Part 1. Can You Import DVD Content to iTunes
You cannot play a DVD in iTunes by putting the disc into your computer. The program does not read discs. iTunes only works with digital files in formats such as MP4, MOV, or M4V. These formats are light, easy to store, and play well across Apple devices.
To add a DVD to iTunes library, you must first rip the disc and save the video as one of these supported formats. Ripping refers to transforming the movie into a digital file that is understandable to your computer. After fixing it, you will be able to put the file in iTunes and watch it on a Mac or iPhone or iPad. Such an arrangement will allow you to enjoy your collection at any time without carrying a DVD or a player.
Why Does iTunes Support Only MP4, MOV, and M4V?
iTunes supports MP4, MOV, and M4V because these file types work best with Apple devices. They keep good video quality but do not take up too much space, so that you can play them smoothly on iPhones, iPads, and Macs.
Apple also made iTunes stay within its system. Using these formats only avoids errors and makes syncing across devices simple. M4V is Apple's version of MP4 that can also include DRM, which protects movies and shows you buy from iTunes.
If you want to add a DVD or other video, you must first convert it to one of these formats.
Part 2. Rip DVD to iTunes Supported Formats
You may ask, Can I add a DVD to my iTunes library? The answer is yes, but only if you change the disc into a format iTunes supports. iTunes works best with MP4 and MOV. To do this, you need a ripper tool.
Tipard DVD Ripper is a top choice. It can rip DVDs into MP4 or MOV with clear sound and video. It also supports many encoders, so the quality stays high. The tool has AI features to make videos sharper and editing tools to trim or crop clips. Once the file is prepared, you can insert it into iTunes and play it on any Apple device.
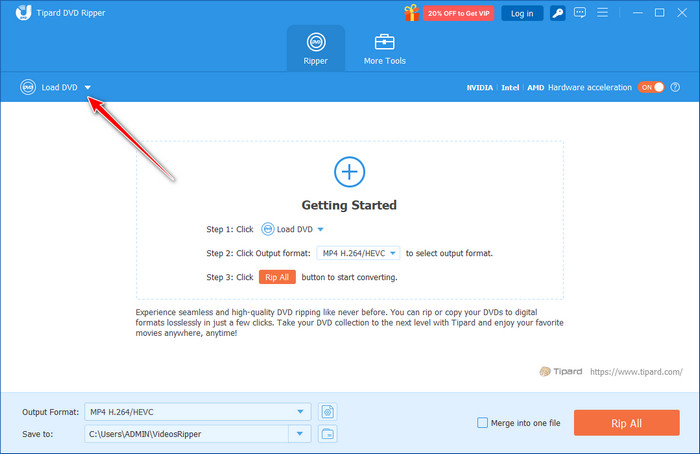
Step 1 Download the DVD ripper from the official site and install it on your computer. Once done, open the tool to get started.
Step 2 Insert the DVD into your computer's disc drive. In the program, click Load DVD at the top menu. The software will scan and display the video content.
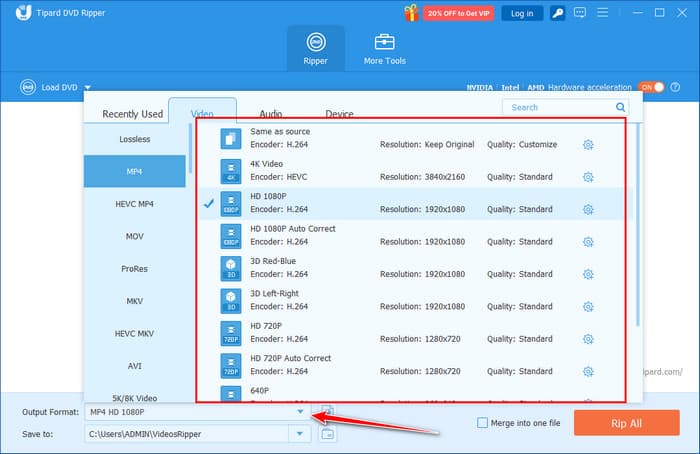
Step 3 Click the Format drop-down menu. Choose MP4 or MOV, since these formats work well in iTunes. For better control, open Custom Profile to fine-tune video quality, resolution, or audio settings.
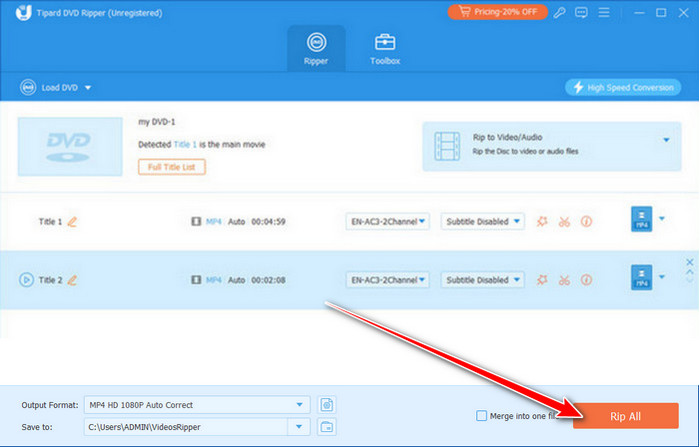
Step 4 When you are ready, click Rip All. Tipard DVD Ripper will turn your DVD into a high-quality digital file.
Once the ripping is done, the video is saved on your computer. From there, you can open it in any video editor on your PC to cut, mix, or add effects. It makes it easy to turn your DVD content and create music video or your own project.
Part 3. Import Converted DVD Files to iTunes Library
Once your DVD is ripped into MP4, MOV, or M4V, you can import it into iTunes. This step is how you move the video from your computer into your iTunes library. Make sure you have the updated version of iTunes installed. An iTunes account and internet access may also be needed.
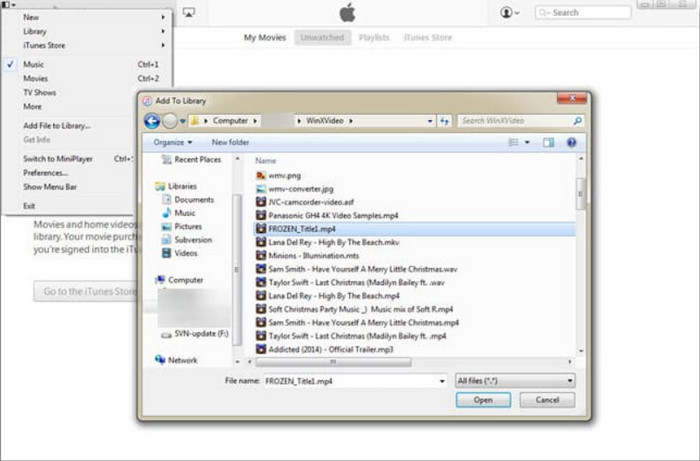
On Windows, press Alt to open the menu bar. Click File, then select Add File to Library or Add Folder to Library if you have many videos in one folder. Choose the converted DVD file and confirm. You can even drag and drop the videotape into the Movies window.
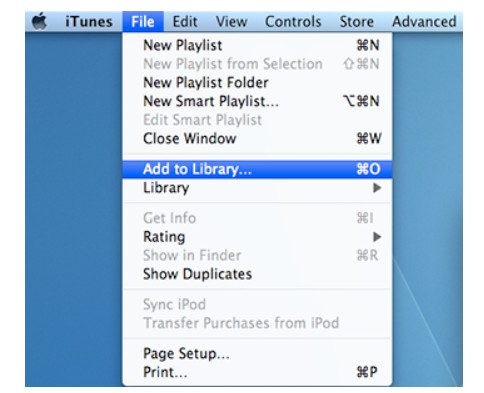
On Mac, go to File > Add to Library. Select the converted video, and iTunes will place it in the Movies category. Drag-and-drop also works on Mac.
Now the video is in your iTunes library. You can find it under Home Videos and sync it with your iPhone, iPad, or iPod using Wi-Fi or a USB cable. It is the final step to add a DVD to your iTunes library and enjoy your collection across all Apple devices.
Part 4. How to Burn a DVD from iTunes Quickly
Sometimes you may want to move your iTunes movies back to a disc. This is useful if you plan to share them, create a backup, or play them on a DVD player. The process is simple when you use the right tools. With a few steps, you can burn iTunes films to DVD and enjoy your media offline anytime.
Step 1 Export the movie from iTunes in MP4 or MOV format. Make sure it is saved on your computer.
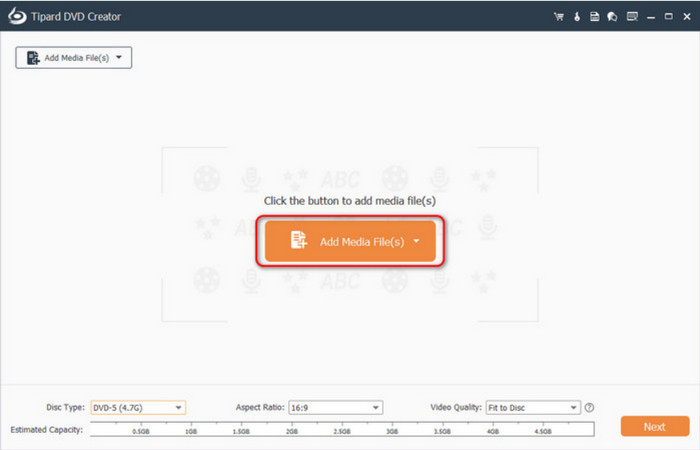
Step 2 Download and install a DVD burning tool like Tipard DVD Creator. Open the program once it is ready.
Step 3 Click Add Media File(s) and select the iTunes movie you saved. You can also drag and drop it into the program. Customize the video if you want. You can add a menu, crop, or adjust basic settings, then click Next.
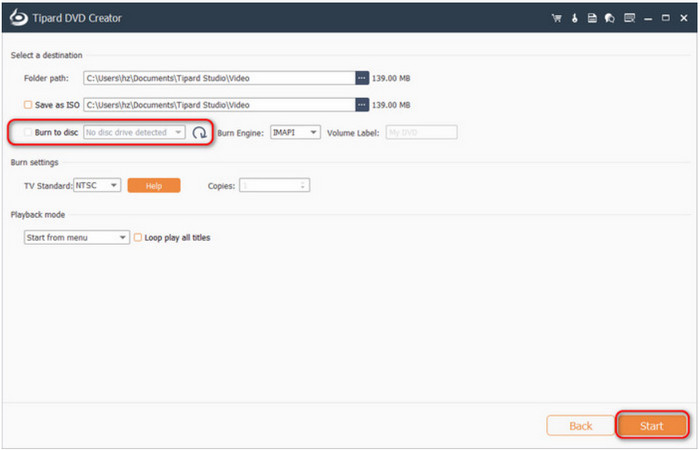
Step 4 Insert an empty DVD into your computer's disc drive. Choose the template and click Burn. Set the Burn to disc with your DVD and click Start.
Now you have a physical copy of your iTunes movie ready to use on any standard DVD player. It is a quick way to keep your media safe and shareable. Whether you want to back up family videos, save your favorite films, or even make vlog content, burning a DVD from iTunes gives you a reliable option.
Conclusion
Turning DVDs into digital files and moving them into iTunes makes your collection easy to enjoy on any Apple device. At the same time, you can also burn an iTunes movie to DVD if you want a backup copy or a disc you can share. Both methods give you more control over how you keep and watch your media. With the right tools, it only takes a few steps to move between discs and digital files, so your favorite movies are always ready when you need them.
More Reading


About the Author
