When it comes to recording videos, it's essential to have a few tricks up your sleeve, as editing can be a lot of work. For example, background noise in the audio can become noticeable and disrupt the entire project. This can affect not only your video-related work but even simple voice recordings. In some cases, it might cost you valuable time and force you to reshoot.
The good news is that you can remove ambient noise from audio using simple tools. In this guide, we'll show you free and premium software that can clean up your recordings in just a few steps.

Part 1. When Do You Need to Remove Background Noise from Audio
Background noise can mess up a good recording. Whether you're working on a podcast, video, or transcription, noise like hums, echoes, or chatter can get in the way. Fixing it makes your audio clearer and easier to work with.
Here are some common situations where removing background noise becomes essential:
1. Podcast & Voice Recording
If you don't have a professional-grade microphone, using your phone might not be the best option for recording in certain places, like at home. If you're vlogging or recording a podcast, poor audio quality can make your videos less engaging and give the impression that they were unprepared. Even if you're skilled at editing, cleaning up the unnecessary noise will take a lot of time, especially when selecting frames to fix the audio.
2. Online Meetings & Calls
Have you ever had to constantly mute and unmute yourself during meetings because of embarrassing and disruptive noises, like barking dogs, traffic sounds, or echoes? These distractions can be a real nuisance and may even force you to leave or call back into your meetings.
3. Video Editing & Production
People who work with video content know how distracting unwanted sounds from interviews, vlogs, or event recordings can be. Background noise can easily pull attention away from the real message. That's why, during post-production, a lot of effort goes into removing these distractions to make sure the final product sounds polished, professional, and truly engaging
4. Transcription Work
For those who work as transcribers, background noise is a major problem that can significantly slow down the transcription process. Since their work needs to be as accurate as possible, muffled voices, static, or overlapping sounds make it much harder to capture every spoken word. Using premium software that utilizes AI to remove background noise can be a great way to address this issue and make the job much easier.
The good news is, fixing this is easier than it seems. In the following sections, we'll walk you through simple tools that help.
Part 2. The Easiest Way to Remove Background Noise from Audio
When choosing the best tool, it's essential to have dedicated software that can effectively remove white noise from audio. The option featured here is one of the easiest to use, with an intuitive interface and simple step-by-step guidance; no steep learning curve required.
Tipard Video Converter Ultimate is one of the most reliable tools for removing background noise from any audio or video file. It supports over 500 file formats, ensuring compatibility with virtually any media type. Its AI-powered noise removal feature makes the process quick and hassle-free. Simply upload your audio or video file, apply the noise remover with a few clicks, and preview the results before exporting.
How to use Tipard Video Converter Ultimate:
Step 1 To get the software, simply click the Free Download button below. Double-click the downloaded file to install it on your computer. Run it afterward.
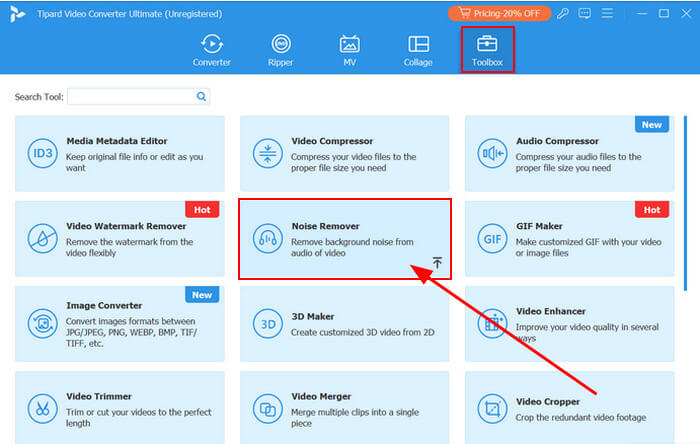
Step 2 On the main interface, click the Toolbox tab. Locate the Noise Remover tool and select it. You'll be redirected to a new window; click the Add button or simply drag and drop your audio or video file into the interface.
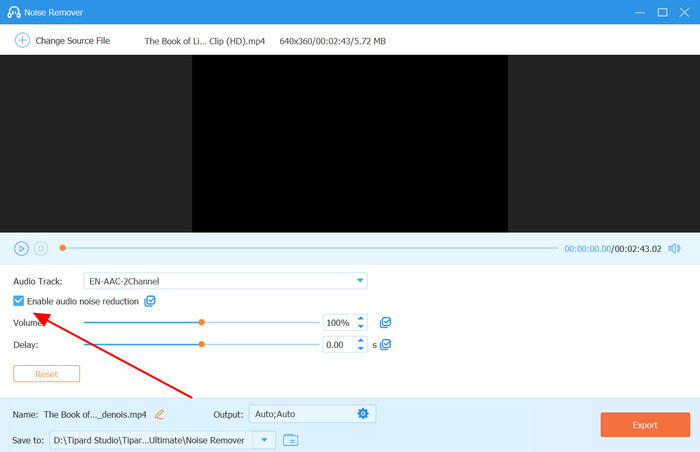
Step 3 Click on the Enable audio noise reduction option. Make sure the checkbox is ticked. Once enabled, all that's left to do is click the Export button to save your file.
The AI-powered noise reduction feature ensures that the process is quick and effective, automatically analyzing and eliminating unwanted sounds from your files. With its drag-and-drop functionality, users don't need to navigate complex menus or settings. It's perfect for those who need a fast, reliable solution for cleaning up audio and video content without unnecessary steps.
Part 3. How to Remove Background Noise in Audacity
Audacity is one of the best free tools to remove noise from audio. Follow these steps to clean up your recording:
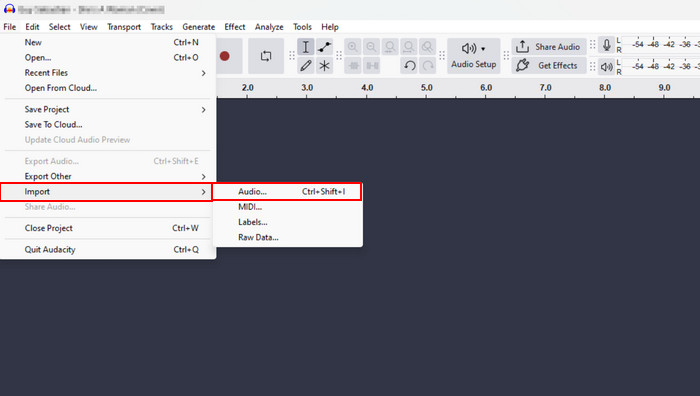
Step 1 Download the software from audacityteam.org and install it on your computer. Once installed, open the program, click on the File menu, and select Import, then choose Audio. Locate and select the audio file you want to edit.
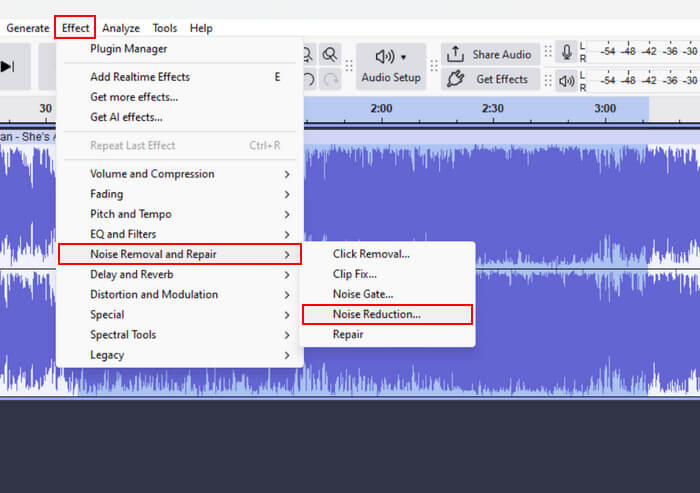
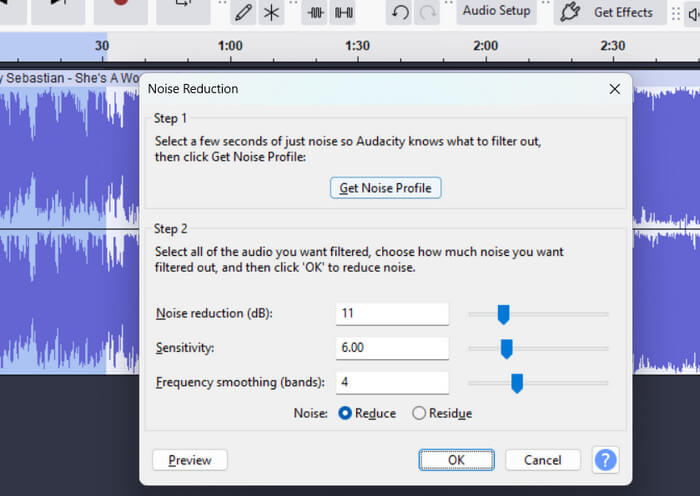
Step 2 Go to the Effect menu, select Noise Removal and Repair, and click on Noise Reduction. In the panel that appears under Step 1, click the Get Noise Profile button. After capturing the noise profile, you can select the part of the audio you want to clean and return to the Noise Reduction panel. From there, adjust the Noise Reduction (dB), Sensitivity, and Frequency Smoothing (bands) settings to your preference.
Step 3 Choose whether you want to Reduce the noise or remove the Residual noise by selecting the appropriate option. Once you're satisfied with the settings, click the OK button to apply the changes.
Audacity provides an intuitive and user-friendly interface, making noise reduction simple even for first-time users. The process is straightforward, offering clear controls to adjust the level of noise reduction. The software allows for great flexibility, enabling users to focus on specific parts of the audio they want to clean. While it may not be as feature-packed as some paid tools, Audacity offers excellent value for a free tool and is perfect for anyone looking to improve the quality of their audio without spending money.
Part 4. How to Remove Noise from Audio in Adobe Audition
For those working with high-end audio editing, Adobe Audition offers advanced noise-reduction features that deliver professional results. It's often used by video editors, sound designers, and content creators.
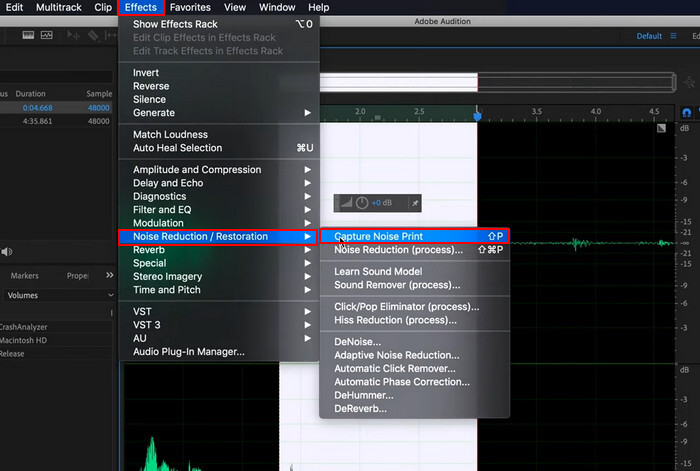
Step 1 Open Adobe Audition and import your audio file. In the editor, select the portion of the audio that contains the background noise. Then, click on the Effects menu, go to Noise Reduction/Restoration, and select Capture Noise Print to identify and label the selected noise as unwanted.
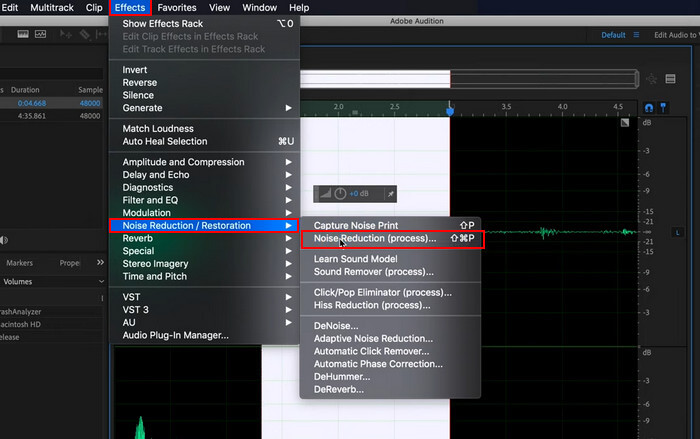
Step 2 Go back to the Effects menu, select Noise Reduction/Restoration, and this time choose Noise Reduction (Process). In the panel that appears, you will see a graph of the audio. Click the Apply button to proceed with the noise reduction.
The procedure is expected to be highly customized, offering precise control over how much noise is reduced at a professional level. The interface of this software is designed primarily for those familiar with audio editing, both for intuitive beginners and highly proficient users.
Part 5. How to Remove Background Noise in Premiere Pro
Premiere Pro is Adobe's professional video editing software. It also includes tools to improve audio, like adding sound effects and the Denoise effect, which helps reduce background noise in video or audio. Here's how to use it:
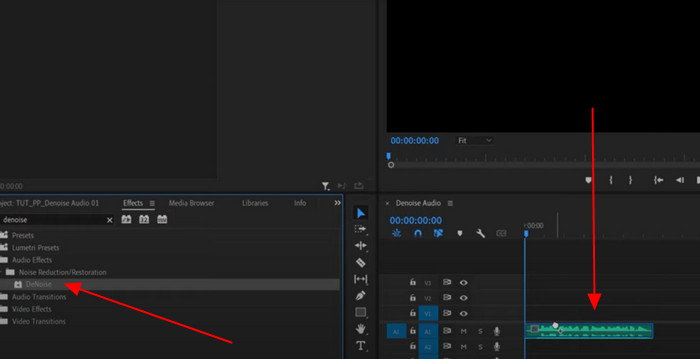
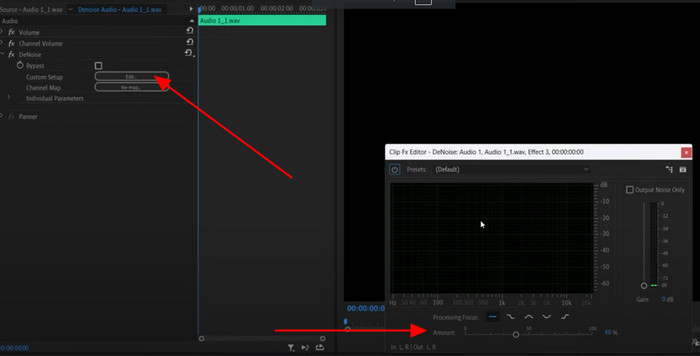
Step 1 Open the software and import your video or audio file. In the Effects panel on the lower-left corner, search for Denoise. Once found, drag and drop the Denoise effect onto the audio layer.
Step 2 In the upper-left area where the Denoise effect controls are located, click the Edit button next to Custom Setup under the Denoise effect. A new panel will appear, allowing you to adjust the Denoise Amount based on your preference.
Premiere Pro offers an easy-to-use toolset for video editors who need an audio enhancer without leaving the platform. This tool is particularly helpful for editors who are already familiar with Premiere Pro's interface and workflow.
Conclusion
Removing background noise from audio can be tricky without the right tools. Some software can be overwhelming, with too many features that make it hard to navigate, especially for regular users. If you're looking for a tool that can quickly and automatically remove unwanted noise with just a few clicks, Tipard Video Converter Ultimate is worth considering. Its user-friendly interface and simple, effective noise removal feature make it a great choice for anyone who wants to clean up their audio easily. With Tipard, you can get your audio editing done efficiently without the frustration of complicated settings.
More Reading


About the Author