
Have you been using Premiere Pro for a long time, or are you just starting? Either way, you may want to edit audio in the program. Well, you are in luck! Premiere Pro has built-in tools for audio editing. It makes it an excellent choice for improving sound quality, adjusting volume, and adding effects.
And the best part? We are here to help! In this guide, we will show you step-by-step instructions on how to edit audio in Premiere Pro. Plus, we will share helpful tips to make your editing process even smoother. So, keep reading to learn how!
Part 1. Is Premiere Pro Good for Sound Editing
Yes! Premiere Pro is suitable for sound editing. It has many tools to help you edit and improve audio. You can fix lousy sound, remove noise, and adjust volume easily. It also lets you add effects and mix audio like a pro.
Key Sound Editing Features:
1. Essential Sound Panel - Makes sound editing easy with presets for dialogue, music, and effects.
2. Noise Reduction - Removes background noise for cleaner audio.
3. Auto Ducking - Lowers background music when someone is talking.
4. Multitrack Editing - This lets you edit many audio layers at once.
5. Audio Effects & Transitions - Adds cool effects like echo, reverb, and more.
6. Adobe Audition Integration - Works with Adobe Audition for advanced sound editing.
Part 2. How to Edit Audio on Premiere Pro
We know Premiere Pro can be hard to use, especially if you are a first-timer and have not explored it yet. But do not worry; we are here to help. We will guide you step by step so you can learn how to edit audio in Premiere Pro. Just follow our instructions, and you will make your sound clear and smooth in no time.
Step 1Adjust Volume
Click on the audio track in your timeline. Find the thin line in the middle of the clip. Drag it up to make the sound louder or down to make it quieter. You will see the decibel (dB) level change.
Step 2Use Audio Gain
Right-click on the audio clip. Select Audio Gain from the menu. Here, you can increase or decrease the overall volume. You can also normalize peaks to balance the sound.
Step 3Fade In and Out
To make a smooth start or end, look for the small squares at the beginning and end of the audio clip. Press Option (Mac) or Alt (Windows) and drag the square to create a fade. You can control how fast or slow it fades.
Step 4Fix Audio Cuts
If your clip has rough cuts, add a fade effect. Open the Effects Panel and search for Exponential Fade under Audio Transitions. Drag it between two audio clips to make them blend smoothly. Adjust the length by dragging the edges.
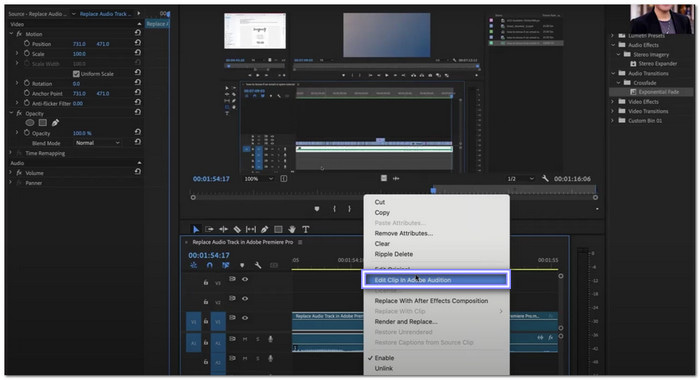
Step 5Use Adobe Audition for More Edits
If you need advanced tools, right-click on the audio clip and choose Edit in Adobe Audition. You can add more effects and remove noise. When you save, the changes update in Premiere Pro automatically.
That is how you edit audio using one of the best audio editing software! These steps will help you get better sound in your videos. Keep practicing, and your edits will sound great!
Part 3. Tips for Editing Audio on Premiere Pro
Above, you already learned how to edit audio on Premiere Pro. But it does not stop there. You also need to know some tips for editing audio in this program. These will really help you; read them below.
1. Use Keyframes for Volume Control
Keyframes help you adjust the volume at different points in a clip. If you have background music, you can make it quieter when someone is talking and louder when they stop.
- Select the Pen Tool (Press P on your keyboard).
- Click on the audio track to add keyframes.
- Drag keyframes up to make the volume louder and down to make it softer.
- Add more keyframes if needed to smooth out changes.
2. Use the Essential Sound Panel
Premiere Pro has a unique audio panel. It helps you organize sounds by type: Dialogue, Music, Sound Effects, and Ambience. Each type has its own settings to improve the sound.
- Open the Essential Sound Panel (Window > Essential Sound).
- Select your audio and tag it as the correct type.
- Adjust settings like loudness, clarity, and reverb to get a balanced mix.
3. Add VST Plug-ins for Better Effects
Sometimes, built-in tools are not enough. You can add third-party VST plug-ins to remove noise, improve voices, or add effects.
- Go to Preferences > Audio and open the Plug-in Manager.
- Click Scan for plug-ins to find installed effects.
- Drag a plug-in from the Effects Panel to your audio clip and adjust the settings.
4. Normalize Your Audio for Consistent Volume
If some parts of your audio are too loud and others are too quiet, use Audio Normalization to balance them.
- Right-click on the audio clip and select Audio Gain.
- Click Normalize Peaks and set a value below 0dB. It makes sure your audio does not go too high or too low.
5. Use the Audio Track Mixer for Advanced Edits
The Audio Track Mixer gives you more control over your sound. You can adjust the volume, add effects, and even record new audio inside Premiere Pro.
- Open the Audio Track Mixer from the Window menu.
- Change volume levels for each track instead of each clip.
- Add effects to the whole track instead of applying them one by one.
- Watch the clipping meter to make sure your audio does not get too loud.
6. Always Listen Before Exporting
After making changes, listen to your audio with headphones and speakers. Sometimes, what sounds good on one device may not sound good on another. Adjust if needed, then export your final video.
Bonus Tip: Best Alternative to Premiere Pro When Editing Audio

Good audio makes a huge difference in a video. But not everyone wants to use Premiere Pro. It can be hard to learn, and it takes time to get used to all the tools. If you need something more straightforward but still powerful, there is a better option.
Tipard Video Converter Ultimate is an excellent alternative to Premiere Pro for editing audio. It has intuitive buttons and a simple interface, so anyone can use it. You do not need to go through complex menus or settings. It works on Windows and Mac, giving you the flexibility to edit audio anywhere.
This audio enhancer removes unnecessary background noise from your audio. It allows you to increase the volume up to 200% if your sound is too low. If your audio is not in sync with the video, you can adjust the delay up to 10.00 to fix it. If you have multiple clips, you can merge them into one for smooth playback. Plus, you can apply fade-in and fade-out effects to make your audio transitions sound natural.
Conclusion
You made it this far! That means we expect you to have learned how to edit audio on Adobe Premiere Pro. Was it easy to use? Did you have a hard time? Or were you able to follow the steps smoothly? We would love to hear about your experience, so please share it in the comment section.
But if you find it difficult, do not worry! There is another program that is much easier to use for editing your audio. That is Tipard Video Converter Ultimate. We are sure you will love it, and you will learn how to use it in no time!
More Reading


About the Author
