How to Delay Audio Using Online and Offline Tools [Detailed Steps]
Suppose you are interested to know how to delay audio online and offline. Then, this article has the best solution for you. Also, you will learn why you need to delay audio for your video. This post will give various methods to perform. This way, you will have different options on what tools suit you best. So, read this post to discover these proven and tested methods without further ado.

Part 1: How to Delay Audio inVideo Offline
Sometimes when watching a movie on a media player, the audio may not be in sync. Because there could be a slight delay between the audio track and the video. This can be frustrating while you are watching your favorite video. You can use the right tool to set an audio delay and correctly sync the audio and visuals. Another reason to delay audio in a video is that it will give crispness to the audio track. This way, the audio will get a nice effect, making it better for people to hear.
How to Delay Audio with Tipard Video Converter Ultimate
Tipard Video Converter Ultimate is the software you can operate offline. You can delay your audio in just a few seconds using the Audio Sync feature. In addition, with its intuitive interface, you can use the tool efficiently. This way, all professional and non-professional users can delay audio in this program. This offline software is also free to download. It is also accessible on Windows and Mac, making it convenient. Aside from delaying the audio, there is more you can do. Moreover, you can modify the audio settings. You can change the channel, sample rate, and bitrate. You can also change the output format of the video. It includes MP4, MOV, AVI, WMV, MKV, and more. Also, the exporting process is fast. You can save your final output in just a few seconds. Furthermore, besides delaying audio in a video, this program offers more features. One of the main features of this software is converting videos. It supports multiple files like MP4, MOV, AVI, FLV, MKV, WMV, and more. It offers a batch conversion process to convert multiple files simultaneously.
Follow the simple instructions below to learn how to delay audio in a video using Tipard Video Converter Ultimate on your Windows and Mac.
Step 1Download the Tipard Video Converter Ultimate. You can click the Download button below to access the app easily. After the installation process, launch the software.
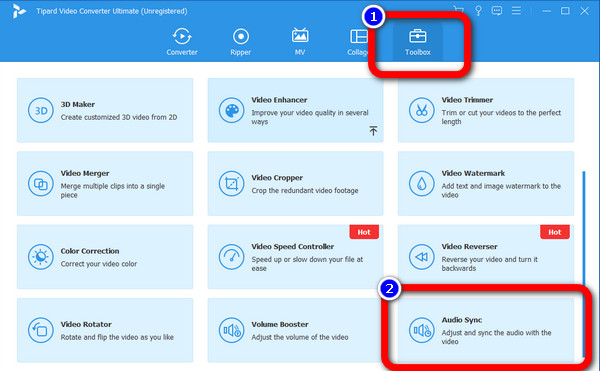
Step 2When the interface appears on your screen, navigate to the Toolbox panel. Then, select the Audio Sync function.
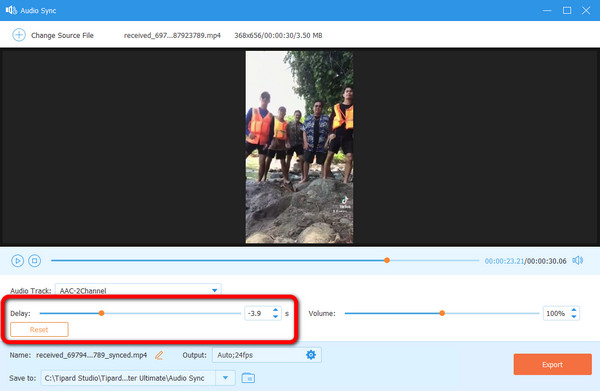
Step 3Afterward, another interface will appear on your screen. Click the Plus icon on the center interface. Your file folder will show up, and choose the video you want to add. Then click Open.
Step 4After you add the video, go to the Delay option. You can delay the video by adjusting the sliding bar. To delay the audio, slide the Orange dot to the left. You can also adjust the volume of your video by adjusting the sliding bar.
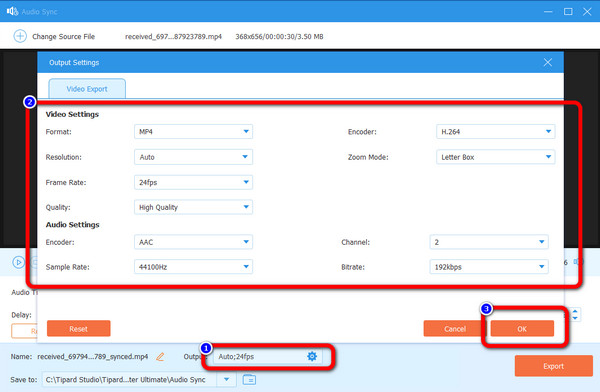
Step 5If you want to change the audio and video settings, click the Output option. You can change the video's resolution, frame rate, quality, and other parameters. Also, you can change the audio's sample rate, bitrate, channel, and more. After that, click the OK button.
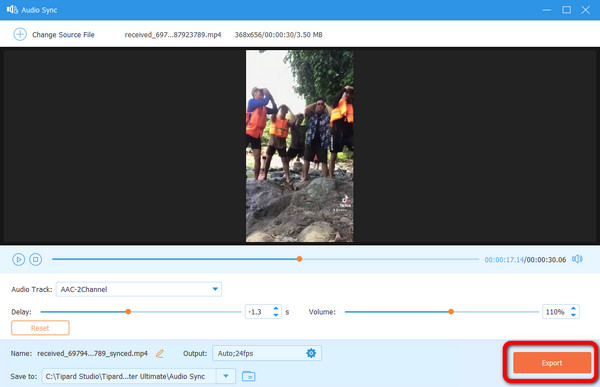
Step 6Click the Export button for the last and final step. You can see it on the lower left interface. Wait for the exporting process; it will take a few seconds. Once the process is done, you can see your file in your output folder.
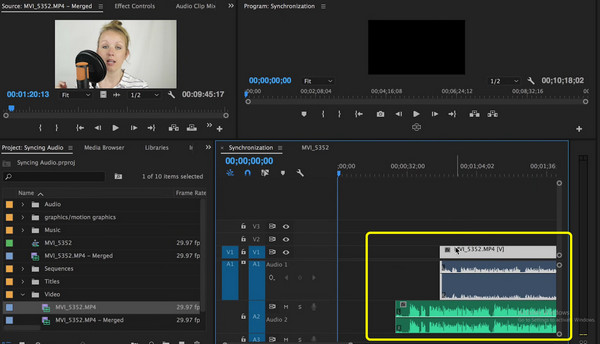
How to Delay Audio with Adobe Premiere
Another software you can use is Adobe Premiere. This program can delay audio in your video using practical tools. Also, it is one of the popular editing software you can use. However, Adobe Premiere is not perfect for beginners. Delaying audio in the video is hard. It has a confusing interface with many options, making it difficult to understand. Additionally, this software only offers a 7-day free version. So, after the version, it will charge you automatically. Purchasing it is costly, so you need to think first if you will use this software continuously. It also has a complicated installation process. If you are a new user, you need to seek help from skilled users to operate this program.
Step 1Download and install Adobe Premiere on your computer. Then, run the program
Step 2Go to File > Open option when the interface is open. The folder from your computer will appear. Choose the video you want to add.
Step 3Go to the Project panel and select audio and video clips. Drag the clips on the sequence. This way, you can move the audio track to delay it from the video. Then, save your video.
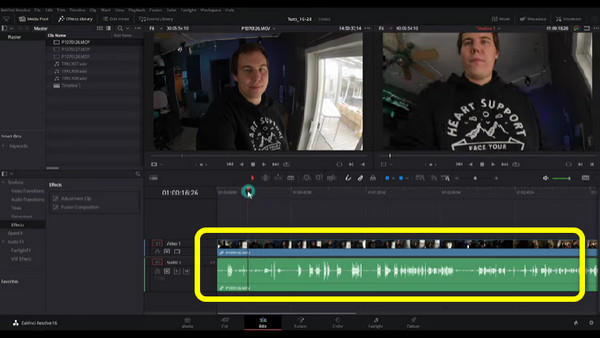
How to Delay Audio with Davinci Resolve
Davinci Resolve is also capable of delaying audio in a video. All you need to do is to adjust the audio track from the video track. Moreover, it is a video editor that helps users with post-production processes. It includes 8K editing, visual effects insertion, color correction, reversing videos, and more. However, utilizing the software is challenging. It has a confusing option, which is unsuitable for non-professional users. You also need to buy a subscription plan to experience more great features. But the software is expensive.
Step 1Download Davinci Resolve on your desktop. Launch the software after the installation process. Then, the interface will show up.
Step 2Go to the File option on the upper left of the interface. Then select the Open option to attach the video.
Step 3Drag the video on the Timeline section. Then, the audio and video track will show up. You can drag the audio track to your desired location. You can move it to the left side to delay audio from the video.
Step 4When the process is done, go to the File > Save as option to save your edited video.
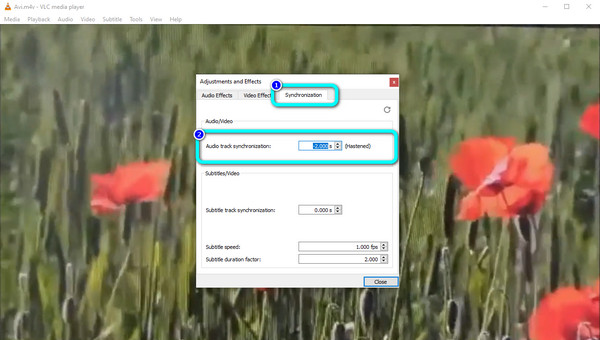
How to Delay Audio with VLC Media Player
A free editor you can use to delay audio is VLC Media Player. This software is not only good for playing various videos but also delays the audio in video easily. It is also free to download, making it accessible and convenient. There are more features you can encounter in this software. You can convert video files, trim videos, etc. However, this tool is enormous. You need to consider the storage of your computer. In addition, its installation process is too long. It will consume too much time, which is not suitable for users. Follow the simple guides below to learn how to use VLC Media Player audio delay.
Step 1Install VLC Media Player on your computer.
Step 2Open the video by clicking the Media > Open file option on the upper left interface.
Step 3Navigate to the Show Extended Setting icon on the lower interface. A new interface will pop up.
Step 4Go to the Synchronization option and see the Audio track synchronization. In this part, you can adjust how many seconds you want to delay the audio on your video.
Part 2: How to Delay Audio Online
If you are looking for an online way to delay audio in your video, use Kapwing. This web-based tool lets you adjust the audio tracks of your video separately from the video track. It means that delaying or advancing the audio is a piece of cake. Moreover, aside from delaying audio, you can also enhance your video. There are more editing tools it can offer, such as adding subtitles, filters, text, and more. However, you need to create an account to use this online tool. The process is also challenging, especially when adding the video and audio track. In addition, if you want more editing features, you must purchase the pro version.
Step 1Go to the Kapwing website and create an account.
Step 2Click the Create New Project option to start. Then, hit the Plus sign to add the video file. Also, on the left interface, go to the Audio tab and add the same video to get the audio track of the video.
Step 3When the video and audio tracks are on the timeline, adjust the audio track by moving it with your mouse.
Step 4Lastly, after you delay the audio, go to the upper left interface and click the Export button to save the video.
Part 3: FAQs about How to Delay Audio in Video
1. Is reverb the same as a delay?
No, they are not the same. Amplified musical instruments produced reverb. As you observe other reverb videos, the audio becomes slow. When we say delay, it talks about the latency of the audio in the video.
2. What causes the audio delay in a video?
One reason for the delayed audio is a poor internet connection. Sometimes, the audio track is not correctly synced to the video.
3. What is the benefit of delaying audio?
It will generate additional effects. It will improve the echo on the video. This way, it will become more satisfying to hear while watching.
4. How to use FFmpeg to delay audio?
Let's say you want to delay audio by 3 seconds. You can type ffmpeg -i "movie.mp4" -itsoffset 3 -i "movie.mp4" -map 0:a -c cop. Then, press Enter on your keyboard.
Conclusion
As mentioned above, these are the best solutions you can learn on how to delay audio online and offline. However, some of the ways are unsuitable for non-professional users. If that is the case, use Tipard Video Converter Ultimate. This offline software offers an intuitive interface, perfect for all users, especially beginners.