

If you want to extract audio from a video with FFmpeg, you can do it directly from the command line without opening a traditional video editor. Many users choose FFmpeg because it is a free, open-source multimedia framework that can convert and process a wide range of video and audio formats.
This guide explains how to extract audio from video using FFmpeg, including commands for MP4, MKV, MOV, AVI, and other formats. You can also learn how to extract audio without re-encoding, choose a specific audio track, convert audio to MP3, and troubleshoot common FFmpeg errors.
Part 1. Extract Audio from Video with FFmpeg: Basic Steps
Before using FFmpeg, make sure it is installed on your computer and that you can run the FFmpeg command from Terminal or Command Prompt. Once FFmpeg is ready, follow these steps.
Step 1 Open Terminal or Command Prompt
- On Windows, open Command Prompt or PowerShell.
- On macOS or Linux, open Terminal.
Step 2 Navigate to the Video Folder
Use the cd command to move to the folder containing your video. For example:
cd /d path/to/your/video
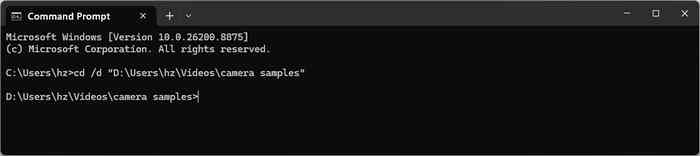
Here, /d means to change to the drive where your video file is stored.
Step 3 Extract the Audio with FFmpeg
The simplest approach is:
ffmpeg -i input.mp4 output.mp3
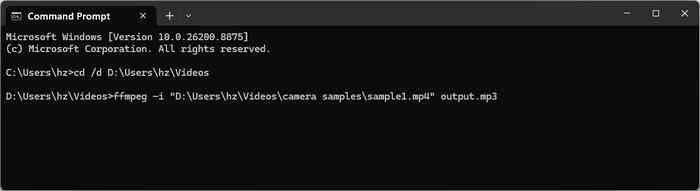
FFmpeg will detect the input streams and convert the audio into MP3. After processing finishes, you should find the extracted audio file in the specified output location. Of course, the original video remains unchanged.
Part 2. FFmpeg Extract Audio from Common Formats
How to Extract Audio from MP4 with FFmpeg
MP4 is one of the most common video formats (containers), and it can contain different audio codecs such as AAC, ALAC, and others.
To convert the audio from an MP4 video to MP3:
ffmpeg -i video.mp4 audio.mp3
If you want to control the MP3 quality, you can specify the bitrate:
ffmpeg -i video.mp4 -b:a 192k audio.mp3
For a higher bitrate:
ffmpeg -i video.mp4 -b:a 320k audio.mp3
Although FFmepg can extract audio effectively, you should know that converting an already compressed audio stream to another lossless format does not restore lost quality. If the original MP4 contains AAC audio, converting it to MP3 involves another encoding step.
How to Extract Audio from Video Without Losing Quality
When you extract audio from video using FFmpeg, you can preserve the original audio stream. You just need to avoid re-encoding whenever the target container supports the source codec. You can use the command line below:
ffmpeg -i input.mp4 -vn -c:a copy output.m4a
Here:
- -i input.mp4 specifies the input video.
- -vn tells FFmpeg not to include video.
- -c:a copy copies the original audio stream instead of encoding it again.
- output.m4a is the output audio container.
This method is often called stream copying or lossless extraction. However, you should also know that if the source audio was already compressed, the extracted file retains that existing quality.
FFmpeg Extract Audio from MKV
MKV video files frequently contain multiple audio tracks, such as different languages or commentary tracks. To extract the default audio stream with FFmpeg:
ffmpeg -i input.mkv -vn -c:a copy output.mka
If you want to extract the audio track to MP3:
ffmpeg -i input.mkv -vn output.mp3
The first command attempts to copy the original audio codec, while the second converts the audio into MP3.
Because MKV can contain many different audio tracks and codecs, the appropriate output container may differ. If FFmpeg reports that the audio codec cannot be stored in the selected output format, you can choose a compatible container or re-encode the audio.
FFmpeg Extract Audio from MOV
To extract audio from a MOV video with FFmpeg and convert it to MP3, you can use the command as below:
ffmpeg -I input.mov output.mp3
If you consider the video stream is too large because MOV may have a ProRes video codec, you can remove it while copying compatible audio:
ffmpeg -i input.mov -vn -c:a copy output.m4a
This can be useful for recordings created with cameras, smartphones, or Apple-oriented video workflows. You can get the excellent audio quality while highly reducing the file size.
FFmpeg Extract Audio as WAV
WAV is commonly used when you need uncompressed PCM audio for editing, mixing, or further processing. To extract audio as WAV in FFmpeg, use:
ffmpeg -i input.mp4 -vn output.wav
You can also explicitly select PCM audio:
ffmpeg -i input.mp4 -vn -c:a pcm_s16le output.wav
WAV files can be considerably larger than MP3 or AAC because uncompressed PCM audio may have larger file size. For simple listening, WAV is not a necessary option while MP3 or AAC may be more practical. For audio editing, WAV can be a better choice because it avoids another lossy compression stage.
How to Extract Audio as AAC in FFmpeg
If you want an AAC output file, you can use:
ffmpeg -i input.mp4 -vn -c:a aac output.m4a
You can also specify the bitrate:
ffmpeg -i input.mp4 -vn -c:a aac -b:a 256k output.m4a
AAC is widely used for streaming and portable devices, and M4A is a common container for AAC audio.
FFmpeg Extract a Specific Audio Track
Some videos contain multiple audio streams. For example, a movie may include English, Japanese, and commentary tracks.
First, inspect the streams:
ffmpeg -i input.mkv
FFmpeg will display information about the video and audio streams. You may see something like:
- Stream #0:0: Video
- Stream #0:1: Audio
- Stream #0:2: Audio
- Stream #0:3: Subtitle
To extract a specific audio stream, use -map:
ffmpeg -i input.mkv -map 0:2 -c:a copy audio.mka
-map 0:2 tells FFmpeg to select stream 2 from input 0. This is particularly useful when a video contains multiple languages or separate commentary tracks.
Part 3. FFmpeg Audio Extraction: Copy vs. Convert
You have known many basic command lines that can help you do a simple audio extracting tasks. However, one of the most important decisions is whether you should copy or convert the audio. You can check two simple rules as below to figure out the method you need:
- If your target format (container) is compatible with the original audio codec, copying is generally preferable for preserving the source stream.
- If you need a particular format for compatibility, you'll need to convert the audio and choose an appropriate encoder and bitrate.
Part 4. Common FFmpeg Audio Extraction Errors
FFmpeg is still a professional tool for advanced users. Even if you only need to extract audio files, you may still encounter some problems like:
1. Invalid argument
This can occur when the output format does not support the selected audio codec or when the command contains an invalid option.
To fix that, you can choose an appropriate output extension or codec.
2. Multiple Audio Tracks
If FFmpeg extracts the wrong language or commentary track, inspect the available streams with:
ffmpeg -i input.mkv
Then use -map to select the desired audio stream.
3. Output File Already Exists
FFmpeg may ask whether you want to overwrite an existing file. To overwrite automatically, use:
ffmpeg -y -i input.mp4 output.mp3
Use -y carefully because it can overwrite an existing file without asking.
4. Audio Codec Is Not Supported by the Container
As we mentioned above, a source audio codec may not be compatible with your chosen output video container.
For example, copying an unusual audio stream, like DTS, directly into an incompatible container, like MP4, will fail. In this situation, either select a more suitable container, like MKA, or re-encode the audio, like AAC.
Part 5. FFmpeg vs. GUI Tools for Extracting Audio
FFmpeg is powerful, flexible, and free, but it is not necessarily the easiest option for everyone. First, the command-line interface is not easy to operate, and the commands must be entered correctly. Moreover, if there are some errors, it may be difficult for beginners to figure it out and correct their command.
That's why a graphical video converter, like Tipard Video Converter Ultimate, can be more convenient if you prefer to select files, output formats, and audio tracks through menus rather than commands. Tipard Video Converter Ultimate provides a more straightforward way to extract and convert audio from videos. Instead of remembering FFmpeg parameters, you can select audio tracks, output formats, and conversion modes directly from the interface.
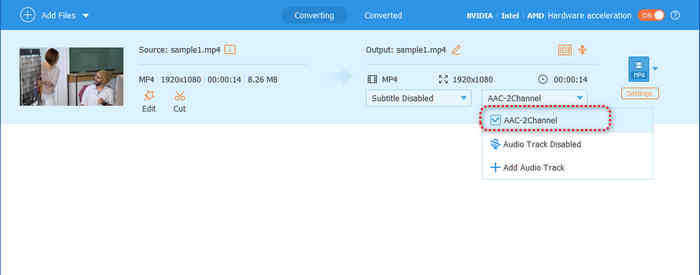
Feature 1: Select the Audio Track
Choose the specific audio track you want to extract from a video with multiple audio streams, such as different languages or commentary tracks.
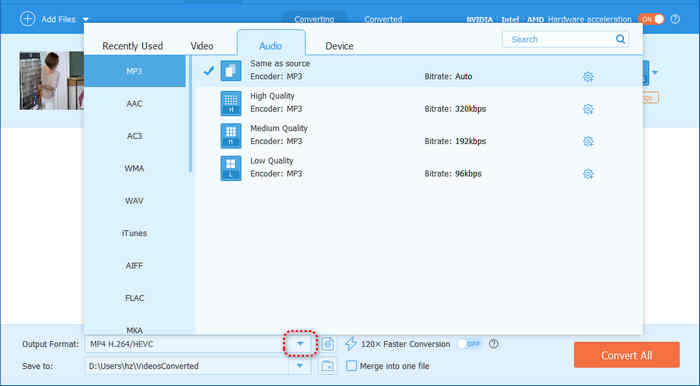
Feature 2: Choose the Output Audio Format
Select the desired format directly from the output menu, including MP3, AAC, FLAC, WAV, and more, without writing codec commands.
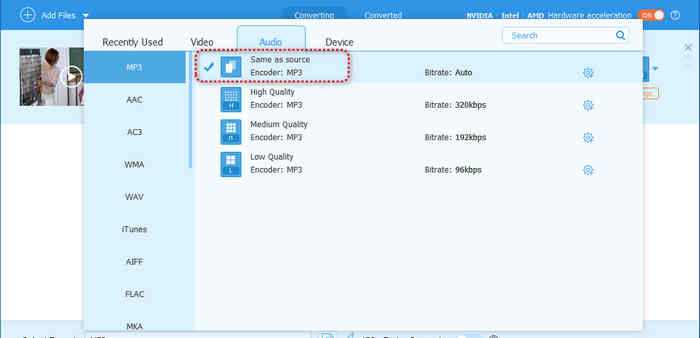
Feature 3: Copy or Convert Audio
Choose whether to copy the original audio stream when compatible or convert it to another audio format for broader compatibility.
Feature 4: Batch Extract Audio
Import multiple videos and extract or convert their audio in one task instead of processing each file individually. Tipard officially supports batch conversion for video and audio files.
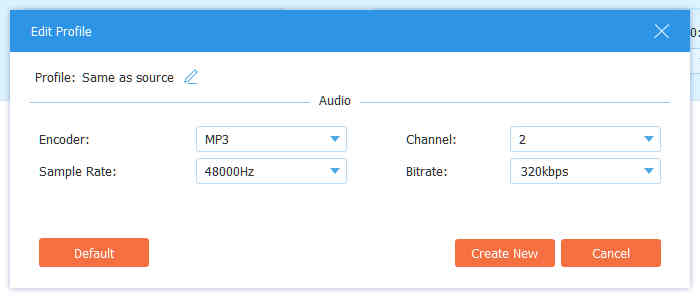
Feature 5: Customize Audio Settings
Adjust audio encoder, bitrate, sample rate, and channels when you need more control over the output.
Feature 6: Preview and Edit Before Extraction
Trim or clip the source video before extracting audio when you only need a specific section rather than the entire soundtrack.
Conclusion
FFmpeg is one of the most flexible ways to extract audio from video. A simple command such as ffmpeg -i input.mp4 output.mp3 is enough for basic MP3 extraction, while options such as -vn, -c:a copy, and -map provide much greater control.
However, it is still very difficult for beginners to use FFmpeg to extract audio from multimedia files, for there are many setups that need to be done and many errors ready to be encountered. If you need to extract audio immediately, you can resort to Tipard Video Converter Ultimate, an easy-to-use GUI media converter. It lets you remux audio, extract audio, and convert video/audio easily with a simple workflow.

All-in-one video toolbox: convert, edit, upscale, enhance, and compress your videos easily
100% Clean & Safe
100% Clean & Safe

More Reading


About the Author


 Tipard Video Converter Ultimate