Video Exposure: Easy-to-understand Introduction and Helpful Guides
Exposure is one of the most important things you must consider in a video. The best exposure is one that preserves all of the detail in both the highlights and the shadows. In other words, the exposure makes the most of the camera's sensor's capacity to capture as much shadow and highlight detail from the video as feasible. In this guidepost, you will discover the full definition of video exposure. In addition, you will also learn the different types of video exposure. It includes double exposure, long exposure, and low exposure. Aside from that, you will also know the most remarkable methods to adjust video effects for great exposure. So, to learn all these essential topics, read this post instantly.
Part 1. Complete Definition of Video Exposure
The amount of light that reaches a camera's photo-sensitive component is known as video exposure. The brightness gradations you see on your screen are controlled by exposure; most consumer digital video cameras support 100 shades of light and dark. In the days of film cameras, there used to be some mechanism in front of the film. When you took a picture, that object would move, letting light briefly touch the film. The object would then move into position to block the light once more. The film would be exposed to light. An appropriately exposed photograph will never have a brightness level greater than 100 or lower than 0.
When your video's highlights, mid-tones, and shadows are properly balanced, it is said to be exposed. The overexposed video is tilted toward the highlights. The opposite of being over-exposed would be under-exposed, resulting in a dark image. Fixing video exposure makes the video as realistic as possible. It's crucial to avoid having a wide range of highlights and shadows while filming with less expensive cameras because most cameras won't be able to manage this. Moreover, as we're talking about exposure, remember that even in a dark setting, strong highlights or backlighting can help define the shapes in the image and even lend a round, realistic-looking depth to the composition, enhancing the dramatic effect of the photograph. Also, having a solid bright and dark reference is soothing to the eye. It prevents the image from fading to medium gray in the eye-brain combination.
Double Exposure Video
Double exposure can help you convey your story in unique and interesting ways. And you can do it with either an old film or a digital camera. Layering two distinct exposures on top of one another is the process of double exposure. Since the picture overlay is not opaque, a bit of both photos can be seen, giving the impression that a ghost is there. If you were using actual film, the same part of the film would need to be exposed twice, with the second image being superimposed on the first. A double-exposure video is more original and beautiful. You can create a double exposure with a camera or editing software in digital photography.
Long Exposure Video
Long exposures are frequently used for filming movement. For instance, a moving object is blurred, but the image's background is sharp. The opposite is also possible when the camera is following the topic. Low light conditions are needed since long exposure photography tries to use exposure times of up to 2 minutes or 30 seconds. Yet you can shoot long exposures in bright, sunny conditions with the right set of filters. For instance, taking long-exposure pictures of landscapes is helpful when the sun is out. The sky will turn a gorgeous, deep blue in this manner, and the picture will have more contrast.
Low Exposure Video
Low exposure on your video means that less light is coming from it. If your video is too bright, the best thing to do is to dim the light by lowering the video's brightness. Making a low exposure is also a good idea if you prefer a semi-dark mode video over a brighter one.
Part 2. How to Set Great Exposure when Shooting A Video
You must consider three important things to learn how to set great exposure. These are the aperture, image gain or sensitivity (ISO), and shutter speed. Changing one of these will affect the exposure and how the photo looks to some degree. Let's elaborate on them one by one to understand more.
Aperture
A hole or opening through which light can pass is called an aperture. Most lenses on contemporary camera systems feature variable apertures, and changing the aperture's size will alter how much light reaches the sensor. The aperture controls the distance between the closest and farthest objects that seem reasonably crisp in a picture.
Sensitivity (ISO)
The sensor itself is another component of a camera system that influences exposure. It is referred to as gain or ISO in a camera system. To correctly expose the image, all image sensors have a range of sensitivity they can be tuned to. Like your stereo, the audio becomes noisier as the level is increased. The amount of noise added to the image increases when your sensor is turned up, which also slightly reduces the detail and dynamic range.
Shutter Speed
The following is shutter speed, also referred to as shutter angle. Your image sensor is exposed to light for the duration of the shutter speed. With an electronic shutter, the pixels charge up from light at the beginning of the exposure. It is before being discharged and read by the camera after the exposure. The shutter speed also influences the amount of motion blur in your photograph.
These are the three things you need to consider if you want to set great exposure when shooting a video.
Part 3. How to Adjust Video Effect for Great Exposure
Are you looking for an effective way to adjust the video effect to see great exposure in a video? Then use Tipard Video Converter Ultimate. If you encounter a low-exposure video, you can modify the brightness to make it brighter. Also, you can make the bright video darker. This way, you can ensure that you will get fantastic exposure for the video. Also, it allows you to fix the video exposure by the video's contrast, brightness, saturation, and hue. In addition, the offline program offers a trouble-free method. So skilled and non-professional users can use the program. Moreover, you can save your video in various formats. It includes MOV, AVI, MP4, MKV, and more. Furthermore, you can save the edited video without watermarks. See the simple steps below to alter the saturation, contrast, brightness, and hue for better video exposure.
Step 1Download Tipard Video Converter Ultimate on your computer. Click the Download button below to access the program. Proceed to the installation process, and run it on your desktop.
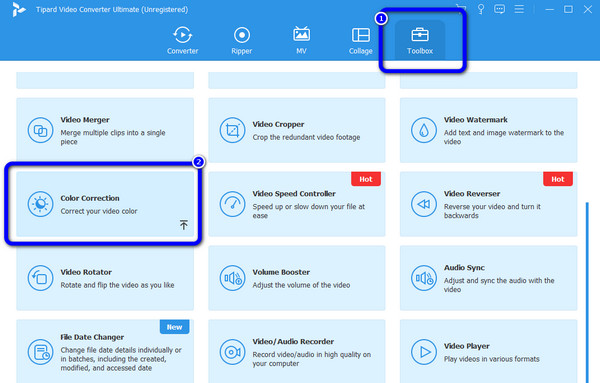
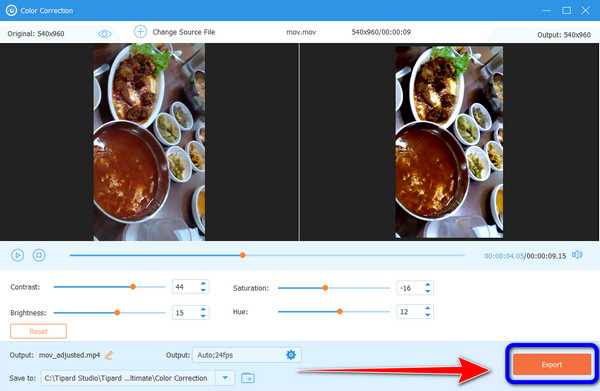
Step 2Select the Toolbox menu on the upper part of the main interface. After that, click the Color Correction tool.
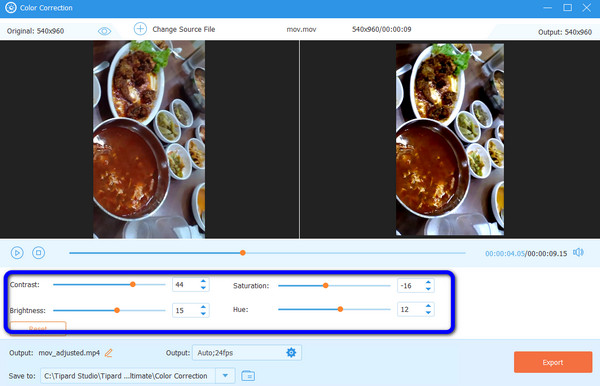
Step 3Another interface will show up on the screen. Click the + icon to add the video.
Step 4After adding the video, you can adjust the video's brightness, hue, saturation, and contrast. You can adjust them by controlling the sliders. This way, you can fix the exposure of a video.
Step 5After making some changes to the video, you can save your final output by clicking the Export button. Wait for the exporting process; you can keep the video on your desktop.
Part 4. How to Fix Overexposed Video
Did you overexpose your shot resulting in an overexposed film? Worry no more. In this part, we will give you an effective way to fix overexposed videos using Premiere Pro. With the help of this downloadable program, you can effectively fix your video and change your video color. However, Adobe Premiere Pro is not easy to use. Its interface is confusing because of its numerous options. Beginners are unsuitable for this program. In addition, it only offers a 7-day free version. So you must get a subscription plan to use the program continuously. If you want to learn the method, see the step below. We will provide you with the steps on how to fix overexposed videos in Premiere Pro.
Step 1Download Adobe Premiere Pro on your computer. Then launch it when the installation is finished. Go to File > Open Project to insert the overexposed video into the program.
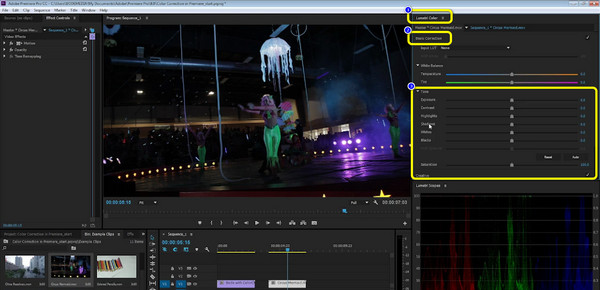
Step 2After adding the video, navigate to the Lumetri Color option. Then click the Basic Correction option. This way, you can control the sliders to adjust the video's exposure, contrast, brightness, and other parameters.
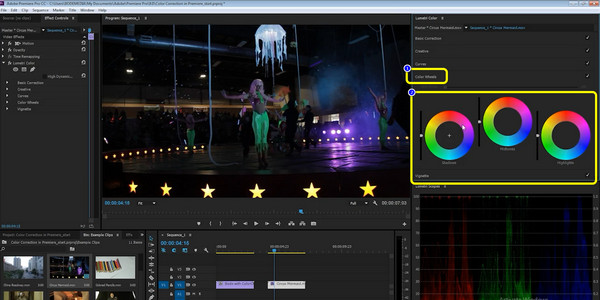
Step 3Another way to fix the video is to use the Color Wheel. Navigate to the Lumetri Color option and click the Color Wheel. This way, you can enhance your video manually based on your preference.
Part 5. FAQs about Video Exposure
How to fix overexposed videos in iMovie?
In the editing box, drag the movie clip. To choose the overexposed video clip, click on it. The Color Correction button is located above the video preview. Click it. To change the exposure, move the Exposure slider. The video shouldn't be overexposed anymore.
Why should I fix video exposure?
Fixing video exposure is necessary. It provides an outstanding video, especially for viewers. Having a video with poor exposure, it is possible that viewers won't get interested in the video.
Why is my video overexposed in iMovie?
There are two possible reasons why iMovie overexposed the video. It may be that the user used an HDR mode when filming or a high-brightness setting.
Conclusion
Now you know all the things about video exposure. You also get an insight into the importance of having great exposure on a video. In addition, you've learned the method to edit and enhance the video for great exposure using an offline program. However, Adobe Premiere Pro is not easy to use and requires a subscription plan. In that case, use Tipard Video Converter Ultimate. This downloadable program offers a hassle-free method and free.