
Have you ever saved a video and saw it ended in .webm? WebM works great on websites, but not all applications or players support it. That is when you might need to turn your WebM to MP4, as MP4 works on almost everything.
In this post, you will learn what makes WebM and MP4 different from each other, and how to convert WebM to MP4 the easy way without sacrificing video clarity. Go, learn every detail below!

Part 1. WebM vs MP4 - When Should You Convert WebM to MP4?
Windows and Mac users can easily convert WebM to MP4 using Tipard Video Converter Ultimate. This program makes the job simple. More than that, it lets you fine-tune the output settings like frame rate, resolution, and bitrate so your video stays sharp and clear. In addition, it supports batch conversion so that you can convert many WebM files into MP4 all at once. It is not limited to MP4; it also supports other formats, which makes it useful for more than just WebM files.
- Supports over 500 video and audio formats.
- Speed up conversion 60× and still get high quality.
- Keep video clear by fine-tuning bitrate, resolution, and frame rate.
- Edit videos by trimming, rotating, and more before converting.

Here is how to convert WebM to MP4 on Windows and Mac using Tipard Video Converter Ultimate. This program is easy to use and works fast. The steps below are simple and made for beginners!
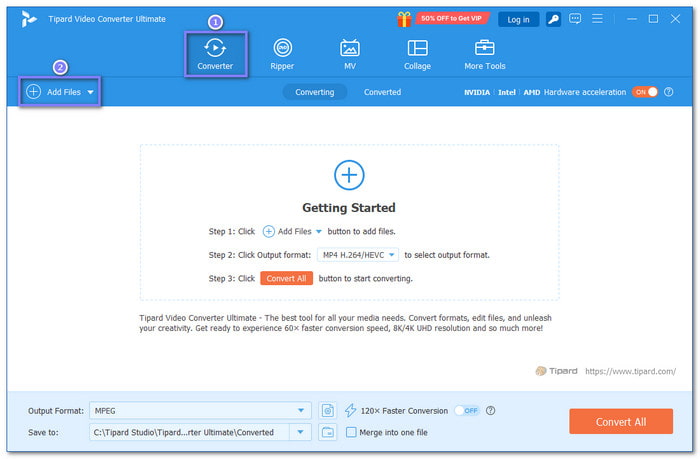
Step 1 First and foremost, download and install Tipard Video Converter Ultimate on your Windows or Mac. You can rely on the download buttons provided above. Once it opens, click the Add Files button or drag your WebM video into the program.
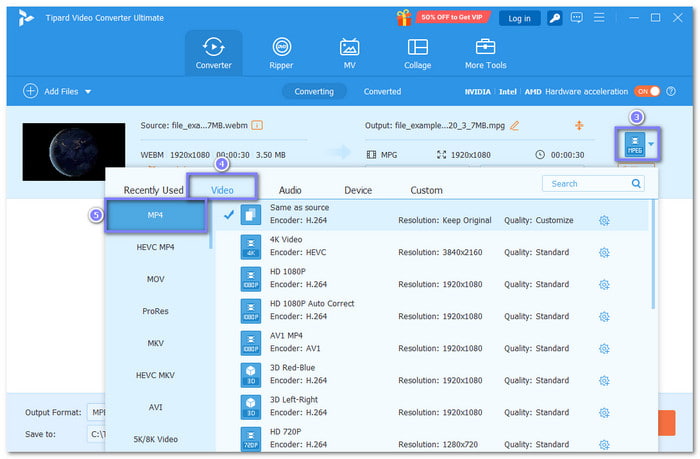
Step 2 After adding your file, click the Format drop-down menu in the right corner, head to the Video section and pick MP4 as the format.
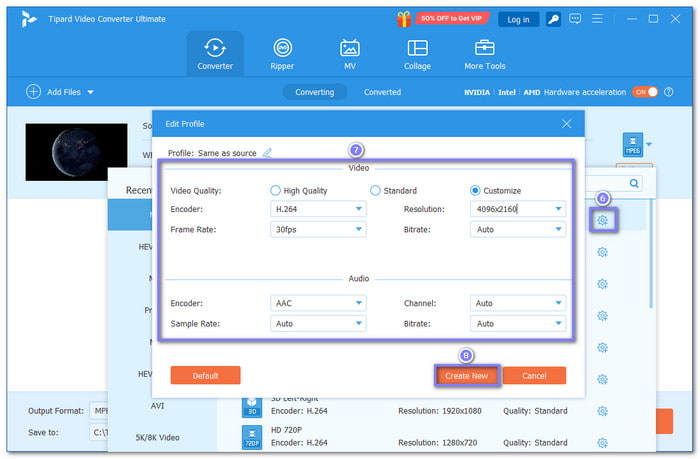
Step 3 Now, click the Custom Profile button next to your selected format. A small window will pop up. Here, you can change the resolution, bitrate, frame rate, and more. It helps keep the best video quality. When done, click the Create New button to save the settings.
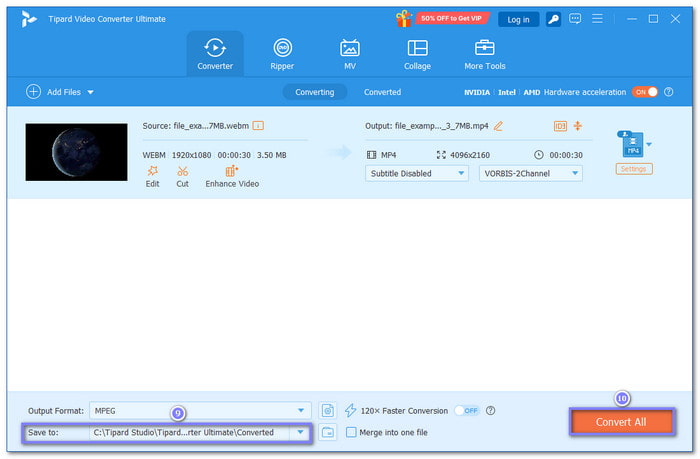
Step 4 Choose where to save your new file by clicking the Save To box. After that, press the Convert All button to start; your WebM video will turn into MP4 in no time!
Part 2: How to Convert WebM to MP4 Free Online
CloudConvert is a free online platform that lets you transform WebM to MP4 without downloading anything. You just upload your file, choose MP4 as the format, and wait for it to process. It lets you increase video resolution, clarity, and size before converting. You can also trim the video, adjust the sound, or even add a watermark. It is easy, fast, and works in most browsers.
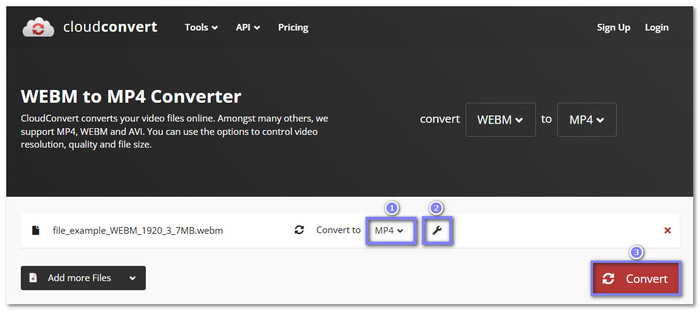
Step 1 Go to CloudConvert - WEBM to MP4 Converter's official website.
Step 2 Hit the Select File button and import the WebM you would like to convert.
Step 3 MP4 is already set as the output format, so nothing needs to change under the Convert to option anymore.
Step 4 Optionally, you can fine-tune the video and audio settings by opening the Wrench button.
Step 5 Once you are set, click the Convert button, please wait for a moment, and proceed to download your MP4 file.
Part 3: How to Convert WebM to MP4 with VLC
VLC is a free and trusted media player for Windows, Mac, and Linux. Many people know it for playing videos, but it can also convert files. You can use it to change WebM files to MP4 files without an extra program. It works offline, supports many formats, allows you to crop video, and gives good video clarity. It is great for anyone who wants a free and simple way to convert.
Step 1 To convert WebM to MP4 using VLC, first download and install VLC from its official site. Once it is installed, open VLC and click Media in the top menu, then choose Convert / Save to open the converter tool.
Step 2 Next, press the Add button to upload the WebM video you want to change. After picking the file, click Open, then click Convert / Save to move to the next step.
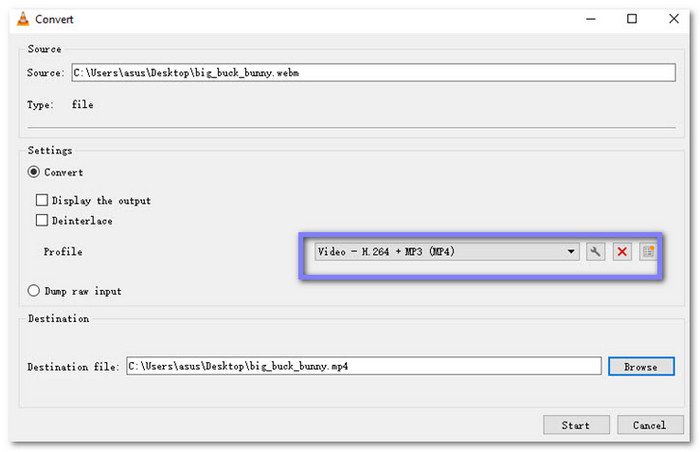
Step 3 Now, choose Video - H.264 + MP3 (MP4) from the Profile list. This option makes sure your video will be saved as an MP4 file. After that, click Browse to pick a folder where the new video will be saved. Type a name for your file and click Save.
Step 4 Press Start to begin the conversion. VLC will now turn your WebM video into an MP4 file.
Step 5 Go to the folder you chose earlier. You will see your new MP4 file there, ready to use. You can now play it on most devices and players without any problem.
Part 4: How to Convert WebM to MP4 with FFmpeg
FFmpeg is a free program used by users who want more control over video files. It works through a command line, which means you type what you want it to do. You can turn WebM into MP4 using a single command. It is fast, supports almost every format, and does not lose video clarity. FFmpeg is good for users who know how to use basic commands, not for those who are novice in this task.
Step 1 If FFmpeg is not installed, you need to get it first.
• Windows: Go to the official FFmpeg site. Download the file. Follow the setup steps.
• Mac: Open Terminal. Type this: brew install ffmpeg
• Linux: Use these commands:
sudo apt update
sudo apt install ffmpeg
When installed, FFmpeg is ready to use.
Step 2 On Windows, open Command Prompt. On Mac or Linux, open Terminal. It is where you will type the commands to convert the file.
Step 3 Type this in your command tool: ffmpeg -i input.webm output.mp4.
• Replace input.webm with your file's name or path.
• Replace output.mp4 with the name you want for the MP4 file.
It changes the file format from WebM to MP4.
Step 4 If you want to control the video quality, use this command: ffmpeg -i input.webm -b:v 1000k output.mp4.
• 1000k means the video will have a bitrate of 1000 kbps.
• You can change this number for a higher or lower quality.
Step 5 To make sure your MP4 plays on most devices, use this: ffmpeg -i input.webm -c:v libx264 -c:a aac output.mp4.
• libx264 is a common video codec.
• AAC is a common audio codec.
Once you run the command, FFmpeg will start converting the file. Just wait. Bigger files take more time. That is it; you have now changed your WebM to MP4 using FFmpeg.
Part 5: WebM vs MP4 - What Makes Them Different
When choosing WebM vs. MP4, it helps to know what each one is best for. Both are video file formats. But they have different uses, strengths, and support. Let us look at what sets them apart.
1.Format Type and Purpose
WebM is an open-source format made by Google. It was built for the web and works great in web browsers like Chrome, Firefox, and Edge. MP4, on the other hand, is more of a universal format; it works almost everywhere, even on phones, TVs, and editing applications.
2.File Size and Compression
WebM files are usually smaller, and it is good for fast loading and streaming online. MP4 files are often bigger, but they keep better quality. That is why most people use MP4 for saving or sharing videos offline.
3.Compatibility and Support
MP4 works on almost all devices and platforms, including Windows, Mac, iPhone, Android, and smart TVs. WebM is limited; it works well in browsers but not always in media players or apps without extra support.
4.Video and Audio Codecs
MP4 uses common codecs like H.264 for video and AAC for audio. These are widely supported and keep the quality high. WebM uses VP8/VP9 for video and Vorbis/Opus for audio. These work better in browsers but are not always good for editing or mobile use.
5.Use Cases and Best Fit
Use WebM when you need videos for websites or online use. It loads fast and saves space. Use MP4 when you want to save videos, edit them, or play them on different devices. It is more flexible and higher in quality.
Conclusion
We hope this helped you find the best WebM to MP4 converter. If your videos are big or high in quality, it is better to use something more powerful, such as Tipard Video Converter Ultimate. It is fast, easy to use, and works on both Windows and Mac. Additionally, it lets you edit videos before saving them. If you want good results every time, Tipard Video Converter Ultimate is worth trying.
More Reading

About the Author
