
You are editing a project and suddenly hit a roadblock: Premiere Pro WebM files would not import. You have downloaded a video in WebM format, possibly an animation or a transparent overlay for your timeline, but Adobe Premiere Pro throws an error or fails to recognize it. This is a common issue for editors who work with web-optimized formats, such as WebM, only to find that the Adobe suite lacks native support. Whether you are trying to save time, avoid plugin hassles, or need a quick fix, this guide will walk you through why it happens and how to fix it fast, efficiently, and with zero headaches.

Part 1. Can Premiere Pro Import WebM?
By default, Adobe Premiere Pro does not let you import or export WebM files. Although WebM is a royalty-free, open-source video format created by Google, Adobe has not added built-in support for it. Instead, Adobe leans toward industry-standard codecs like QuickTime mov, MPEG, and MXF, which broadcasters and post houses still rely on every day.
That said, WebM is a staple on the web itself, appearing on YouTube and in lightweight, looping, transparent clips embedded on various websites. Because its ecosystem is geared toward grade-A broadcast work rather than web-friendly video, WebM has stayed outside the default codec club.
Part 2. Download and Install Adobe Premiere Pro WebM Plugin
If you do need WebM files, adding them is just a matter of installing a third-party plug-in. Adobe skips native support for the format mainly because it is open-source and tied to web workflows, not to the traditional film or broadcast pipeline. Luckily, a well-regarded plug-in from Fnord Software seamlessly integrates WebM support into both Premiere Pro and Media Encoder.
You can install the plug-in in one of two ways: either let an installer do the heavy lifting or drop the files into the right folders yourself, whichever suits your taste for speed or manual control. Once set up, you can also stabilize video in Premiere for smoother, professional-looking results.
Method 1: Install via Adobe Creative Cloud (Easy and Automatic)
This method is extremely straightforward and user-friendly for anyone. Adobe now includes the WebM Export plug-in, made by Fnord Software, right in the Creative Cloud Marketplace.
Here is how to grab it:
Step 1 Open the Adobe Creative Cloud desktop app.
Step 2 Click on the Stock & Marketplace tab in the sidebar.
Step 3 Type WebM Export into the search box at the top.

Step 4 Find the plug-in labeled WebM Export by Fnord Software.
Step 5 Hit the Install button next to it.

Step 6 Approve any prompts that pop up by pressing Ok, so the installation can finish.

Step 7 After the process, the plug-in will sit in this folder on your system:
C:\Program Files\Adobe\Common\Plug-ins\7.0\MediaCore
Once it is in place, Adobe Premiere Pro and Adobe Media Encoder can both save projects as WebM files. You can even export clips with an alpha channel, making them perfect for overlays, animations, and clear-background video for websites, especially when exporting from Premiere Pro to MP4 for wide compatibility.
Method 2: Manual Installation from GitHub (Advanced Option)
If you would rather tuck the plugin into your system by hand or are curious about the newest features still in testing, grab the files straight from the Fnord Software GitHub page.

Steps:
Step 1 Head over to Fnord's GitHub at https://github.com/fnordware.
Step 2 Look for the Releases tab, then select the WebM plugin build that matches your system (Windows or Mac).
Step 3 Save the installer file: a .exe for Windows or a .pkg for macOS.
Step 4 Open the downloaded file and work through each prompt.
Step 5 After the process finishes, restart Premiere Pro so it can load the new plug-in.
Using this approach gives you finer control, and it is the easiest way to set up the plugin on a computer that does not interact with Creative Cloud, particularly when you are troubleshooting version quirks.
Part 3. Easily Convert WebM to a Format That Premiere Pro Supports
Because Premiere Pro does not natively accept WebM files, the smoothest fallback is to convert your clips to MP4, MOV, or AVI first. Tipard Video Converter Ultimate is one of the quickest apps for that task. It is a handy all-in-one tool that shrinks WebM videos into formats Premiere Pro welcomes, letting you bypass plugin headaches completely.

- Convert WebM to MP4, MOV, AVI, WMV, and other formats Premiere Pro accepts.
- Intel, AMD, and NVIDIA support boost conversion speed, great for large files.
- Save time by converting several videos at once.
- Keep original quality or upscale/compress without noticeable loss.
- Trim, crop, rotate, add filters, and use optimized presets for Premiere Pro.

Follow these simple steps to prepare your WebM files for Adobe Premiere Pro:
Step 1 Download and Install the Software
Visit the official Tipard website and download Tipard Video Converter Ultimate for Windows or macOS. Install it by following the on-screen instructions. Once installed, launch the application.
Step 2 Import Your WebM File
Hit the Add Files button in the top left. Browse to the WebM video stored on your computer and double-click it or drag the file straight into the window.

Step 3 Choose a Compatible Format
Tap the Output Format button next to the video thumbnail. From the list under Video, pick MP4 H.264 or MOV; both play nicely with Premiere.

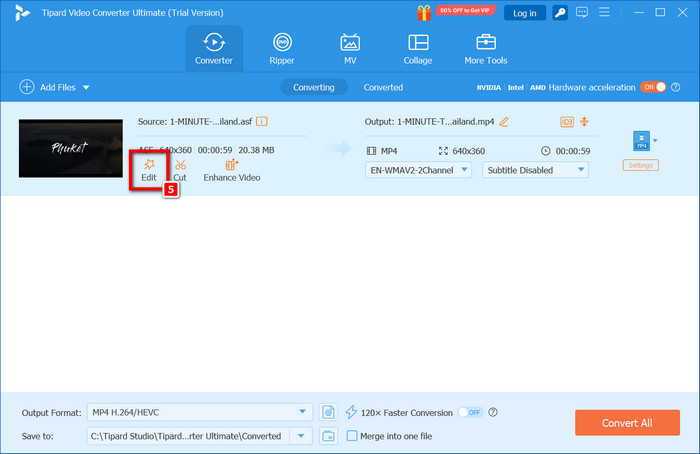
Step 4 Adjust Output Settings (Optional)
Click the Edit button if you want to tweak resolution, bitrate, or filters. To keep transparency, choose a codec like ProRes 4444 inside a MOV wrapper.
Step 5 Start the Conversion
Finally, press Convert All and watch the progress bar.

Step 6 Import into Premiere Pro
After the file is converted, launch Adobe Premiere Pro, choose File > Import, and pick the fresh video. It will load quickly and play without stuttering.
Part 4. FAQs of WEBM Format for Premiere Pro
Is WebM H.264?
No, WebM is not H.264; it typically uses VP8 or VP9 video codecs instead of H.264.
Can I export as WebM in Premiere Pro?
By default, Adobe Premiere Pro does not natively export WebM. But you can use a WebM plugin to make Premiere Pro support WebM. You can also export as MP4 first, and then use Tipard Video Converter Ultimate to convert MP4 to WebM.
How do I tell if my video is WebM?
You can view the file extension. A WebM file's name ends with .webm. You can also check the file properties: Right-click on your video and select Properties. Look at the Type of file, and a WebM video should be WEBM Video File (.webm).
Conclusion
The WebM format Premiere Pro incompatibility can be frustrating, especially when you’re on a tight deadline or working with web-sourced assets. Fortunately, with the right tools and plugins, you can seamlessly bridge the gap. Whether you choose to install the Fnord WebM plugin for native support or convert WebM to a more Premiere-friendly format using Tipard Video Converter Ultimate, both methods ensure a smooth workflow. Now, you can confidently edit, enhance, and publish your projects without worrying about format restrictions. In the fast-paced world of video editing, having flexible solutions like these makes all the difference in staying productive.
All-in-one video toolbox: convert, edit, upscale, enhance, and compress your videos easily
100% Clean & Safe
100% Clean & Safe
More Reading


About the Author
