Adobe Premiere Pro Speed Up Video Techniques Guide 2026
Are you a content developer who wants to deliver interesting video material on a tight deadline? Discover how to speed up a video with Premiere Pro so that you may satisfy your project requirements more efficiently. Whether you're a freelance filmmaker, social media influencer, or marketing professional, learning the discipline of quick-paced editing may boost productivity and ensure the timely delivery of compelling material. With the correct approaches, you can expedite your process while keeping viewers interested, effectively communicating your message dynamically and engagingly.

Part 1. Speed Up a Video in Premiere Pro - 3 Ways
You have three main methods for speeding up a video in Adobe Premiere Pro: the Speed/Duration command, Time Remapping, or the Rate Stretch Tool. Here's how to do each:
1. Time Remapping:
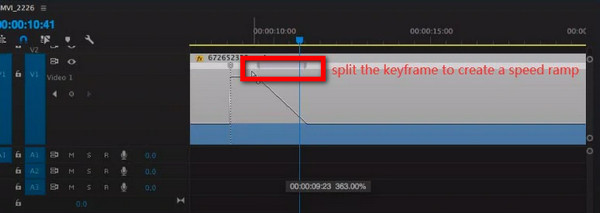
Time Remapping allows you to put one or more keyframes into a video and accelerate specified areas. Its broad speed control features make it a popular choice among experts for altering the tempo of videos in Premiere Pro. It is highly recommended due to its versatility.
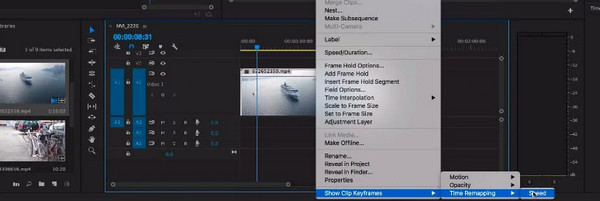
Step 1Double-click a video track to expand and reveal its contents for further editing.
Step 2Make a right- the clip and select Show Clip Keyframes > Time Remapping > Speed > Drag the Playhead to find the moment you want to speed up.
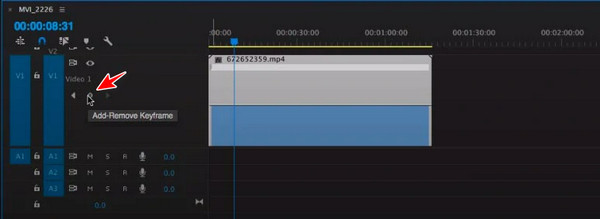
Step 3Add Two Keyframes on Either Side of the Moment You Wish to Speed Up.
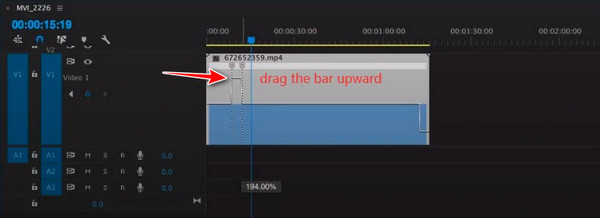
Step 4Drag the bar upward in the timeline's speed control section to speed up the video.
Step 5To create smoother transitions, split keyframes to generate a gradual change in speed.
2. Speed/Duration Command:
The Speed/Duration Command is frequently utilized to adjust the speed of entire videos or specific portions within Adobe Premiere Pro.
Step 1Import a clip onto the timeline, then ensure it's selected to apply adjustments or modifications effectively during editing processes in Premiere Pro.
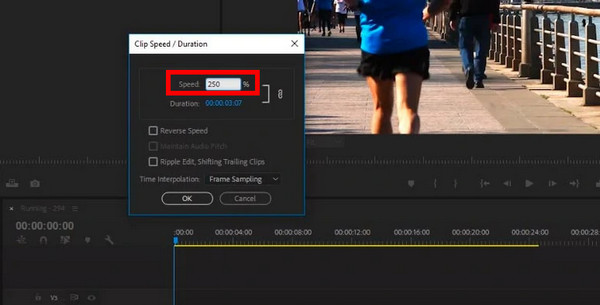
Step 2Right-click the Clip > Select Speed/Duration keyboard shortcuts: Ctrl/Cmd +R.
Step 3Increase the Percentage of the Playback Speed and Hit OK.
Example
100% = original video speed
300% = 3x faster
600% = 6x faster
Note: Make sure the little chain is toggled on to change the clip's duration along with the speed change. You can also use the Razor tool to cut off a portion of the video and increase its speed. Check Ripple Edits to close any gaps between clips. To maintain audio pitch, check Maintain Audio Pitch or unlink the audio and video and trim the audio track to match the video's length. Additionally, consider using a video stabilizer to ensure smooth playback.
3. Rate Stretch Tool:
If you want to speed up a video and don't worry about the speed at which it changes, the Rate Sketch Tool in Adobe Premiere Pro is another potential option.
Step 1Choose a clip within the timeline to perform editing or apply modifications in Premiere Pro.
Step 2Click the Third Tool on the Toolbar > Select Rate Stretch Tool
Step 3Drag the clip's edge inward on the timeline in Premiere Pro to accelerate it, then change the duration and playback speed accordingly.
Step 4To close gaps between clips, drag the adjacent clip towards the edited clip, seamlessly aligning them in Premiere Pro.
Part 2. The Best Premiere Alternative to Speed Up a Video
Are you looking for the best alternative to Premiere for speeding up your videos? Tipard Video Converter Ultimate is your ultimate solution. Its user-friendly design and extensive functionality make it the best option for increasing video playback speed.
Step 1Install Tipard Video Converter Ultimate on your PC. Then, launch the software to begin the process.
Step 2Navigate to the tool's main interface, then pick the Toolbox tab to locate the Video Speed Controller option.
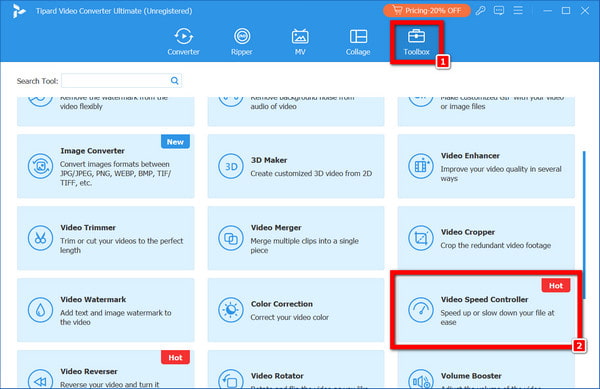
Step 3A window will display, and you may click the + button to choose your favorite film or clip to speed up.
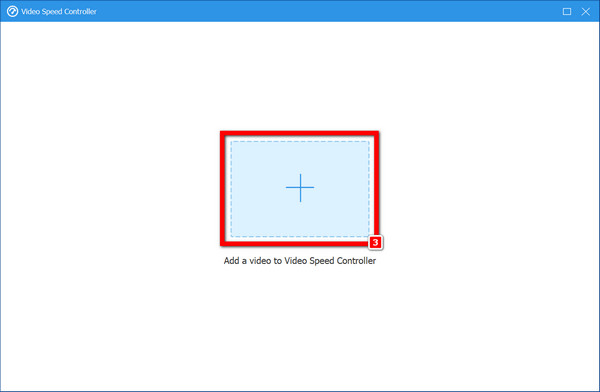
Step 4After loading the movie into the app, look for the speed choices beneath the video window. To accelerate the movie, you can choose among rates of 1.25X, 1.5X, 2X, 4X, or 8X.
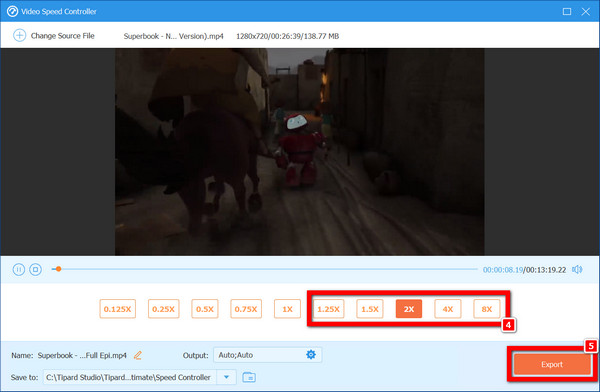
Step 5Finally, play the output video to get a preview of it. If you are satisfied with the results, click the Export button to save the resulting video to your computer.
Part 3. FAQs About Speeding Up Video in Premiere
Can I adjust the video speed dynamically in Premiere Pro?
Yes, Premiere Pro allows for dynamic adjustment of video speed. You can dynamically alter the speed of specific segments within your video timeline through techniques like Time Remapping and Rate Stretch Tool. This flexibility enables precise control over the pacing of your project, enhancing its overall impact and engagement with viewers.
Is there a way to maintain video quality while speeding up?
Maintaining video quality while speeding up is achievable in Premiere Pro. You can preserve the original video's clarity and sharpness by adjusting the speed using methods like Time Remapping or the Speed/Duration command. Additionally, selecting appropriate speed increments and utilizing advanced rendering options can ensure minimal degradation of quality during acceleration.
How do I ensure smooth transitions between sped-up segments?
To ensure smooth transitions between sped-up segments in Premiere Pro, utilize techniques such as creating speed ramps with keyframes in Time Remapping. Adding keyframes before and after each speed change and adjusting their positions allows you to create gradual transitions, minimize abrupt changes, and maintain a seamless flow between different speeds in your video.
Can I use Premiere Pro for speed adjustments in batch processing?
No, Premiere Pro does not offer batch processing for speed adjustments. Each clip needs individual adjustments using tools like Speed/Duration or Time Remapping. However, you can create presets for commonly used speed adjustments, which can streamline the process when applying similar changes to multiple clips. Consider using third-party software or scripts designed for batch processing, such as a video fixer.
Do editing tools usually handle diverse video format support?
Modern editing tools commonly offer extensive support for various video formats, ensuring flexibility and compatibility across different platforms and devices. Whether it's popular formats like MP4, AVI, and MOV or less common ones, these tools are designed to handle a wide range of media files, providing users with the versatility needed for their editing projects.
Conclusion
This post explored various methods for enhancing video playback speed using Premiere Pro. By mastering Premiere Pro speed-up video techniques such as Time Remapping, Speed/Duration Command, and the Rate Stretch Tool, you can effectively tailor the pacing of your videos to suit your content's requirements. Additionally, we introduced Tipard Video Converter Ultimate as an alternative solution for users seeking versatile speed adjustment capabilities. With these insights and tools, you can elevate your video editing skills, maintain viewer engagement, and deliver impactful content that resonates with your audience in today's fast-paced digital landscape.