
Camera shakes can ruin a shot, making stabilization crucial for improving visual quality. Even small shakes can make a video look unprofessional or hard to watch. Regardless of whether it's a handheld vlog, drone footage gone wild, or an action scene, making shots look polished is essential. Adobe After Effects has your back when it comes to these situations. Known for its motion graphics and visual effects (VFX) magic, this tool is not just for flashy animations. This program is also a lifesaver when it comes to fixing wobbly camera work.
Ready to turn jittery clips into buttery-smooth scenes? Let's dive in and learn how to stabilize shaky footage in After Effects.
Part 1. Why Do You Need to Stabilize Footage in After Effects
Shaky footage can ruin an otherwise great video. Here are some reasons why stabilizing in After Effects is a game-changer:
1. It Saves Unusable Clips
Sometimes, you capture the perfect moment, yet the footage is too shaky to use. Instead of reshooting, stabilization can salvage these clips and make them usable. This is a huge money and time saver for projects with limited filming opportunities or tight schedules.
2. It Improves Motion Tracking
Stabilization creates a smoother motion path, ensuring that your added elements adhere accurately to the scene. If you are adding graphics, visual effects, or text to moving footage, shaky camera work makes tracking much more difficult. Therefore, this is essential for professional compositing work.
3. For Professional Quality
As we know, unstable footage immediately indicates or suggests that it is amateur work. Whether you are creating a short film, commercial, or YouTube video, smooth motion makes your content look intentional and polished.
4. It Fixes Hand-Held Shakes
In most cases, even if you think you are holding the camera steady, tiny micro-shakes are inevitable. This is especially true with lightweight cameras or smartphones, where camera shakes are prone to occur. The stabilization tools of After Effects will help you analyze these subtle movements and compensate for them. You can turn the handheld shots into something that looks like it was shot on a gimbal or tripod.
5. Enhances Drone and Action Footage
Fast-paced or powerful shots, such as drone footage, sports, or chase scenes, often suffer from excessive movement. While some motion adds excitement, too much can make the footage chaotic. Stabilization helps balance dynamic action with smoothness, preventing disorientation issues and maintaining the energy in the video. On the other hand, if you need to stabilize a shaky video in Adobe Premiere, the Warp Stabilizer effect can help balance dynamic action with smooth viewing.
Part 2. How to Fix Shaky Video in After Effects
Adobe After Effects is a powerful visual effects and motion graphics software used by many professionals for creating animations and post-production work. It offers advanced stabilization tools to fix shaky footage without sacrificing high-quality results. Learn below how to stabilize shaky footage in After Effects.
Step 1 Open After Effects and create a new project. Then, drag your shaky video into the Project Panel and onto the Timeline.
Step 2 Apply the Warp Stabilizer effect by selecting your clip in the Timeline. Go to Animation > Warp Stabilizer VFX. You may also search for it in the Effects & Presets panel.
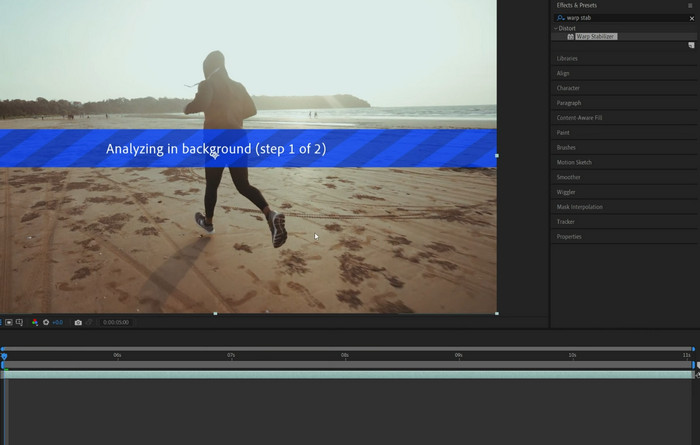
Step 3 Allow After Effects to analyze the video. Then, the software will automatically analyze the motion and stability of the clip. A progress bar will show in the Effects Controls panel.
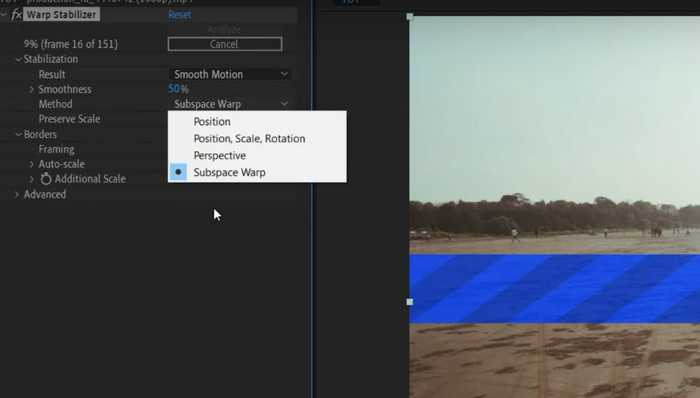
Step 4 For this step, adjust the stabilization settings to achieve smoothness, select the desired method, and apply cropping as needed. You can control the amount of stabilization you wish to apply by choosing Position, Scale, or Rotation for the Method and adjusting the Crop Less / Crop More setting to balance stabilization strength against visible edges. Lastly, play back your clip to check the results and export the video if satisfied.
Part 3. Best After Effects Alternative to Make Video Stable
If you are a user seeking a simple yet powerful way to stabilize shaky videos without complicated editing, Tipard Video Converter Ultimate offers an ideal solution that works on both Windows and Mac systems. This intuitive software simplifies the stabilization process with just a single click. This program will enable you to import your shaky footage, activate the stabilization feature, and instantly preview the smoothed output before exporting your polished video. With this program, there is no need for technical expertise. The app provides immediate stabilization for various footage types, including handheld smartphone clips and dynamic action shots. These are all possible while maintaining excellent video quality. The ability to see real-time previews ensures you get your desired results every time.
Step 1 Install and launch the program
First and foremost, download the program by clicking on the Free Download button located below. You can choose between the Mac and Windows systems. Whichever fits your computer's operating system, choose it. Once downloaded, install and launch the app on your computer. Then, you will see a clean-looking interface.
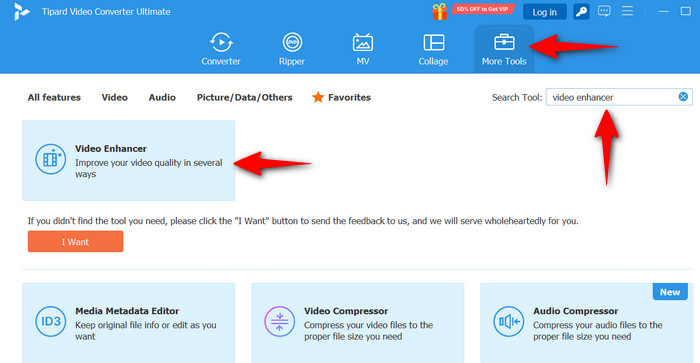
Step 2 Access the Video Enhancer tool
Click the More Tools tab from the main tabs displayed in the app's interface. Then, look for the Video Enhancer tool by scrolling through the provided features. Click the tool afterward.
Step 3 Upload a video file
At this point, click the plus button in the upload area of Video Enhancer. Choose the video you wish to reduce the shaking. After that, it will direct you to the other settings or adjustments you can apply to the uploaded video.
Step 4 Stabilize the video
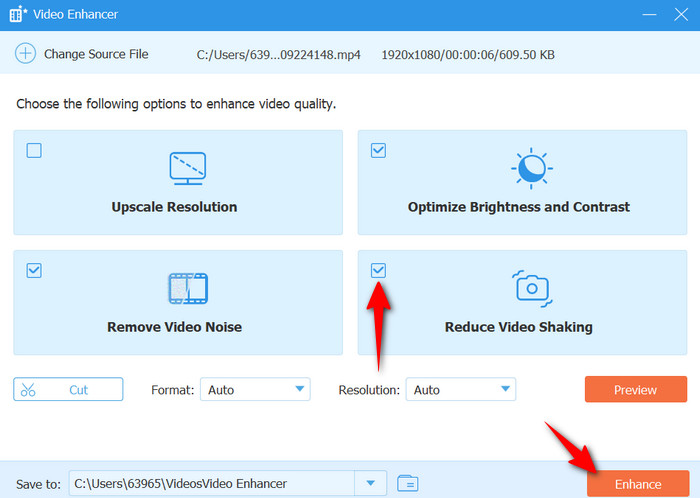
Once the video is uploaded, you will see several options to enhance your video, including reducing video shaking. Tick the box for the option of Reduce Video Shaking. Additionally, you can tick other boxes for options like Optimize Brightness and Contrast, Upscale Resolution, and Remove Video Noise. You get to see the results before even exporting the video by clicking the Preview button. When satisfied, hit the Enhance button. The app will display the location where the output video was saved.
Part 4. Tips for Shooting Relatively Stable Videos
For some essential tips on shooting stable footage, consider the following to minimize the need for post-production stabilization and elevate your video quality.
1. A monopod offers stability while paving the way for more movement flexibility than a tripod.
2. Holding your breath briefly while filming minimizes natural body sway. Try to practice breathing control.
3. Using a stabilizing rig or strap could also help distribute weight and reduce shake in handheld shooting.
4. When working with extremely shaky footage, it is essential to know about a video deshaker, as it specializes in correcting severe camera movements that standard stabilizers cannot handle.
5. You may also want to avoid digital zoom as it amplifies small movements. Instead, move closer or use optical zoom.
6. Try walking like a ninja by bending your knees slightly and moving smoothly to avoid jerky handheld footage.
7. It is also essential to hold the camera properly, using both hands, keeping elbows tucked in, and holding the camera close to your body.
Conclusion
That covers all the particulars about how to stabilize footage in After Effects. On top of that, you can try alternatives, such as the given tool, if you are looking for an effective yet simple-to-use alternative. Then, to prevent future videos from shaking, tips are provided for your perusal.
More Reading


About the Author
