
Learning how to edit vertical videos in iMovie is essential if you are creating content for TikTok, Instagram, or YouTube Shorts. Given that the default mode is horizontal (landscape) editing of iMovie, vertical videos may require some tweaking. In this guide, we will discuss how to properly rotate, crop, and export your clips designed for mobile devices.

Part 1. How to Edit a Vertical Video in iMovie
Filming videos in vertical orientation has become standard with social media TikTok, Instagram Reels, and YouTube Shorts. A common issue faced in iMovie is that integrating a vertical video does not maintain the vertical orientation, or it is cropped to fit a landscape frame. The good news is that iMovie does allow for the proper editing of vertical videos: all you need to do is rotate, crop, and cut videos in iMovie accordingly. In this post, we will explain how to edit a vertical video in iMovie while maintaining its format.
Step 1 To begin with, open iMovie on your Mac and click on Create New, then select Movie to start a new project that you will be editing.
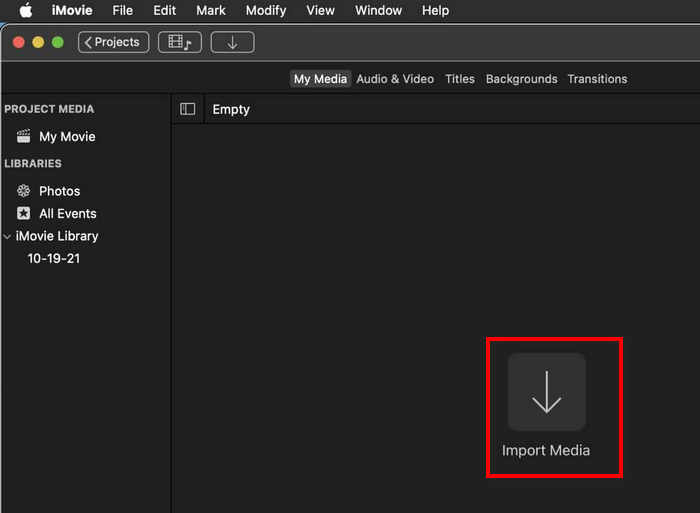
Step 2 In another step, forward import your vertical video by selecting Import Media or simply dragging the file to the media library.
Step 3 After importing the video, drag the clip onto the timeline located at the bottom of the screen, where the edits will be made.
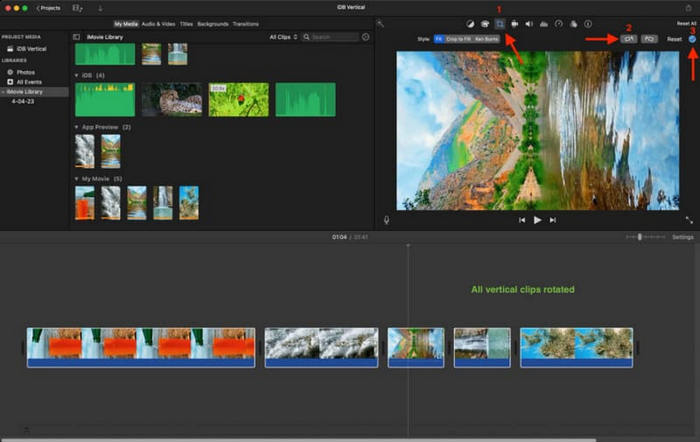
Step 4 In the next step, select the video on the timeline by clicking on it. At the top right corner, above the preview window on the top right corner, click on the Crop tool button. Select the option saying Crop to Fill, and if your video is sideways, click the Rotate button or the circular arrow until the video is facing upright.
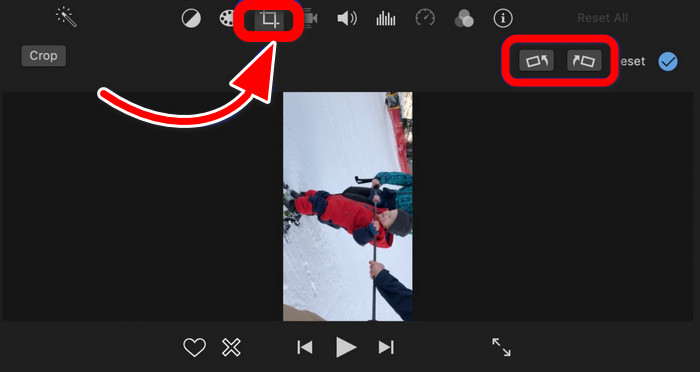
Step 5 With the video correctly oriented, adjust the cropping outline to center your main subject and click on the blue checkmark to save the changes.
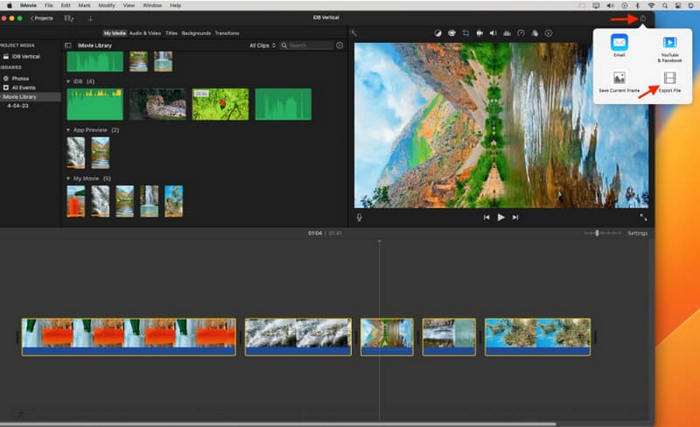
Step 6 After all desired edits are done, click the Share button located in the upper right section and click on File. This gives the option to save video on the desktop or folder you have selected.
Step 7 Lastly, designate a name to your file, select the desired resolution and quality settings, and click on Next, which will save the video. Your vertical video is now perfectly formatted and is ready to be posted on any mobile-sensitive platform.
Part 2. How to Make a Video Vertical Using iMovie
If you are trying to change a previously recorded landscape video, iMovie for Windows does not support vertical video projects; you can still switch the format. This is ideal for Instagram Stories and Reels or other similar vertical video platforms. With some smart rotating and cropping, you can modify your content without recording it all over again.
Step 1 Open Imovie, head over to Create New and select Movie to start working on a new project.
Step 2 Drag your video into your media bay and click on either Import Media or drag the file into the bay.
Step 3 Move the imported video clip into the timeline, where you can begin editing it.
Step 4 Select the video clip in the timeline, and to the right in the preview section above, click the rotate button two times (this rotates the video 180 degrees) to change the orientation to vertical.
Step 5 After rotating the video, click on the Crop tool button and select the option Crop to Fill. Ensure that the frame you are cropping contains only the portion of the video you wish to retain after adjusting to the new vertical orientation. Try your best to position the subject in the middle during framing and avoid cutting off key aspects of the video content.
Step 6 After adjusting the crop, click on the checkmark to apply the crop adjustments and go back to the video preview.
Step 7 After cropping and rotating the video, click the top right corner Share button and select Export File option.
Step 8 Once the file is saved, open it with QuickTime Player. In case the video is still sideways, navigate to View in the menu bar, then Rotate Left or Rotate Right until the video displays correctly in a vertical orientation. Save your version afterward.
Part 3. iMovie Alternative to Convert and Edit a Video in Vertical
Tipard Video Converter Ultimate is undoubtedly a remarkable option if you are looking for something more than just basic video editing features provided by iMovie, especially when sharing videos on social media. This program not only allows you to edit and convert videos effortlessly; it also offers advanced features such as creating slideshows, split-screen layouts, and format presets for Instagram, TikTok, and YouTube. Whether you are a beginner or someone with editing experience, Tipard offers a streamlined experience that can turn raw footage into polished, platform-ready content in just a few clicks.

- Rotate, crop, and convert videos to vertical or landscape.
- Create slideshows or split-screen videos with templates.
- Export videos in TikTok, Instagram, and more formats.
- Enhance the quality, add filters, and clean up the audio.
- Convert files fast with GPU boost and batch tools.

Step 1 You can get Tipard Video Converter Ultimate from the official website. For your system, download the corresponding Windows or Mac version.
Step 2 Open the installer after downloading, and proceed with the installation by following the synoptical directions. Launch the application after installation.
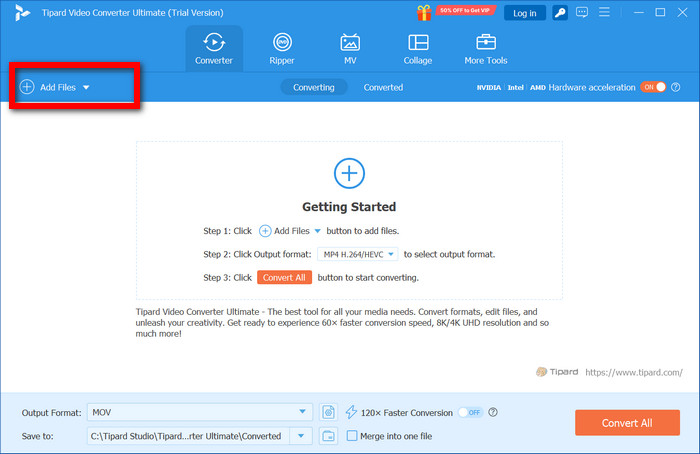
Step 3 Click the Add Files button and select the video you wish to edit. Dragging and dropping the file into the interface also works.
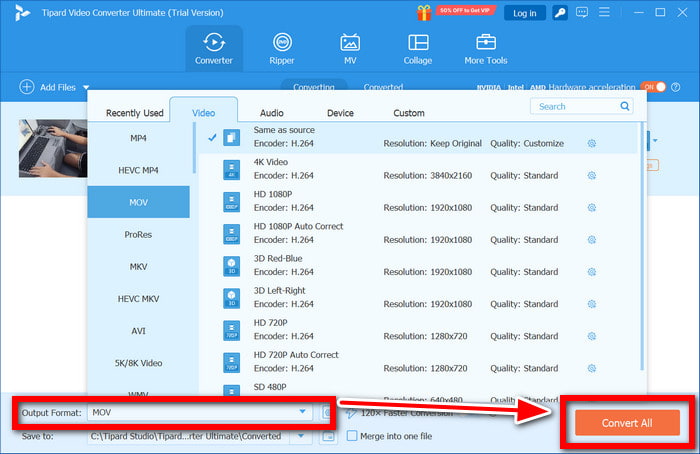
Step 4 With your video loaded, to modify it, click the Edit button indicated by a magic wand on the right side of the file. Click on the Rotate & Crop tab to change the orientation of your video. The aspect ratio of 9:16 is vertical, and 16:9 is landscape.

Step 5 You can also add filters or adjust trim and brightness, add watermarks, and set filters in the other tabs, so feel free to do so after cropping and rotating.
Step 6 For social media, pre-defined options such as TikTok, Instagram, or YouTube can be found in the dropdown section of the format selection.
Step 7 Then, click Convert All to begin processing your video. Tipard will convert and save the video to your selected output folder.
Step 8 Once the conversion finishes, go to the folder location to preview your final vertical video, which is now ready for uploading or sharing.
Conclusion
iMovie vertical video editing may seem tricky at first, but with the proper steps, you can easily rotate, crop, and format your footage for any platform. Whether you are sticking with iMovie or trying alternatives like Tipard, you now have everything you need to create polished vertical videos that stand out.
More Reading


About the Author
