Learn How to Edit 3D Video in Final Cut Pro on Mac
Many people want to learn how to edit 3D videos in Final Cut Pro. And if you are one of them, you are reading the right article. You probably know what Final Cut Pro is if you are a macOS user. Final Cut Pro is a famous editing software that Apple creates. It allows you to edit complex videos, working with larger frame sizes, high frame rates, and effects. Read this article until the end if you want to know more about Final Cut Pro and edit 3D videos.
Part 1. How to Edit 3D Video in Final Cut Pro
Final Cut Pro is known to perform immensely; many professional editors use this app. And if you are wondering if Final Cut Pro and Final Cut Pro X are the same, they are not. But, they do not have that much difference. Final Cut Pro X is more advanced than Final Cut Pro. Final Cut Pro X or FPX is the latest version of the Final Cut Pro. They do not have many differences; some of them are the technical differences, user interface layout, and feature location. So, if you are interested in doing a 3D video, Final Cut Pro will help you with that.
Pros:
- 1. It allows you to handle complex projects.
- 2. It enables you to conduct Multicam editing.
- 3. You can organize your audio and video detailedly.
- 4. It has many advanced editing features to use.
- 5. You can edit videos offline.
Cons:
- 1. It has a hard-to-operate user interface.
- 2. Only works on Mac computers.
As stated above, Final Cut Pro is a famous software application for Mac for video editing. And if you do not know, Final Cut Pro also allows you to edit 3D videos. Using this tool's built-in features, you can create your 3D effects. You will know the final cut pro 3D editing steps in this part.
With the help of the Draw Mask Effect of Final Cut Pro, the effects will stimulate 3D imagery using a flat video-freeze frame. Using the Draw Mask Effect will require you to do a manual outline to differentiate it from your background. So in this process, you need a video with a clearly defined background.
Step 1Add your video to the timeline. Then, using the keyboard shortcut, you will capture a still frame.
- 1. Create a project by clicking File>New>Project located at the top menu bar.
- 2. Press the Import button above the browser, or press Command+I on your keyboard.
- 3. Then, select your video and increase the Scale property of your video to 110%.
- 4. And then, drag your video to the timeline and skim to where you want to freeze the frame.
- 5. Press Option+F to capture the freeze-frame.
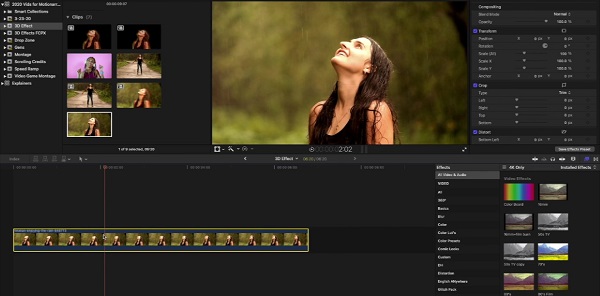
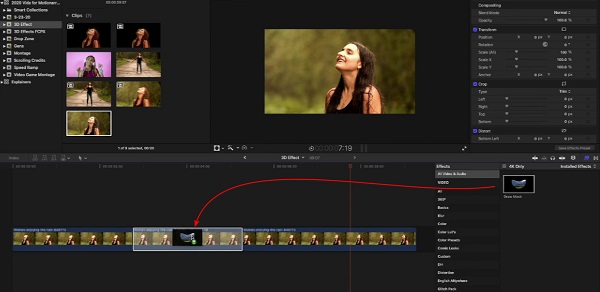
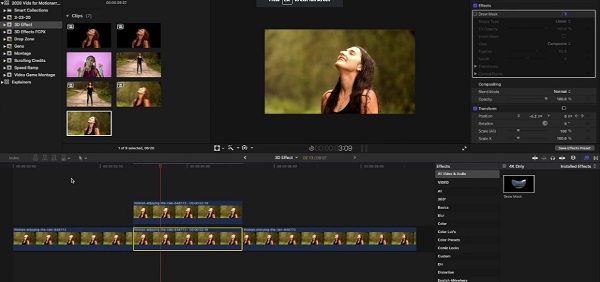
Step 2Next, we will add the draw mask effect to your video. Go to the Effect Browser in the Mask option.
- 1. On the Effect Browser, click the Draw Mask and drag it to the timeline on your freeze-frame.
- 2. Select the freeze frame, then in the Viewer, press the Click to Add a Control Point.
- 3. Turn up the Feather property in the Inspector panel to make it look more like a 3D video.
Step 3You need to create copies of the still frame and move them independently to create a moving background.
- 1. You need to make a keyframe at the beginning of your still frame. To do that, click the diamond located at the right of the Position property.
- 2. And then, find the middle keyframe and set it to -10.
- 3. Hold the Option and drag it upwards to copy your still frame.
- 4. Next, invert the middle clip's X position. The -10 will turn into 10.
- 5. Below the timeline, select the freeze frame clip, then disable the Draw Mask effect. You will observe that the background will appear.
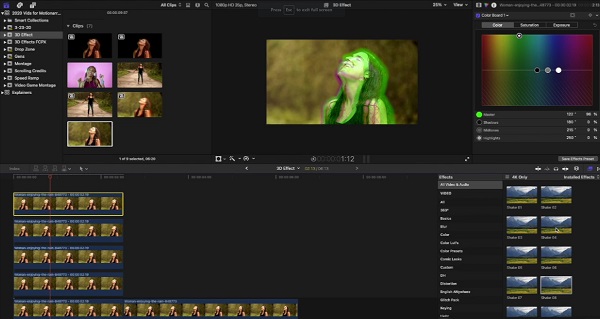
Step 4Now, let us add the Stereoscopic Effect to your video.
- 1. Make a copy of your video by holding the Option button and dragging it upward.
- 2. Reduce the new clip's opacity and set it to 50%.
- 3. And then, go to the Color Inspector and adjust the Master Control, making the red the highest.
- 4. Create two copies of your video, and change the Master Control to blue and green.
- 5. On the Effect browser, search shake. Add a shake effect on each of your colored videos.
- 6. Lastly, go to the Transition browser and add Cross Dissolve to each colored video clip.
Quite complicated? After some practice, you will easily create a 3D video using Final Cut Pro. You can also use the 3D effect in Final Cut Pro X to have more advanced 3D editing features.
Part 2. Top Alternative to Final Cut Pro
Final Cut Pro is only available on Mac computers. So, if you are using a Windows computer, you might want to try this tool.
Tipard Video Converter Ultimate is a software application available on all media platforms, including Windows and Mac. In addition, it is editing software that has many functions. You can make 3D videos, GIFs, convert videos, and more. Moreover, it supports numerous file formats, such as AVI, MKV, FLV, AVI, MP4, WMV, and 500+ more formats. Also, you can choose what type of 3D video you want to have your video (Anaglyph or Split Screen).
Pros:
- 1. It has an easy-to-use software interface.
- 2. It supports 8K, 5K, 4K, and HD video resolutions.
- 3. It has a built-in DVD ripper.
- 4. Downloadable on all media platforms.
Cons:
- Purchase the app first before accessing its special features.
How to make a 3D video in Tipard Video Converter Ultimate:
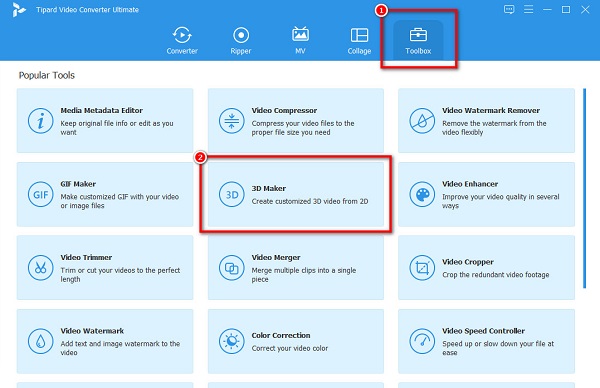
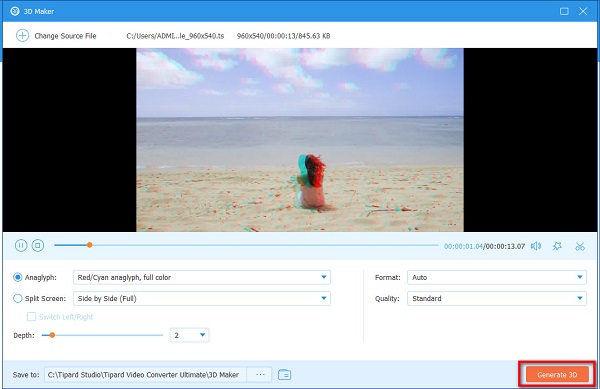
Step 1Download Tipard Video Converter on your computer, then open the app. Go to the Toolbox panel, then click the 3D Maker.
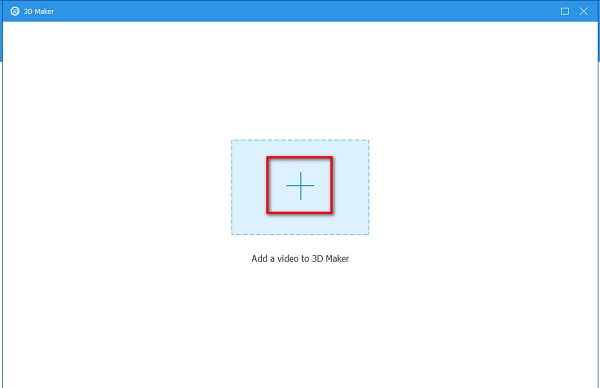
Step 2Click the plus (+) sign button to upload a video on the next interface.
Step 3After uploading a video, select what type of 3D video you want to have between Anaglyph 3D or Split Screen 3D.
Step 4Finally, click the Generate 3D button to apply the 3D effect to your video.
Extended Reading:
Movavi Video Converter 3D 2.0 - Reviews and Alternative
3 Most Outstanding 3D Music Video Makers for Windows and Mac
Part 3. FAQs about Editing 3D Videos in Final Cut Pro
How to do a 3D photo effect in Final Cut Pro?
Create a hold frame.
Draw Mask.
Add Shake.
Add horizontal shake effect.
Add a side-to-side motion.
Copy and Paste second video clip.
Adjust the shake amount.
Add the frame rate effect.
Can you animate an image in Final Cut Pro?
Yes. Final Cut Pro has many editing features that you can use. You can also use this tool to animate images and videos.
Is Final Cut Pro X free?
No. Many professional editors use Final Cut Pro X for filmmaking and streaming media. And Final Cut Pro X costs $299.99 from the Mac App Store.
Conclusion
Now that you know how to edit 3D videos in Final Cut Pro, we hope you can now create your 3D video. Final Cut Pro surely will help you create a 3D video. Many professionals use this because of its amazing editing features. However, if you want a 3D maker available on Windows and is easier to use, download Tipard Video Converter Ultimate now!