

If you are into video editing, you have probably heard of CapCut. It is a popular video editor linked to many creative tools. But did you know it can do more than editing? Meet CapCut Video Upscaler!
This review covers what it is, how to use it on desktop, online, and mobile, plus useful details that will help you know what to expect. Ready? Let us dive in!
Part 1. What Is CapCut Video Upscaler
CapCut Video Upscaler can make low-quality videos look clearer and better. It uses AI to improve sharpness and add more detail. It can also fill in some missing details in blurry videos. This helps create a clearer video instead of just making the pixels bigger.
Technical Specifications
- AI Engine: Uses AI and computer vision.
- Max Resolution: The desktop app can improve videos up to 4K UHD, or 2160p.
- Input Formats: Supports common formats such as MP4 and MOV.
- Color: Can keep common video color spaces such as Rec. 709.
How to Find It on CapCut Desktop
Step 1 Open CapCut on your Windows or Mac.
Step 2 Import your video and place it on the Timeline.
Step 3 Click the video clip on the Timeline.
Step 4 Open Video > Basic in the top-right panel.
Step 5Scroll down and turn on Enhance quality.
Is CapCut Video Upscaler Free?
CapCut has free editing tools. Its online version also offers some free AI tools. However, the advanced Enhance quality options on desktop may require CapCut Pro. Some features may also have usage limits. So, you can try the basic tools for free. But you may need Pro for advanced AI upscaling and higher-quality output.
Key Features
- AI Edge Sharpening: Makes blurry or soft edges look clearer and sharper.
- Video Denoising: Removes some grain and unwanted noise from the video.
- Texture Recovery: Adds back some lost details. It can help with hair, leaves, text, and other small parts.
Part 2. How to Upscale a Video in CapCut
Do you want to know how to upscale a video in CapCut? You can improve your video on a computer, in a browser, or on a phone. But the steps may look a little different on each platform. Below is the full process!
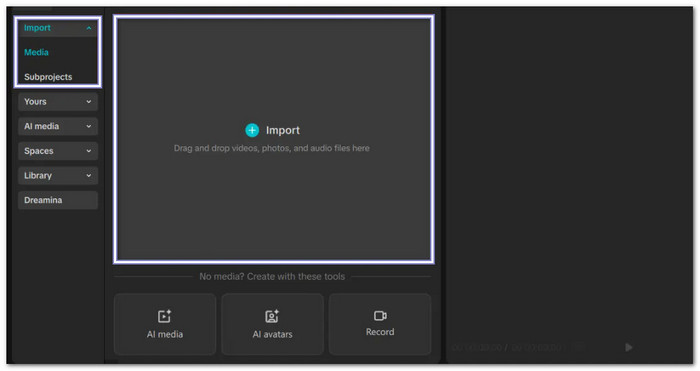
Step 1 Run CapCut Desktop and start a new project. Click Import and choose your video. Then, drag it to the Timeline.
Step 2 Click your video clip on the Timeline. Look at the top-right panel. Choose Video and then Basic. Find Enhance quality and turn it on.
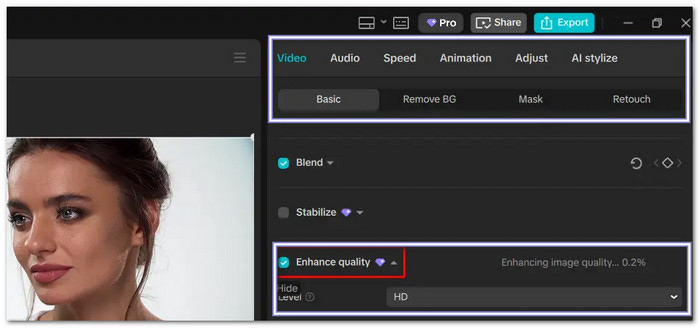
Step 3CapCut may show HD and Ultra HD options. Pick the one you need. Ultra HD is the better choice when you want more detail.
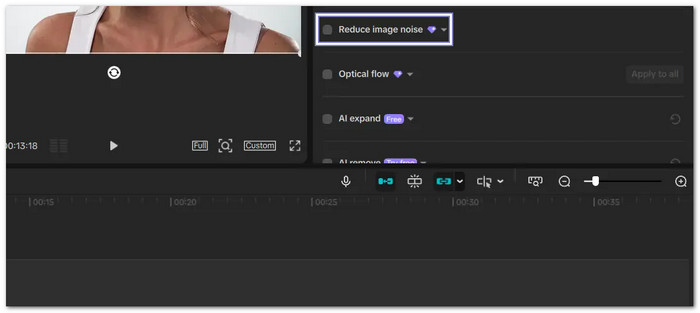
Step 4 Look for Reduce image noise below the quality option. Turn it on if your video looks grainy. This can make dark or old footage look cleaner.
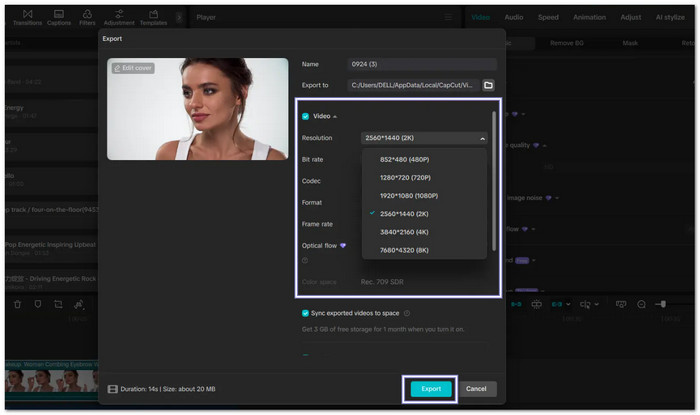
Step 5 Click Export in the top-right corner. Choose 4K if the option is available. Use a high bitrate for better detail. Then, export your video.
Upscaling on Other Platforms
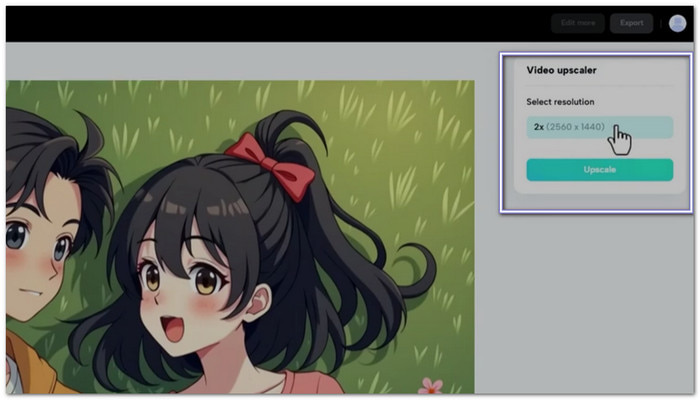
Web Browser: Open CapCut Online Video Upscaler and go to Magic Tools. Choose Video Upscaler. Upload your video and click Upscale. The available output can include higher resolutions such as 2K or 4K.
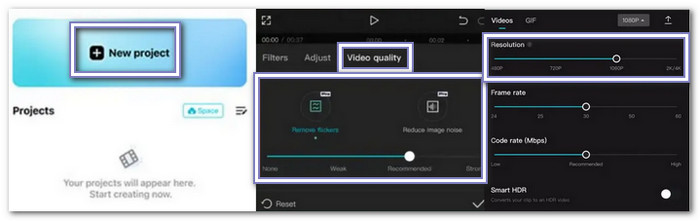
Mobile App: Open CapCut on your Android or IOS and proceed to import your video. Tap Adjust and select Video Quality. Apply the enhancement, then export it in 1080p or 4K. After that, save the upscaled video to your phone's folder.
Part 3. CapCut Video Upscaler Review
How well does the CapCut AI Video Enhancer really handle video upscaling? In this review, we will put its key areas to the test, from ease of use, upscaling performance, detail recovery, processing speed, etc.
| Criteria | Review |
|---|---|
| Ease of Use | Excellent. The tool is easy to find and use. You do not need special skills. |
| Upscaling Performance | Good. It can give low-resolution clips a cleaner look. The result is better when the source is already clear. |
| Detail Recovery | Fair to Good. It can sharpen edges and improve visible details. It cannot bring back details that are fully gone. |
| Processing Speed | Good. Short clips can be processed quickly. The actual time can vary based on the video and device. |
| Motion Quality | Good. The tool works on video frames. Still, fast or complex scenes should be checked after processing. |
| Noise Reduction | Good. CapCut can reduce noise and grain. Too much noise reduction may also remove small details. |
Pros & Cons
- Works inside the video editor.
- Reduces noise and light blur.
- Easy for beginners to use.
- Offers free and Pro options.
- Advanced 4K features may need Pro.
- Strongly compressed videos may look too smooth.
- It cannot restore details that were fully lost.
- Some users are experiencing the Capcut not working issue due to a compatibility issue, a large video file, etc.
Part 4. Is CapCut Good at Video Upscaling
CapCut can be a good match for many creators. But what does a creator really need from an upscaler? The answer is more than just a higher number like 4K. It should save time, keep the video clean, and fit easily into the editing process.
What Creators Look For vs. What CapCut Delivers
- Creators want fewer extra tools. CapCut lets them upscale the video inside the same editor. There is no need to move the clip to another app.
- Creators want videos to look sharper and cleaner. CapCut works best with footage that already has some detail. It is less useful for very poor footage.
- Creators often work with tight deadlines. CapCut keeps the process simple. Short clips can be enhanced without a complex setup.
- Creators want the video to look real. CapCut can improve visible details. However, it cannot fully rebuild details that the source video never had.
- Videos should still look natural after upscaling. CapCut can keep the original motion fairly well. Very complex scenes should still be checked before export.
- You can edit, enhance, add text, and export in one place. This keeps the whole process simple.
So, is CapCut good for video upscaling? Yes. It is a good option for social media creators, vloggers, and people who edit videos for everyday use. However, it may not be the best choice for professional video restoration where small details are very important.
Part 5. The Best CapCut Video Upscaler Alternative
If CapCut Video Upscaler feels too limited for more than basic upscaling, you may want a tool with more video enhancement controls. Tipard Video Converter Ultimate is a solid alternative. Its AI Video Enhancer can upscale video to higher resolutions while also reducing noise and shakiness. It can also adjust brightness and contrast to make colors look more balanced.

- Cut videos and add smooth fade-in or fade-out effects.
- Support resolutions up to 4096×1260.
- Support output formats like MP4, MOV, MKV, AVI, WMV, and WebM.
- Preview the video before saving the final result.
Step 1Run Tipard Video Converter Ultimate once downloaded and installed on your Windows or Mac computer.
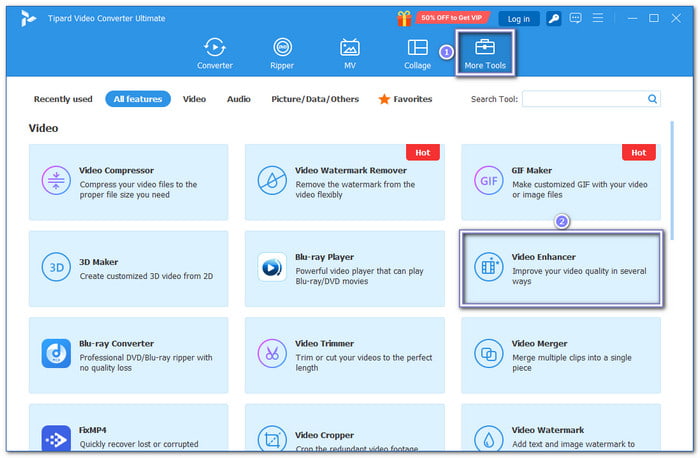
Step 2 Go to More Tools and choose Video Enhancer. Click the Add button. Then, import the video you want to upscale.
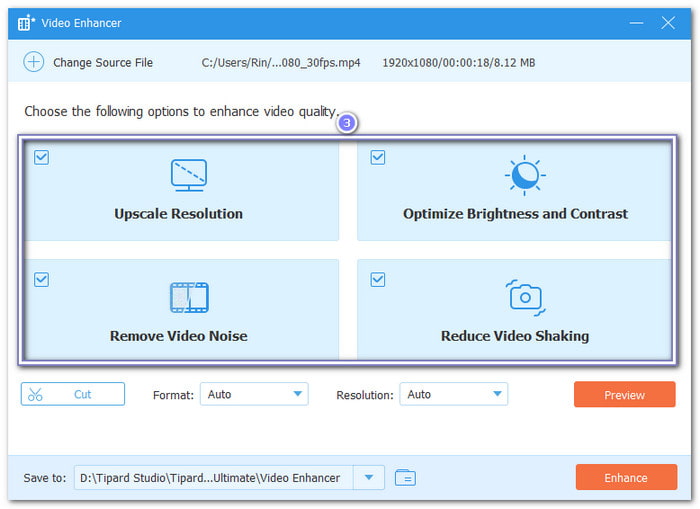
Step 3Check Upscale Resolution to improve the video quality. You can also enable Remove Video Noise, Reduce Video Shaking, or Optimize Brightness and Contrast when needed.
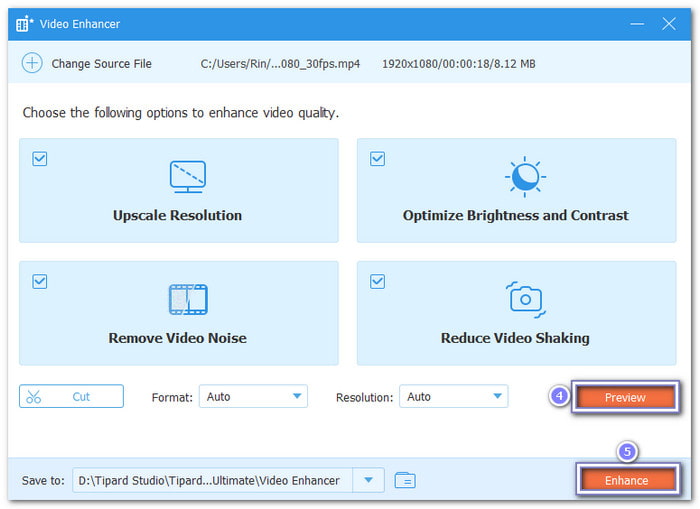
Step 4Click Preview to check a 10-second sample. You can also trim the video and change its format, like MP4, AVI, MOV, and MKV. Once you are happy with the result, click Enhance to process the video.
Part 6. FAQs of CapCut Video Upscaler
Does upscaling change the video frame rate?
No. Upscaling mainly changes the video resolution. You can choose the frame rate when exporting.
Does CapCut keep the original audio?
Yes. The original sound can remain in the video when you export it. Before saving, make sure the sound settings are correct.
Does upscaling increase the file size?
Yes, it may. Videos with higher quality usually need more storage space. The settings you choose when exporting can also change the file size.
Conclusion
Overall, CapCut Video Enhancer is a simple choice for better-looking videos. It can sharpen details and reduce noise with little effort. For an alternative, try Tipard Video Converter Ultimate. It can upscale videos and also reduce noise, fix shaky footage, and improve brightness and contrast.
All-in-one video toolbox: convert, edit, upscale, enhance, and compress your videos easily
100% Clean & Safe
100% Clean & Safe

More Reading



About the Author


 Tipard Video Converter Ultimate