"For the first time, I wanted to share a video of mine on YouTube, but after uploading, my video appeared blurry, laggy, and had black bars on the sides. Why is that?"
It happens because the recommended settings for YouTube were not followed. If you do not use the right video format for YouTube and ignore important settings like resolution, frame rate, and aspect ratio, your video may lose quality or play poorly.
But do not worry anymore; this guide has all the important information and easy steps to help you adjust your video settings.

Part 1. The Absolute Best Video Format for YouTube
When you plan to put your video on YouTube, choosing the best video format for YouTube makes a big difference. For most people, and as recommended by YouTube, the best format is MP4.
Why MP4 is the Winner:
1. MP4 with H.264 for video and AAC for audio gives high quality while keeping file sizes smaller.
2. MP4 files rarely crash or have playback problems. Your viewers can watch smoothly.
3. YouTube recommends MP4 because it handles streaming better. Your video loads faster and plays without buffering.
4. Most YouTube video editors support MP4. You can cut, trim, or add effects easily without converting formats.
Part 2. YouTube Video Format & Size Explained
Sharing videos on YouTube is not just about choosing the right format. The YouTube video formats and sizes, along with aspect ratio, resolution, quality, and frame rate, all affect how your video looks and plays.
• Aspect Ratio
YouTube works best with a 16:9 aspect ratio. It is the standard widescreen format. Videos with this ratio fill the screen properly and avoid black bars on the sides. If your video is smaller or taller, YouTube will add black bars, and it will not look as clean.
• Resolution & Quality
The higher the resolution, the sharper your footage looks. YouTube supports 720p, 1080p, 1440p, and 4K. For most creators, 1080p is perfect; it looks clear and does not create huge files. If you want extra clarity and have a fast upload, 4K gives the best detail. Always export in MP4 with H.264 to keep the quality while keeping the file size reasonable.
• Frame Rate
Your video's frame rate is how many frames show per second. YouTube supports 24, 30, 48, 50, and 60 fps. Use the same frame rate you recorded. If your video is smooth at 30 or 60 fps, YouTube will keep it that way. Do not try to change it; it can make your video look choppy.
Part 3. The Ultimate YouTube Export Settings Cheat Sheet
To make your video look great on YouTube, you need the right export settings. Below is a cheat sheet with the best settings and why they work.
| Setting | Recommended Value | Why It Is Best |
|---|---|---|
| Container | MP4 | Works on all devices, keeps files small, and is considered the best format for YouTube videos by the platform. |
| Video Codec | H.264 | Gives high quality with low file size; smooth playback on YouTube. |
| Audio Codec | AAC | Clear sound and compatible with YouTube. |
| Aspect Ratio | 16:9 | Fills the screen properly and avoids black bars. |
| Resolution | 1080p (1920×1080) or 4K | Sharp and clear video; 1080p is ideal for most, 4K for great detail. |
| Frame Rate | Match source (30fps or 60fps) | Keeps motion smooth; don't change it to avoid choppiness. |
| Bitrate | 8 Mbps for 1080p, 35-45 Mbps for 4K | Good balance of quality and upload size; avoids buffering on YouTube. |
| Color Space | Rec. 709 | Standard color for YouTube; looks natural on screens. |
| Keyframe Interval | 2 seconds | Helps YouTube compress video efficiently without losing quality. |
| Show MoreShow Less | ||
Follow these settings, and expect your video will look great, upload faster, and play smoothly on YouTube.
Part 4. A Note on "Old YouTube Video Format"
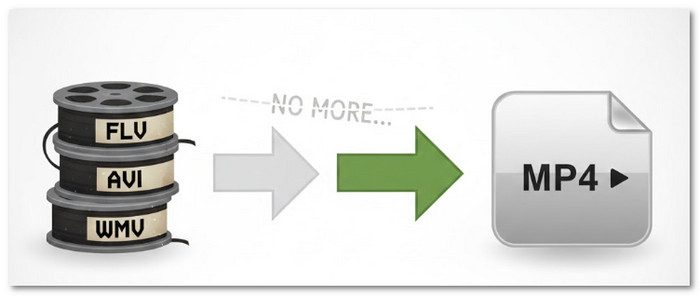
YouTube has changed a lot since it started. In the early days, videos were often uploaded in formats like FLV (Flash Video), AVI, or WMV. These are considered the old YouTube video formats and were popular because internet speeds were slower, and video codecs were different.
Today, MP4 with H.264 has been the standard for over a decade. It gives better quality, smaller file sizes, and faster uploads. YouTube can still accept old formats, but they are not recommended. Using them can make processing slower and lower the final video quality. So, MP4 with H.264 is the safest and smartest choice for YouTube today.
Part 5. How to Apply These Settings in Editing Software
Do not waste any more time; get your video ready to upload to YouTube right now! You can apply the settings you learned using Tipard Video Converter Ultimate.
With this tool, you can change your video format to MP4, which is the recommended YouTube video format, adjust the frame rate, choose the video encoder, set the resolution and bitrate, and fix the aspect ratio. It is super easy to use, so you can quickly adjust all the settings your video needs.
Below is a guide you can follow to make your video fully ready for YouTube:
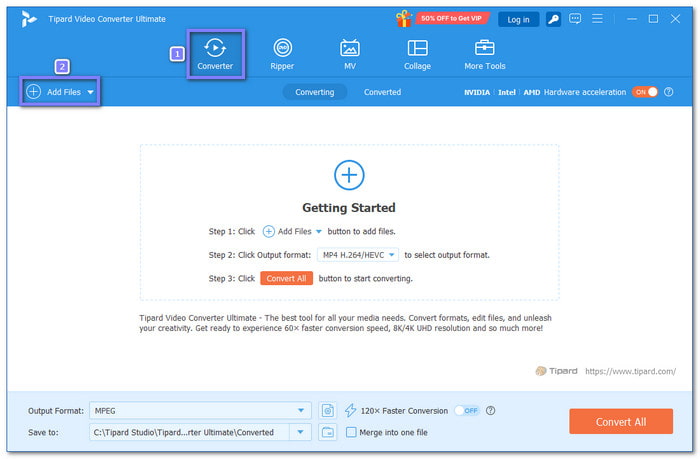
Step 1 Please refer to the Download buttons below to obtain Tipard Video Converter Ultimate on your Windows or Mac computer.
Step 2 You are directed to the Converter tab. Now, upload the video you want to change the settings for by clicking the Add File button. Once loaded, your video will appear in the program, ready for editing and format changes.
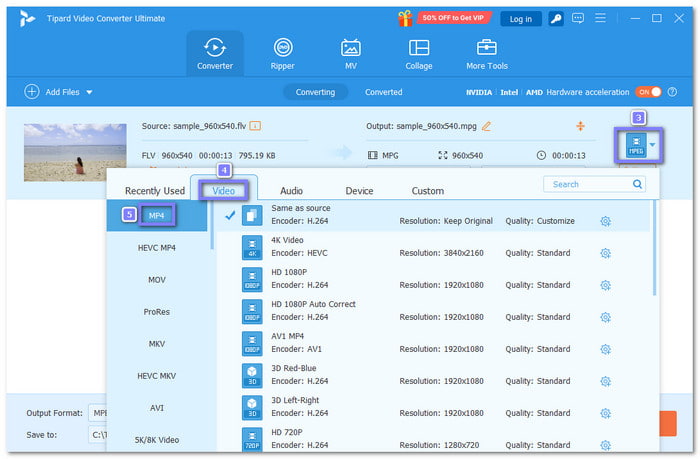
Step 3 Open the Format menu. If your video is not already in MP4, select MP4 as the final container under the Video tab. It ensures your video is compatible with YouTube and uploads smoothly.
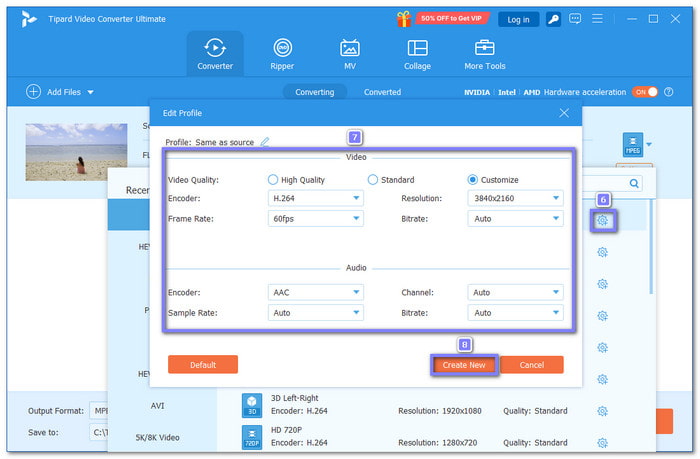
Step 4 Click the Cogwheel button to open more settings. Here, select H.264 as the Video Encoder, pick a Resolution, like 1280×720 (1080p) or 3840×2160 (4K), set the Frame Rate to 30fps or 60fps, and adjust the Bitrate for good quality. For audio, choose AAC as the encoder. Once done, click Create New to apply the settings you just made.
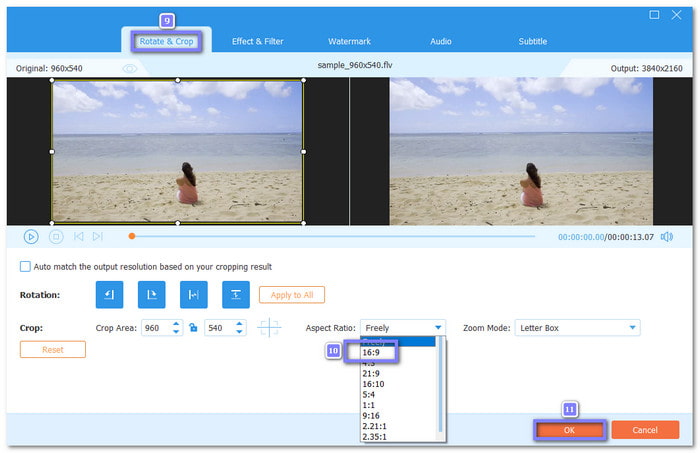
Step 5 Let us change the aspect ratio! To do that, click the Edit button, go to the Rotate & Crop tab, and set the Aspect Ratio to 16:9. It ensures your video fills the YouTube screen correctly. Are you done? If yes, click the OK button to save the changes.
Step 6 You are done following the recommended YouTube settings! Now, click the Convert All button, and please wait a little while. Once done, check your folder to find the video. Now, it is ready to upload to YouTube with the correct export settings!

Additional Details: MP4 is also the best Instagram video format. You can also use Tipard Video Converter Ultimate in case your video is not in the supported format, so that it will play correctly on the platform.
Conclusion
As we discussed above, using the right YouTube video file format, which is MP4, ensures your video uploads are faster and play smoothly. Luckily, Tipard Video Converter Ultimate is here to help you apply the recommended YouTube settings.
We cannot wait for you to upload your video to YouTube and show it to everyone!
More Reading


About the Author