On older systems like macOS High Sierra or earlier, QuickTime Player is still the main tool for recording. But once recording starts, the controls often hide, which can make stopping the recording confusing.
Are you now looking for an answer on how to stop QuickTime screen recording? If yes, you have found the right page. We will present three fast ways to do it. There is also an alternative that can help you upgrade your recording workflow, waiting for you.
Part 1. 3 Fast Ways to Stop QuickTime Screen Recording
QuickTime screen recording looks simple, but many users get confused when it is time to stop it. The control display can disappear during recording, so it may seem like nothing is working. That is why it helps to know a few fast ways to stop QuickTime screen recording without stress.
Method 1: Using the Stop Button
Step 1 Look at the top-right part of your Mac screen while QuickTime is recording. Even if the QuickTime controls disappear, the menu bar stays visible.
Step 2 Click the Stop button in the navigation bar. It ends the recording right away and opens the preview display.
Step 3 Check the video first to make sure the recording ended at the right part. It helps you avoid saving the wrong clip.
Step 4 Click File and then Save. Choose where you want to keep the recording on your Mac.

Method 2: Using the Keyboard Shortcuts
Step 1 To learn how to end QuickTime screen recording quickly, press Command + Control + Escape at the same time. It is the fastest way to stop a recording without using the mouse.
Step 2 Please wait for QuickTime to open the recorded file after the shortcut works. The video usually appears right away.
Step 3 Press Command + S to save the file quickly. A save display will appear on your screen.
Step 4 Rename the recording if needed and choose a folder before you click Save.

Method 3: Using the Activity Monitor
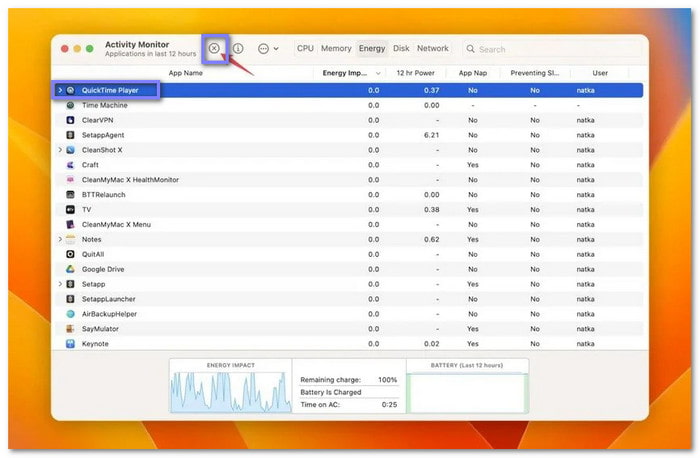
Step 1 If you are unsure how to stop a screen recording on QuickTime Player, open Finder, go to Applications, then open Utilities, and select Activity Monitor.
Step 2 Find QuickTime Player in the process list. Click it once so it becomes highlighted.
Step 3 Click the Stop button at the top of Activity Monitor to close the app process.
Step 4 Choose Quit first. If QuickTime does not respond, select Force Quit, but note that this may remove the current recording if it has not been saved yet.
Part 2. What to Do If QuickTime Freezes or Won't Stop
QuickTime screen recording can freeze, especially when the Mac is under heavy load, or the app stops responding. The screen may stay stuck, and the stop control may not react. In this case, the goal is to close the app without causing more trouble. It also helps to act carefully because an unfinished recording may not save correctly.
If QuickTime does not stop, open Activity Monitor and check if QuickTime Player is still active. Choose Quit first because it gives the app a chance to close safely. If nothing changes, use Force Quit to end it right away. It is often the last option when the app is fully stuck. After that, reopen QuickTime and check if the file was saved automatically. Some recordings may still appear in the recent files list.
Part 3. Why QuickTime Might Not Be the Best Choice in 2026
QuickTime still works well for simple screen recording, but it has limits that many users notice today. The controls can disappear during recording, which can make the process confusing when trying to stop screen recording in QuickTime Player. It also has fewer editing tools, so you often need another app after recording.
Another issue is that QuickTime may freeze when long recordings use more system memory. It also does not give many format choices when saving video files. In 2026, many users want tools that record, edit, and export in one place. That is why QuickTime is still useful for basic tasks, but not always the best choice for longer or more advanced work.
Part 4. QuickTime Alternative to Upgrade Your Recording Workflow
A QuickTime alternative to upgrade your recording workflow should do more than basic screen capture. Tipard Screen Capture gives you that extra help in one tool. It supports long recordings without lag, so long sessions stay smooth.
It also keeps the original video clear and can upscale output to 4K when needed. AV1 and HEVC codec support helps reduce file size while keeping strong quality. It also helps you manage recordings better through simple editing and file control.
Key Features:
- Schedule recording time and set file size limits.
- Capture full, custom, scrolling, or pop-up screenshots.
- Export in a variety of formats, like MP4, MKV, MP3, FLAC, and GIF.
- Edit videos or audio with trim, compress, merge, and resolution tools.
- Draw on screen, add callouts, insert images, or switch to a whiteboard.
Step 1 Head to the main website of Tipard Screen Capture and download the installer for Mac or Windows. After the file finishes downloading, open it and complete the installation.
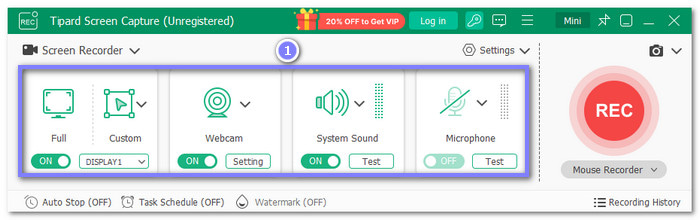
Step 2 The Screen Recorder feature is already active when the program opens. Choose Full if you want to capture the whole Mac or Windows screen. Choose Custom if you only need a selected area. You can also turn on the Webcam, System Sound, or Microphone before recording. It is useful if you want to add your voice, system audio, or camera view at the same time.
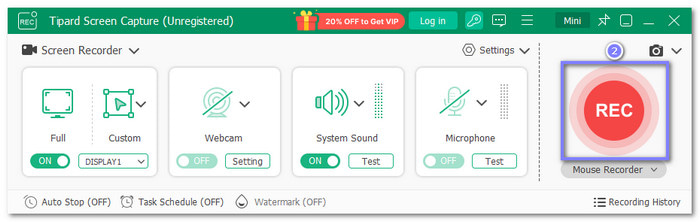
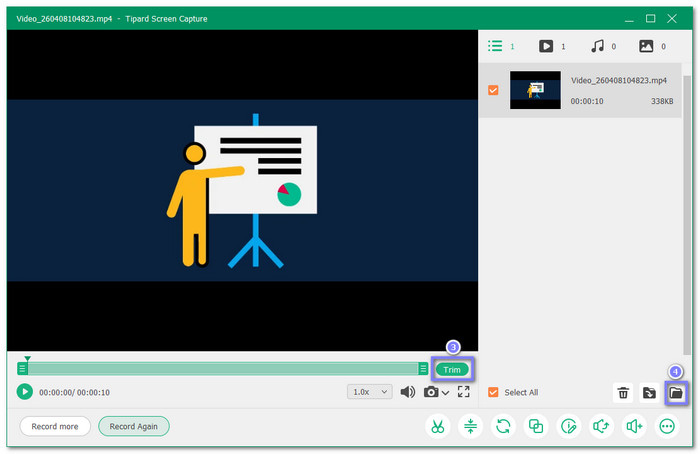
Step 3 Hit the REC button on the right side to begin. A short countdown will appear first, then the recording starts automatically. Keep the recording running until you finish your task or presentation. Once done, click the Stop button, and the preview display will open right away.
Step 4 Watch your recorded video in the preview display and check if everything looks clear. If extra parts appear at the start or end, use the Trim tool to remove them. Once the video looks good, click the Folder button to save it to your local folder. If you want to capture another video, click the Record More button on the left side and start again.
Below is a comparison of QuickTime and Tipard Screen Capture to show which one is better for your recording needs.
| Feature | QuickTime | Tipard Screen Capture |
|---|---|---|
| Recording Quality | Standard clarity. | High quality, can upscale to 4K. |
| Recording Duration | Limited, may lag on long recordings. | Supports long-duration recording without lag. |
| Audio & Webcam | Limited, basic microphone only. | Record system sound, microphone, and webcam at the same time. |
| Scheduling | Not available. | Schedule start and stop time and file size limits. |
| File Formats | MOV only. | Multiple formats: MP4, MKV, MP3, FLAC, GIF, and more. |
| Drawing & Callouts | Not available. | Draw, add callouts, insert images, and use whiteboard mode. |
| User-Friendly | Simple for beginners. | Simple and interactive screen recorder for Mac and Windows. |
| Show MoreShow Less | ||
Conclusion
Hope our how to Stop QuickTime Screen Recording on Mac guide helps you end your recordings easily and safely.
If you want more features, Tipard Screen Capture is the recommended alternative to upgrade your recording. You can download it freely on Windows or Mac. You can record your screen, webcam, and sound at the same time. In addition, it can handle long recordings and runs without lag.
More Reading


About the Author