
Taking screenshots helps you share what is on your screen fast. On a Mac, there are built-in shortcuts, but they are often limited. A snipping tool for Mac can make the job much easier. It lets you capture part of the screen, add notes, and save it right away. This is useful for work, school, or showing someone how to fix a problem.
You can even edit your shots before sending them. In this guide, you will learn what a snipping tool is, find the best ones for Mac, and see how to use them step by step.

Part 1. What Is a Snipping Tool
A snipping tool is a simple app that lets you capture any part of your screen. It can take a full-screen shot, a window, or a selected area, then save or edit it right away. On Microsoft computers, the Snipping Tool has long been built into Windows as a handy screen capture feature. For Apple users, a snipping tool for Mac works in a similar way. It gives more control and options than the default shortcuts. You can use it to highlight, crop, or mark important details. It is a must-have tool for work, study, or daily use.
Part 2. 9 Best Snipping Tools on Mac
Finding the right screen capture app can make work or study much easier. Below are the best snip tools for Mac that combine speed, quality, and easy use.
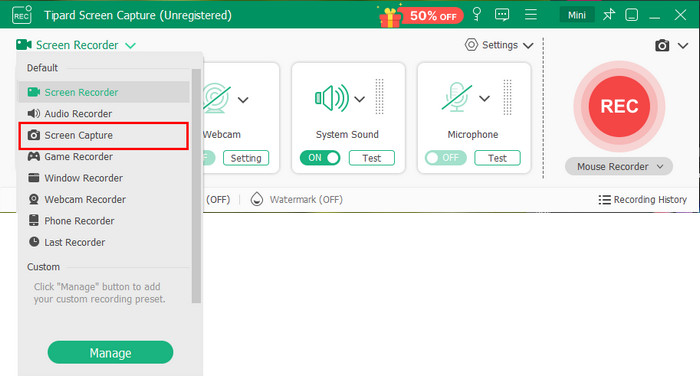
1. Tipard Screen Capture
Tipard Screen Capture is an easy and reliable snipping tool on Mac. It helps you take clear screenshots of your screen in just a few clicks. You can grab the full screen, a window, or any part you choose. After taking a shot, you can crop, draw, or add text right away. The tool also lets you manage your screenshots in one place so that you can find and edit them easily. You can preserve your images in PNG, JPG, or other formats for work, school, or personal use. It is simple, fast, and works smoothly on Mac.
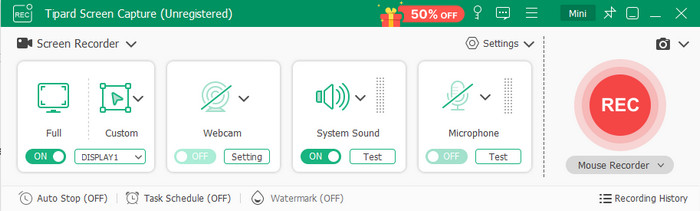
- Easy to use with a clean layout
- Built-in editing for quick fixes
- Saves images in many formats (PNG, JPG, etc.)
- Runs smoothly and captures in high quality
- Some features are locked in the free version
2. Built-in Snipping Tool
Many users ask, Is there a snipping tool on Mac? Yes - Mac has one built right in. It's free, fast, and ready to use anytime. Just press the Mac snipping tool shortcut: Shift + Command + 5. This opens a small toolbar that lets you take a full-screen capture, a window shot, or select an area. You can even record your screen. It's the quickest way to grab what's on your display without downloading anything.
- Pre-installed and free to use
- Works instantly with simple hotkeys
- Capture full screen or part of it
- No built-in editing tools
- Lacks cloud or sharing options
3. Snagit
Snagit is a professional tool for users who want to do more than take screenshots and scrolling screenshots. It lets you record videos, add audio, and capture scrolling windows. The built-in editor makes it easy to highlight details and create clean visuals. If you're wondering how do you use the snipping tool on a Mac for tutorials or work, Snagit gives you everything you need. It even allows direct sharing to email, apps, and cloud services.
- Simple and stable interface
- Captures images, videos, and audio
- Robust markup and editing options
- Fast sharing tools
- Short free
- Costly for those who continuously use it
4. CleanShot X
CleanShot X is one of the most polished snip tools for Mac. It is designed specifically for macOS and offers advanced tools like background hiding, scrolling capture, and quick annotations. You can save your captures to the cloud or share them instantly with a link. Its neat interface and seamless integration make it ideal for professionals who take screenshots daily.

- macOS-optimized and fast
- Cloud upload and link sharing
- Many editing and capture options
- Beautiful, minimal design
- Paid software (no free version)
- It may be overkill for casual users
5. Lightshot
Lightshot is a free snipping tool for Mac that's known for its speed and simplicity. It lets you capture any part of your screen and quickly add text or shapes. When this is complete, one can save the image or even upload it to the cloud with a single click. It is ideal for anyone who has to share screenshots frequently on the internet. Although it does not have sophisticated editing features, it is light, quick and does the task very well.
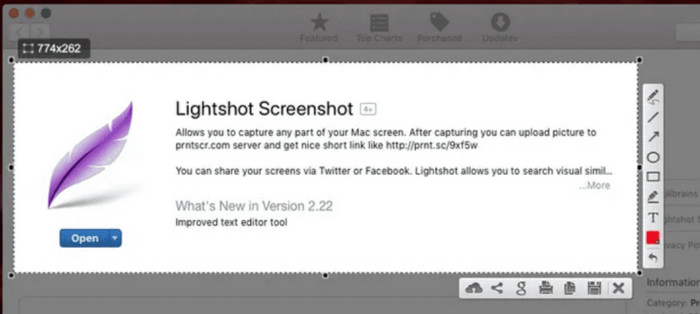
- Free and lightweight
- Simple editing tools consisted of
- Shares photos on the internet easily
- Limited editing features
- Fully non-optimized to 4K screens
6. Monosnap
Monosnap is great if you want to capture and share screenshots easily. It allows you to take images or record videos and upload them to its own cloud service. You can add text, arrows, or boxes to mark key details. The tool also lets you adjust capture settings to fit your needs. If you are learning how to get a Snipping tool on Mac with cloud sharing, Monosnap is a strong pick.

- Capture screen and record videos
- Provides cloud storage and sharing
- Basic editing features were provided
- Can crash at times
- Lacks developed video editing
7. Greenshot
Greenshot is a lightweight snipping app that runs well on both Windows and Mac. It's simple to use and great for basic screen captures, making it an option if you are looking to screenshot on a Mac. You can add text or arrows before saving or sharing. It also supports PNG, JPG as well and BMP formats. Greenshot is a convenient free snipping tool to use in case the user wants a fast and no-frills application.

- Free and easy to install
- Basic annotation tools
- Supports different image formats
- Less tools in the Mac version.
- No cloud sharing feature
8. TinyTake
TinyTake is a simple screen capture and video recorder tool on both Mac and Windows. You are able to take pictures or quick video bits of your display, scribble on them, and transfer them immediately. It also provides free cloud storage, where it is easy to save and transmit files. TinyTake is a decent option in case you need to find a free snipping tool on a Mac that will allow you to take a picture and record a video.
- Captures images and videos
- Has annotation tools
- Includes cloud storage
- Allows direct YouTube sharing
- Free version limits recordings to 5 minutes
- Some features are not available on Mac
9. TextSniper
TextSniper does more than take screenshots. It can capture text from images, videos, and PDFs using OCR technology. This is useful if you need to copy words from pictures or scanned pages without typing them. It works offline, which is perfect for users who want privacy. For anyone who often works with documents, this tool is worth having.
- Extracts text from screenshots and videos
- Works offline
- Accurate and fast text recognition
- Short 7-day free
- Needs macOS Catalina or newer
Part 3. How to Use a Snipping Tool on Mac
Here is how you can capture your screen using Tipard Screen Capture, one of the best tools for Mac users.
Step 1 Download Tipard Screen Capture on your Mac by clicking the download button above or visiting its official website. Follow the setup guide to install, then open the software.
Step 2 On the main interface, choose Screen Capture. Your cursor will change into a crosshair, which is the snipe tool, which is in effect. To choose the area that you would like to capture, simply click and drag and release your mouse to shoot.
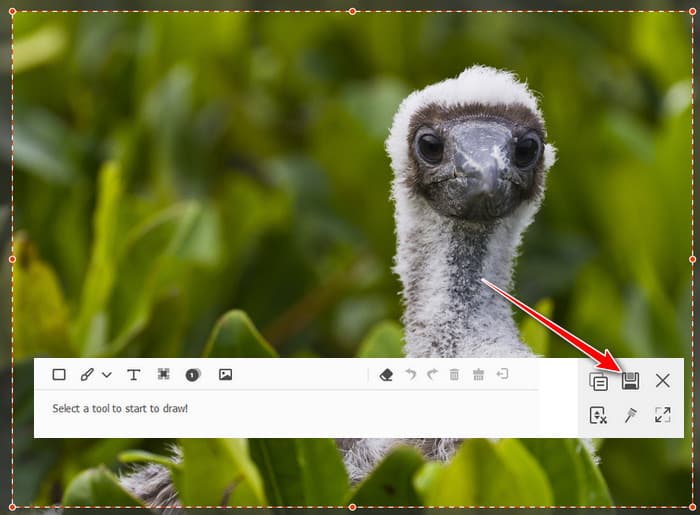
Step 3 After snapping, you can rework your image using the built-in tools. Add highlights, crop, or mark key details. Once done, tick Save to keep your screenshot.
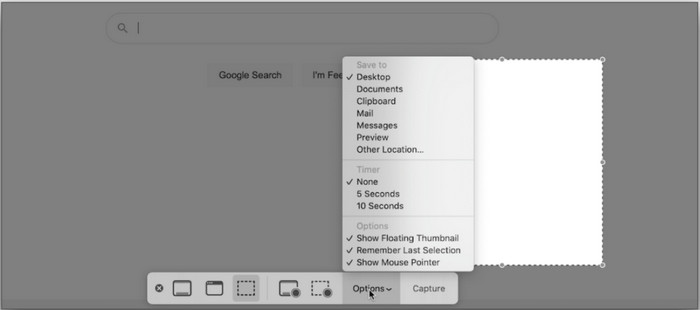
You can instantly take a screen snap with the built-in option rather than having to download software by clicking Shift + Command + 4. The feature allows you to choose and save a certain section of your screen immediately. The picture will automatically save to your desktop, which is a quick option for taking quick snapshots.
Conclusion
Using a snipping tool on a Mac makes capturing and editing screenshots quick and easy. Whether you need to save work notes, share tutorials, or highlight important parts of your screen, this tool helps you do it all in seconds. Tipard Screen Capture stands out because of its simple interface and editing options, making it great for daily use. Try it once, and you will see how convenient it is to take clear and polished screenshots anytime you need.
More Reading


About the Author
