Key Takeaways
iPhone users can use the built-in Screen Recording feature. Mac users can record using QuickTime Player. Other key points are:
- Legal considerations: The consent of all the participants who are being recorded is a must.
- Recording of FaceTime calls on a Mac: QuickTime Player will do the job of making screen recordings. QuickTime Player is also suitable for audio recording.
- Audio/notification issues: It is mostly about audio recording/permissions of the person recording.
- Tool suggestion: Tipard Screen Capture records smoothly, records best, and edits best.
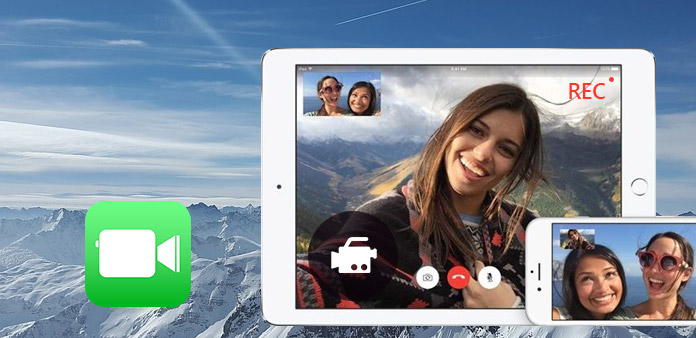
It is important to know how to record a FaceTime call to save and review a meeting, family conversation, online conversation, etc. Users often encounter occasions where it is necessary to document events or information in an easy-to-recall way. People often find themselves needing to capture information or moments in a clear record, especially when recalling details afterward.
Part 1. The Legal and Privacy Baseline
Taking a FaceTime recording is one of the most helpful things to finish a vital discussion, online assembly, or memorable and unforgettable conversation. In some countries or regions, however, it might be illegal to record another person without permission. Make sure all participants are aware of and agree to the recording before beginning any recording. Abiding by legal and ethical practices ensures the protection of personal information and also helps in avoiding unnecessary conflicts.
Here are a few things to keep in mind when recording:
- Obtain permission from everyone participating in the FaceTime call.
- Local laws may affect call recording, so investigate these rules.
- Only record where there is a legitimate need, for instructional, documentary, or personal reference purposes.
- Securely storing recordings so they cannot be viewed by others or accessed by accident.
- Do not share the recorded material without permission.
Part 2. How to Record FaceTime Calls on iPhone
FaceTime is actually not built-in with a recording characteristic; the iPhone has a built-in Screen Recording characteristic, which can be used to seize video in a FaceTime session. With the mic on before starting to record, the screen and voice can both be added to the recording when you record videos on an iPhone.
Step 1 If not enabled, enable Screen Recording in the Control Center. Tap Settings, and here pick Control Center and add Screen Recording from the Controls.
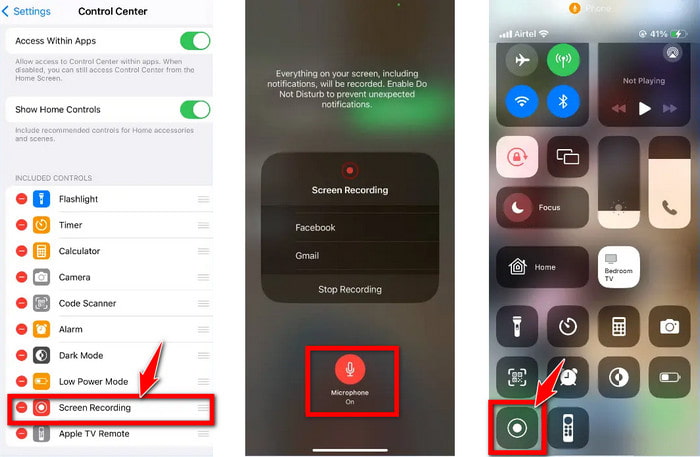
Step 2 Press and hold the Screen Recording, then turn on the Microphone before beginning to Record. This process is to ensure that exterior sounds will be documented.
Step 3 After this, go to Record to commence your FaceTime Video Call. Screen recording starts after a short while.
Step 4 Now, follow suit with your discussion, then do normal stuff you would normally do. Turn on the use of Do Not Disturb to disable Notifications while making a recording, if possible.
Step 5 After the conclusion of the call, make it through with it, press the Red Recording Indicator, and hit the Stop button. This then gets automatically saved into the Photo App, whereby you are able to view, edit, or share it with other people.
Part 3. How to Record FaceTime Calls on Mac
There exist several methods that Mac computers may be applied to document FaceTime video calls. Easiest method. The easiest technique is through the use of QuickTime player, which is included within the Mac OS X. This application may also be used to take a screen capture, and then the video could be edited for necessary modifications.
Step 1 From the File menu, choose New screen recorder in QuickTime Player, then press Film. Then choose Screen Recording from the dropdown menu in the File menu.
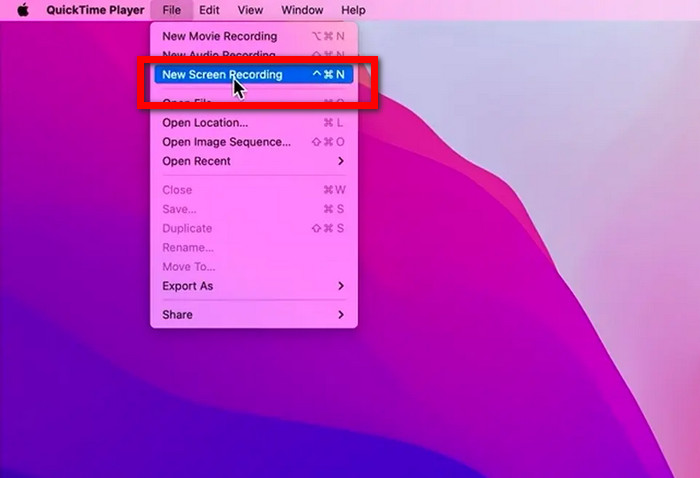
Step 2 Turn on the recording for Video/Audio if necessary, choose the desired Microphone within the choices Menu of control options in the Record control button. You may want to either capture your entire Full screen or the specific FaceTime Window.
Step 3 Turn on the RECORD. Start your FaceTime video call, then press on the button that is placed on the screen; all that is on that specified window on the screen will be captured.
Step 4 At the conclusion of a FaceTime call, turn it off either by utilizing the on-screen menu bar button or by means of a keyboard shortcut for an efficient stoppage.
Step 5 Play back the file recorded and then save it in the folder that best fits for saving on the hard drive. The trim and enhanced version will either require editing on other software or, later, after completion of the audio recording.
Part 4. How to Fix FaceTime Recording No Sound
This is one of the major problems when recording a FaceTime video call. Too often, it is because of the settings of the microphone, recording permissions, and limitations of the built-in recorder. The problem can probably be resolved with basic troubleshooting, but a dedicated screen recording software provides you with more control over your video and audio sources. Tipard Screen Capture is an effective tool to capture a FaceTime conversation with both audio and video that is synced in real time, then has editing and exporting features afterward.
- Take iPhone or Mac video and audio recordings while on FaceTime.
- Maintain original quality recordings (4K and above).
- Record FaceTime, perhaps without any lag, with great quality.
- Select one of the options: Full screen, window, or custom area
- Preview, cut, compress, and output in a variety of sizes.

Step 1 Download and Install Tipard Screen Capture
Install Tipard Screen Capture on the Mac or Windows computer. Once installed, start the software.
Step 2 Choose the Recording Mode
Choose the Screen Recorder mode from the main interface. Select the Full screen, the FaceTime window, or define a Custom recording area based on the recording needs.
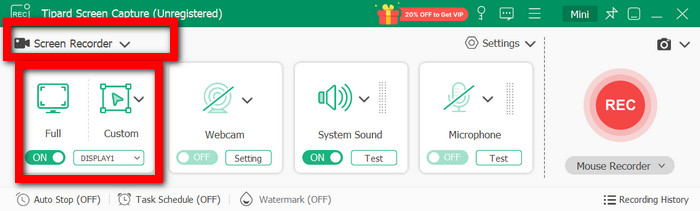
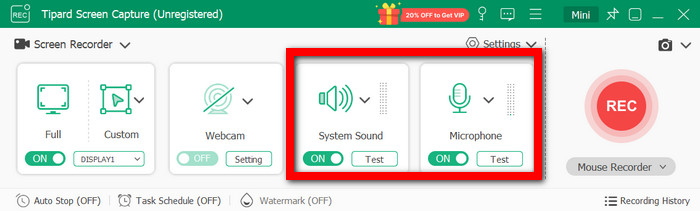
Step 3 Configure Audio Settings
Pre-record, make sure to turn on both System Sound and Microphone. Adjust the volume to get the FaceTime call and voice to sound clear.
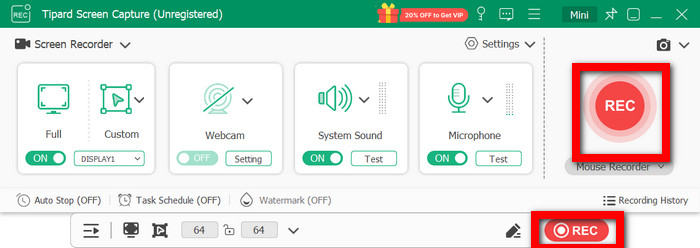
Step 4 Start a recording of the FaceTime Call
Start the FaceTime session and then click the REC button. Once the countdown is over, the recording begins automatically. The recording session includes a drawing tool, text, callout, image, and whiteboard, which are accessible for the entire session.
Step 5 Preview, Edit, and Save Recordings
Press the Stop button when the call is over. Preview the recording, edit out unwanted parts, or compress or convert into a different type of file if necessary, and then save it to a local file or share it to supported platforms.
Part 5. FAQs of Recording FaceTime
Does FaceTime warn the other person that you are recording?
The screen-recording feature on FaceTime does not notify you when you start to record. There is a potential that application participants could sense visual cues/behavior on the device, and therefore, transparency is recommended in order to ensure privacy compliance.
Is it possible to edit recordings of FaceTime?
Yes, your Mac and iPhone can edit recordings that have been saved; on a Mac, use QuickTime, and on the iPhone, use Photos. Users can cut out sections of the video they do not wish to include, shorten or lengthen the video, and edit the playout characteristics before sharing or saving the video file. This is also similar to a game recorder, where captured gameplay can be trimmed, refined, and adjusted before exporting or sharing.
What about decreasing the size of FaceTime videos?
High-quality video, extended calls, and uncompressed video often cause a large file size. Cutting off unnecessary parts and/or the compression tools can decrease the space requirement without discarding more than an acceptable percentage.
Conclusion
Use FaceTime screen recording to capture essential moments, chats, and meetings for later viewing. Users can easily capture using suitable steps on an iPhone or a Mac while allowing for privacy regulations. Tipard Screen Capture brings clearer videos & audio, and offers flexible editing options for more stable results.

Record full screen, portion, window, game, and phone seamlessly without lag
100% Clean & Safe
100% Clean & Safe
More Reading


About the Author