
- Part 1. How Long Can You Screen Record on an iPhone
- Part 2. How Much Space Does Screen Recording Take on iPhone
- Part 3. How to Screen Record on an iPhone
- Bonus. How to Screen Record on iPhone Without Time Limit
- Part 4. How to Edit Screen Recording on iPhone
- Part 5. FAQs of Screen Recording on iPhone
How long can you screen record on an iPhone? Although the built-in feature of Apple makes it easy to record your screen, there are some crucial restrictions and pointers to be aware of. This tutorial explains how to record without time limits using Tipard Screen Capture, providing maximum flexibility, as well as details on recording duration, storage usage, and editing procedures.

- Part 1. How Long Can You Screen Record on an iPhone
- Part 2. How Much Space Does Screen Recording Take on iPhone
- Part 3. How to Screen Record on an iPhone
- Bonus. How to Screen Record on iPhone Without Time Limit
- Part 4. How to Edit Screen Recording on iPhone
- Part 5. FAQs of Screen Recording on iPhone
Part 1. How Long Can You Screen Record on an iPhone
The iPhone screen recording feature has no time limit; instead, it depends on the storage and battery life of your device. You can record continuously for up to three hours if you have enough power and space.
For longer sessions, such as tutorials or gaming, ensure your phone has sufficient free storage and charge it. Even older iPhones can record for long periods if the right conditions are met. Record in a cool environment, as the device may overheat.
Part 2. How Much Space Does Screen Recording Take on iPhone
Screen recordings can consume a significant amount of storage, depending on factors such as length, resolution, frame rate, whether audio is recorded, and the iPhone video formats used. Newer iPhones that support higher resolution and smoother frame rates will naturally produce larger file sizes.
Here is an estimated breakdown of how much space different lengths of screen recordings may use:
| Recording Length | Estimated Storage Usage | With Microphone Audio | With High Screen Activity |
|---|---|---|---|
| 5 minutes | 150-200 MB | +10-20 MB | Slightly larger (~220 MB) |
| 15 minutes | 500-700 MB | +30-50 MB | 800 MB |
| 30 minutes | 1.2-1.5 GB | +100 MB | 1.6-1.8 GB |
| 1 hour | 3-3.5 GB | +200 MB | 3.8-4 GB |
| 2 hours | 6-7 GB | +400 MB | 7.5 GB |
| 3 hours (max) | 9-10 GB | +600 MB | 10.5+ GB |
| Show MoreShow Less | |||
Part 3. How to Screen Record on an iPhone
The iPhone features a built-in screen recording capability that allows you to record everything happening on your screen. To set it up and begin recording, precisely follow these steps:
Step 1 Navigate to the Settings app on your iPhone, select Control Center, and then swipe down to the More Controls section, where you will find Screen Recording. Next to it, tap the green plus (+) button. By doing this, you can quickly access the option at any time by moving it to your active Control Center.
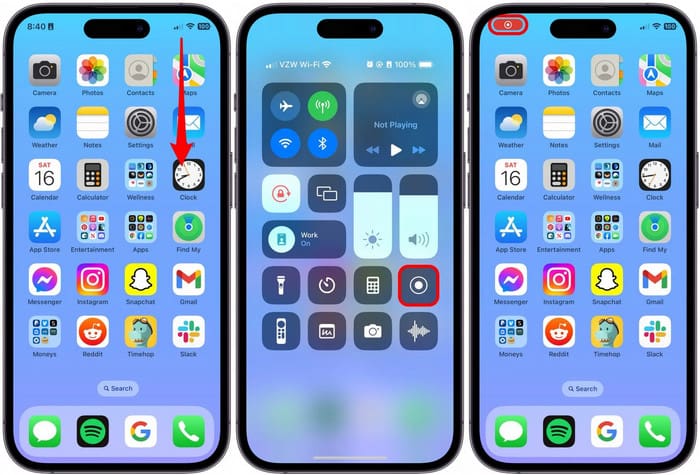
Step 2 If you are using an iPhone with Face ID, such as the iPhone X or later, swipe down from the top-right corner of the screen. On iPhones with a Home button, swipe up from the bottom edge of the screen.
Step 3 Press the Screen Recording button, which resembles a solid circle with a dot inside it. The iPhone will start recording everything that occurs on your screen after a three-second countdown.
Step 4 Press the red status bar at the top of your screen, then select Stop to confirm that you want to stop recording. By returning to the Control Center and tapping the Screen Recording button, you can also end the recording.
Step 5 The video is immediately saved to your Photos app after you end the screen capture. As needed, you can then view, edit a video on iPhone, share, or trim it.

Bonus. How to Screen Record on iPhone Without Time Limit
While the built-in screen recording function on the iPhone is useful, it has its shortcomings, including limitations on recording length, output formats, and compatibility with certain applications. To suggest a solution for these issues, one of the best options available for recording your phone screen without time limits is Tipard Screen Capture.
- This keeps your iPhone storage-free while allowing longer recordings.
- Tipard captures HD screen video with a clear system and mic audio.
- You can record your iPhone screen for hours without performance issues.
- Videos can be saved in HEVC or AV1 for high quality and smaller file sizes.

Step 1 Go to the official website of Tipard and download Tipard Screen Capture for either Windows or Mac. After downloading, open the Tipard Website and follow the instructions to install it on your computer.
Step 2 Use AirPlay or a USB cable to mirror your phone’s display on your computer. Ensure that your phone is connected to the system and that you can see the screen.
Step 3 Launch the software and click on the option for Screen Recorder. Set up whether you want a full-screen capture, a window capture, or a custom area capture.
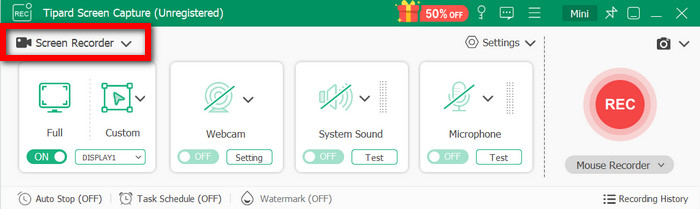
Step 4 For tutorials, app reviews, or even gameplay commentary where you would like to narrate over audio within the application, enable system audio and microphone features so you can record narration while capturing video.
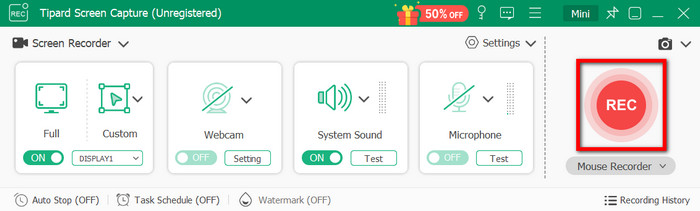
Step 5 To start recording, click the REC button. You have the ability to draw on the screen, make annotations, and even include a webcam overlay while recording.
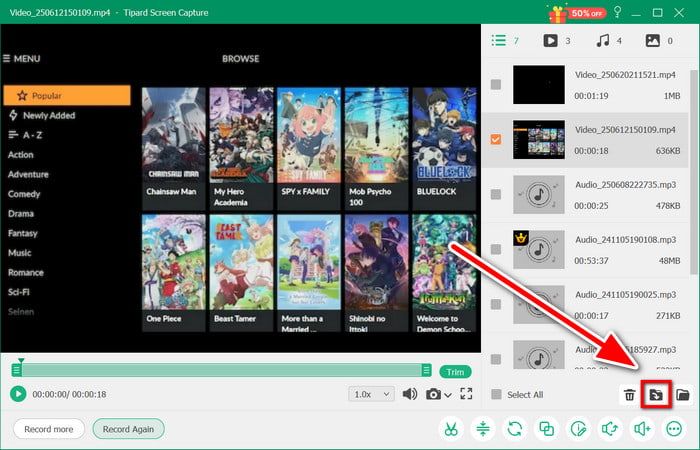
Step 6 Click the Stop button once you are finished. Your file is stored directly on your computer, freeing up your iPhone entirely after clicking the Import button.
Part 4. How to Edit Screen Recording on iPhone
Once you complete a screen recording, you can edit the video to cut out sections, such as the countdown at the start or any surplus footage towards the end. The good news is Apple has made this very easy using the built-in Photos app, so there is no need to use other video editing applications.
To edit a screen recording on your iPhone, follow these simple steps:
Step 1 Launch the Photos app and search for your screen recording. It will automatically save there as soon as you stop recording. Click on the video, and it will open.
Step 2 Click Edit, located at the top right portion of your screen.

Step 3 You will get a timeline of the video at the bottom and arrows or handles at both ends.
Step 4 Move those arrows left or right to delete parts from the beginning or end of video footage.
Step 5 When you have achieved contentment with all your modifications, click Done.

Step 6 From the given options, click Tap Save Video if you want to replace the original file with an edited one by removing a certain length of it. Or select Save Video as New Clip if you want to preserve the original video and wish to save the edited version separately.
Part 5. FAQs of Screen Recording on iPhone
Why can't I find my screen recording on my iPhone?
Screen recordings should appear in the Recent album in Photos. If not, check iCloud sync, storage, app restrictions, or hidden or deleted folders.
How to add screen recorder to iPhone Control Center?
Go to Settings, and then Control Center. Select Add Screen Recording, then access it anytime from Control Center.
Why does my iPhone randomly start recording?
Your iPhone may be starting screen recording on its own due to a Back Tap accessibility setting, ghost touches from a damaged screen or case, a software glitch, or a compromised Apple ID. To fix this, check your Accessibility settings, restart your phone, or investigate potential hardware or security issues like ghost touch or a hacked account.
Conclusion
The length of an iPhone video recording depends on your storage and battery life. Whether you are capturing a quick clip or hours of footage, understanding these limits is essential. For longer sessions without restrictions, Tipard Screen Capture offers the perfect solution, giving you full control over quality, format, and duration.

Record full screen, portion, window, game, and phone seamlessly without lag
100% Clean & Safe
100% Clean & Safe
More Reading


About the Author
