
How to Print Screen on Mac and Windows with Different Ways
Taking a screenshot is a useful skill, not matter your computer runs Mac OS or Windows. However, if you need to take a screenshot in different situations, you will find that it is complicated than you thought. Screenshot a part of your screen, for example, is useful when you ask for technological supports or share something with friends on social platforms. While shooting the entire screen may put your privacy to wrong hands. Therefore this article will introduce how to print screen in details. Considering Mac OS and Windows are totally different systems, we will introduce methods separately.
Part 1. How to take screenshot on Mac
Although Mac OS is different with Windows, Apple also developed some hotkeys to help users print screen in different situations.
#1. Take a screenshot of entire screen
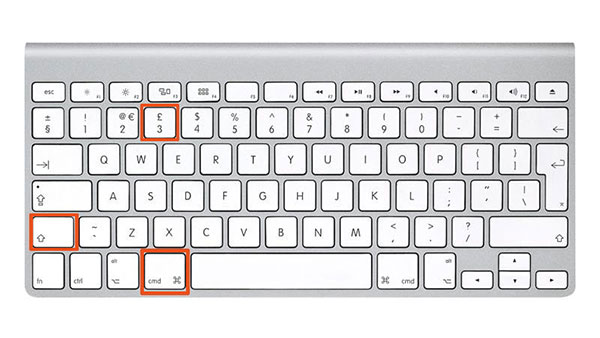
1. After open preparation, hold down the shortcut of Command+Shift+3.
2. Once you heard a sound like camera shutter, the screenshot of entire screen will appear on desktop.
3. It is usually a PNG file, named Screen Shot with shooting date.
4. You can double click on the file and edit it in Preview
5. If you need to save the screenshot to clipboard directly, you have to use Command+Shift+Control+3 in step 2.
#2. Shoot a window
1. Open the application or other window to capture.
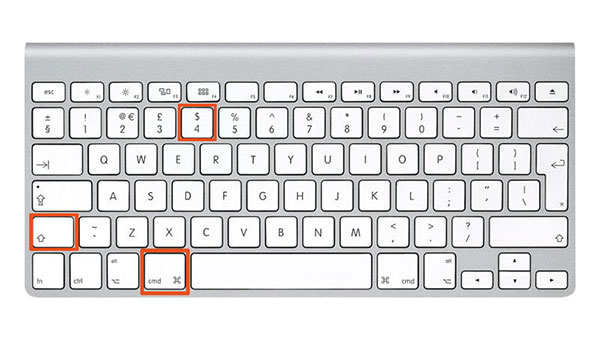
2. Press Command+Shift+4 to turn cursor to a crosshair.
3. Hold down the Spacebar to change cursor to a camera icon.
4. Located the camera icon on the window to rend it to blue.
5. Click on the window to take a screenshot.
6. Then the screen printing will show up in your desktop, labeled Screen Shot and shooting date.
7. You can use Command + Shift + Control + 4 to take place the hotkey in step 2. The screenshot will be saved to clipboard.
#3. Record screen with software
1. Mac also has a built-in screenshot application, called Grab. You can find it in Utilities.
2. Launch Grab to open it.
3. Click on Capture on the top menu area and select from:
◆ Screen: take a screenshot of entire screen.
◆ Selection: capture the selected area.
◆ Window: record the active window.
4. After printing screen, click on Save and select Save As to save the image to your computer.
#4. Create a screencast of the Touch bar
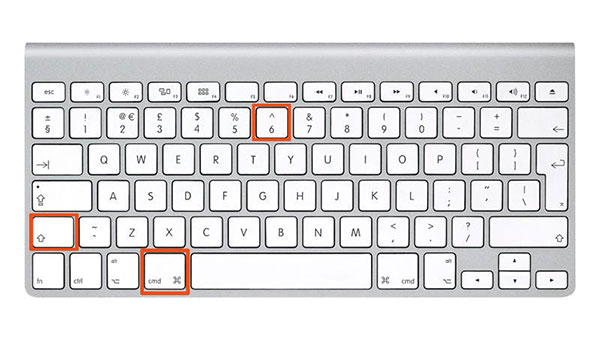
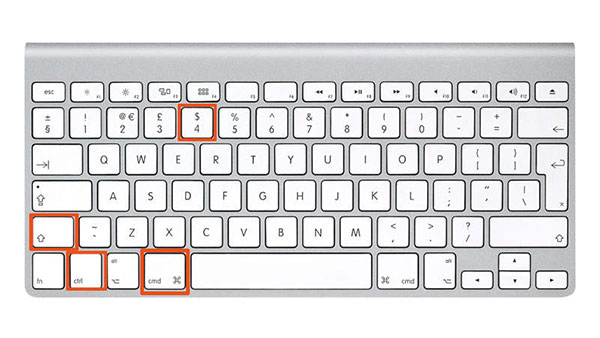
1. Press Shift + Command + 6.
2. The screencast of Touch bar will appear on desktop as a PNG image file.
3. Then you can open the image in Preview or other image editing software.
4. If you need to save the screencast to clipboard directly, you have to use Shift + Command + Control + 6 in step 1.
5. If you need to it frequently on Mac computer, you can add the screenshot button in the Control Strip area.
Part 2. How to print screen of Windows
Microsoft has developed a dedicated key and some shortcuts for Windows users to it. So we can use them to take screenshot on Windows computer in different situations.
#1. Shoot the entire screen
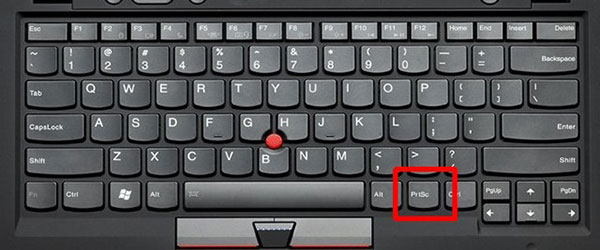
1. There is usually a key titled Print Screen or PrtSc on the keyboard of Windows computer. It is usually located in the first row of your keyboard. Press this key, Windows will shoot the entire screen and save it to clipboard without any confirmations.
2. Open an image editing program, like Paint or Photoshop, and create a new blank canvas.
3. Hold down hotkeys Ctrl+V to paste the screenshot on the canvas.
4. Then you can save it as an image file, such as JPG or PNG.
#2. Capture a window
1. If you want to take a screenshot for a window, you have to open and put it on the top of your desktop first.
2. Press Alt and Print Screen key at the same time to take a screenshot of the active window. The screenshot will be stored in clipboard simultaneously.
3. Then create a new file in any image editing software on your computer.
4. Use Ctrl+V or the paste option embedded in the editing program to put the screenshot on the canvas.
5. Finally, you can save the screenshot of the window as any image format.
#3. Create a screenshot with software
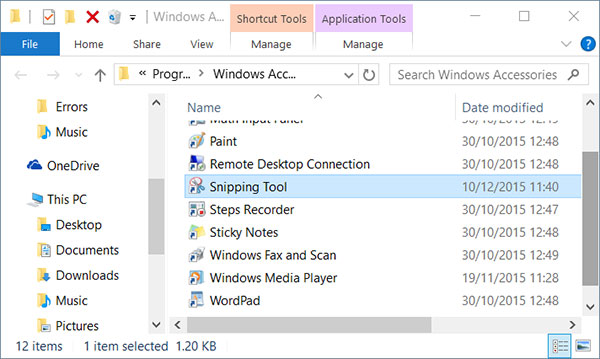
1. Actually, Windows has a built-in program, called SnippingTool. If you can not find it in Start menu, you can navigate to C drive -> Windows -> system32 and search SnippingTool.
2. SnippingTool provides four options in New menu:
◆ Free-form Snip: adjust the shooting area in any shape manually.
◆ Rectangular Snip: capture the rectangular area selected.
◆ Window Snip: record the active window.
◆ Full-screen Snip: take screenshot of the entire scree.
You can select any one depending on your demands.
3. After shooting, the screenshot will appear in a new window. You can use the built-in editing features, like Pen tool, Highlight tool and more, to polish the screen printing.
4. Finally, click on Save button to save the screenshot.
#4. Take a screenshot on Surface Tablets
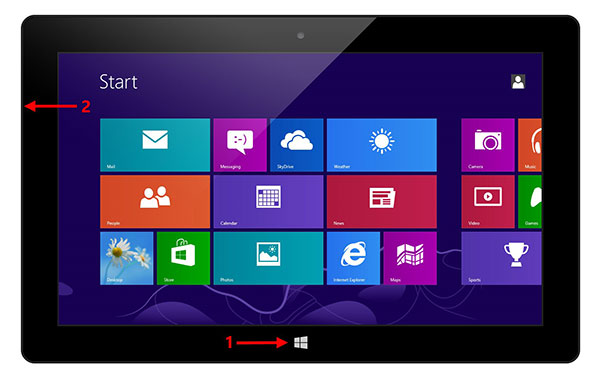
1. There is no physical keyboard or Print Screen key on Surface Tablets. But Microsoft has developed other way to take screenshots for Surface users. Hold the Windows logo on the front of your device and press the volume down button.
2. If the screen becomes dim for a moment, that means a screenshot is taken successfully.
3. Then you can visit Pictures, which belongs to File Explorer, and then Screenshots to preview the output.
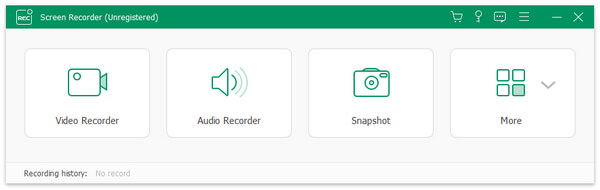
Part 3. Best Alternative to Print Screen as a Video
What should you do if you want to print screen as a video file? Tipard Screen Capture should be the right program to record screen with ease. The screen capture not only take screen in the original quality, but also add audio files as well. What is more, you can also customize the screen size and set capturing time. Once you finish capture the screen, you can preview the result directly with ease.
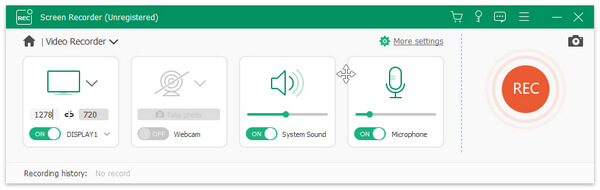
Choose the capture size of your screen. The print screen program just enables you to adjust the capture size with full screen or customize the size.
Set the audio source or microphone voice. When you want to add voice to it, you can also choose the system audio or microphone audio.
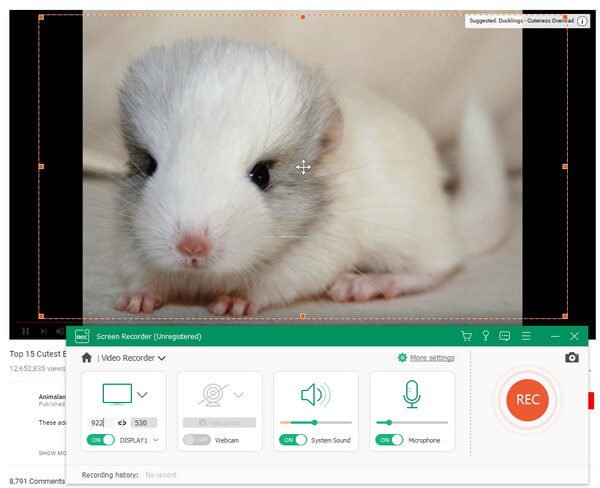
Print screen of computer as a video file. After that you can click the REC button to record screen in high quality and add voice to the files as well.
Preview the video and finish recording. Once you get the desired files, you can preview it and finish recording if you are satisfied with the files.
Conclusion
This article has introduced ways to take a screenshot under different situations. If your computer runs Windows, you can use the Print Screen key to create screencasts. And the specialized screen shooting program, Snipping Tool is also a good choice to take screencasts. It provides some basic editing features as well. Although Mac computers do not have physical key to take a screenshot, the hotkeys are available. You can use the hotkeys to take screencast depending on different requirements. Mac OS allows users to save the screenshot on desktop or to clipboard. And Apple also developed a dedicated screen casting application. Grab has all necessary features related to take screenshots.

 Top 5 Audio Recorder Software in 2021
When you want to capture audio in excellent quality, you can find the top 5 audio recorder Software lined out and explored their unique features.
 Top 5 Camstudio Alternatives to Capture Screen
When you want to use Camstudio or the best alternative programs to capture screen for you. Just read the top 5 Camstudio alternatives from the article.
 Tips and Tricks About Camtasia You Should Know About
This article will cover everything you need to get started using Camtasia to record screen, digital video or create demos.
 Audio Recorder Review on Mac/PC/iPhone - How to Record Audio with High Quality
To record audio on Mac, Windows or iPhone in high quality, you do not need to get too much voice recording experience. Actually, one good audio recorder can get better result in half effort.
