How to Record a Webex Meeting on Computer or Mobile Device
Webex is a one-stop meeting solution released by Cisco. It allows users to organize group chat, video call, and share documents. More importantly, the meeting can be recorded for future reference. This is handy if you need a transcript of a meeting or report it to stakeholders. This guide will share three ways to record a Webex meeting no matter you are the host or a participant on computer or mobile device.

Part 1: How to Record Webex Meeting with Built-in Feature
About the built-in recording feature in Webex meeting, there are somethings you need to know:
- 1. You can record a meeting in the cloud, if you have a paid Webex account.
- 2. You can also record a meeting locally with any kind of Webex account, including free ones. The recordings will be saved to your computer directly.
- 3. The recording feature is only available to the host of the meeting. It means that members cannot use this feature.
- 4. All members will get the notification once you start recording the meeting.
- 5. The recording feature is available on both computer and mobile.
How to Record a Webex Meeting on PC
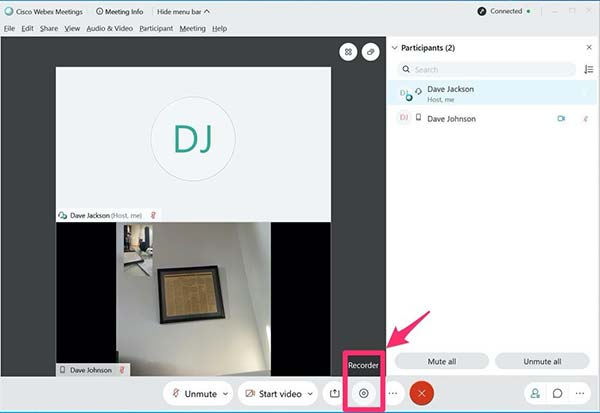
Step 1Create a meeting in Webex or get the permission to record a Webex meeting.
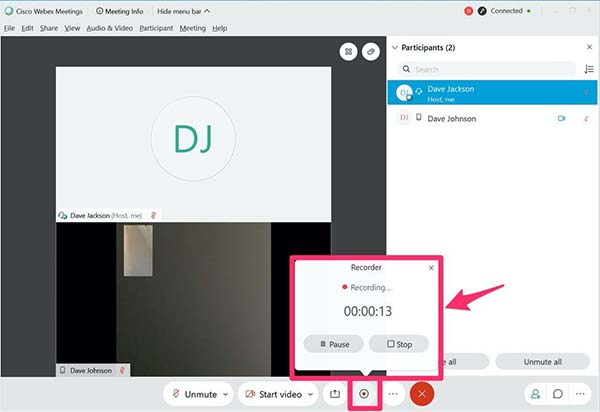
Step 2When you need to record it, click the Record button at the right side of the Share Content button. You can find them at the bottom of the window.
Step 3If you are using a paid account, decide whether to record the meeting to cloud or computer. For free user, set the location folder when prompted. Click Save and the Recorder dialog will pop up.
Step 4You can see the duration of the meeting recording on the popup dialog. When you want to stop it, click the
How to Record a Webex Meething on iPhone/Android

Step 1Open your Webex Meeting app. It can be downloaded from Play Store and App Store. The design is the same on iOS and Android.
Step 2Start a meeting as a host. Then tap the More icon and choose Record to begin recording the Webex meeting.
Step 3To stop recording, go to the More option and tap Resume. After the meeting ends, the recording will appear in the Recordings list.
Part 2: Record Webex as a Participant
As mentioned previously, you cannot record Webex meeting if you are only a participant. Moreover, once you start recording, everyone in the meeting will get a notification. Therefore, the built-in recording feature may be not the best choice to save your conferences on Webex. Tipard Screen Capture is the best alternative solution. It can help you record online meetings secretly no matter you are host or participant.
Briefly speaking, it is the best choice to record a Webex meeting on your computer secretly.
Main Features of the Best Webex Meeting Recorder
- 1. Record Webex meetings without any restrictions.
- 2. Add your face and reaction to the meeting recording.
- 3. Produce high quality videos using advanced technology.
How to Record a Webex Meeting without Any Restriction
Step 1Install Webex recorder
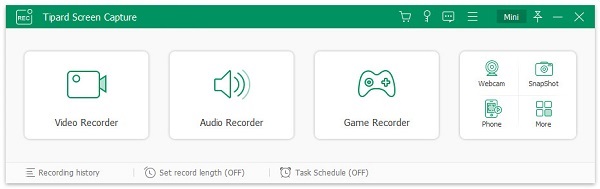
The best Webex meeting recorder has two versions, one for Windows 10/8/7 and the other for Mac OS X. Install the proper version on your computer and launch it. Click the Video Recorder option to open the main interface. If you just want to record audio of a Webex meeting, select Audio Recorder instead. Optionally, click the Settings icon to open the Preferences dialog and customize the options related to Output, Hotkeys, etc.
Step 2Record a Webex meeting
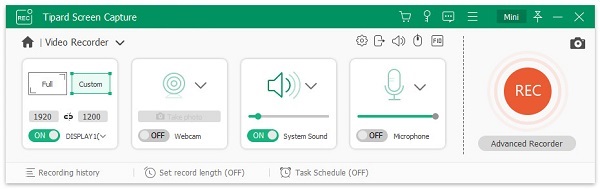
In the main interface, you can see four sections. Firstly, open Webex meeting in web browser or desktop client. Turn to the Webex recorder and set the recording area in the Display section. The meeting recorder is able to record full screen, the activate window or custom region. You can also set recording area in the dimension boxes. Make sure to enable System Sound and adjust the volume. If you want to overlay your face and voice to the recording, enable Webcam and Microphone; otherwise, keep them disabled.
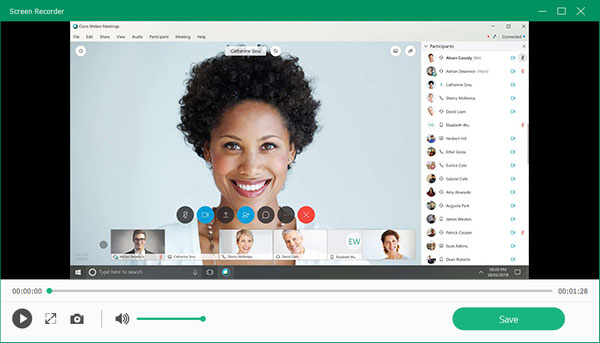
Next, join a meeting in Webex and click the REC button in the recorder to begin recording it. Then you will get a toolbar with several options. The Camera icon allows you to take screenshots while recording. You can add text or painting with the Edit button.
Step 3Preview and save meeting
When the meeting is done or reaches the point that you want to stop, click on the Stop button on the toolbar. After loading, you will be presented the preview window. Check the recording with the built-in media player. Finally, click on the Save button to export the Webex meeting recording to your hard drive.
Don't miss: Top 12 Best iPhone Screen Recorder on iPhone/Windows/Mac
Part 3: FAQs about Webex Recording
Where is my Webex recording?
Webex generally saves your recordings to the Documents folder in My Computer. When recording a meeting, you will be asked to decide the output location and you can change it as you wish.
Are Webex meetings automatically recorded?
No, Webex does not provide the automatic recording feature. Alternatively, you need to click the Record button to begin it manually. However, you can use a third-party meeting recorder that provides the schedule feature.
Do Webex recordings expire?
Cloud-based recordings do not automatically delete. Recordings will remain active as long as they are available on your WebEx site and your WebEx site is active.
Conclusion
Now, you should understand how to record a Webex meeting on computer and mobile device. The built-in recording feature is the easiest way to save your meetings, but it is only available to host. If you wish to save a meeting secretly or as a participant, Tipard Screen Capture is the best choice. It is not only easy to use, but also offers extensive bonus tools.
If you encounter other issues when recording Webex, please leave a message below and we will reply it as soon as possible.