
If you have streamed or recorded in OBS and you encountered stuttering, stalls, or dropped video, then you have experienced dropped frames. OBS is dropping frames of the requisite tasks to stream video, which leads to a loss of video quality and a bad viewing experience. Dropped frames are frustrating, but they can be fixed. In this guide, we'll break down what dropped frames are, why they happen, and the best ways to fix them. We'll also explore a reliable OBS alternative for smoother video recording.

Part 1. What Are Dropped Frames in OBS
Dropped frames happen in OBS when OBS does not send all of the video data it should be sending, either to the streaming platform or to the recorded file. Rather than the nice smooth uninterrupted video, OBS frame drops cause your playback to stutter, freeze, or look choppy. This problem usually appears when there is a mismatch between your computer's performance capacity, your network stability, and the demands of streaming or recording. In simpler terms, if your system or internet connection cannot handle the workload, OBS discards frames in order to keep audio and video in sync.
It is important to note that dropped frames are not limited to live streaming. Even when recording locally, gaps can appear in the video if the system is unable to process and save frames quickly enough. A few dropped frames may go unnoticed, but when they occur frequently, the viewing experience suffers. Your stream may look unstable, with video lagging or appearing inconsistent. We suggest that you use a video enhancement software to stabilize your video.
| Category | Cause | Explanation |
|---|---|---|
| Network Issues | Unstable or slow internet connection | OBS cannot send video data fast enough to the streaming server, leading to skipped frames. |
| High network congestion | Competing apps or devices consume bandwidth, causing OBS to struggle to maintain upload speed. | |
| Hardware Limitations | Weak CPU or GPU | When encoding demands exceed your system's processing capacity, frames are dropped. |
| Insufficient RAM | OBS and other running apps compete for memory, making real-time processing difficult. | |
| Encoding Overload | High bitrate settings | Bitrate too high for either system performance or network bandwidth causes instability. |
| Using CPU-heavy encoder (x264) | If the CPU is already busy, OBS cannot keep up with encoding every frame. | |
| Disk Performance | Slow storage drive (HDD vs SSD) | When recording locally, frames are dropped if the drive cannot save data fast enough. |
| Low available disk space | OBS may fail to write frames consistently when space runs out. | |
| Configuration Issues | Output resolution is higher than the system can handle | Scaling and rendering high resolutions like 1080p or 4K overloads hardware. |
| Frame rate too high (e.g., 60fps on a weak PC) | More frames per second means more processing power needed - dropping occurs if the system can't keep up. | |
| Background Processes | Other programs are consuming CPU, GPU, RAM, or network resources | Heavy multitasking competes with OBS, resulting in missed frames. |
Part 2. Why Is OBS Dropping Frames
There are several reasons why OBS is dropping frames with good internet, and most of them are linked to either system performance limitations or network instability. One of the most frequent causes is insufficient internet bandwidth. When the upload speed is not fast enough to maintain the bitrate that you have set in OBS, the program has a hard time consistently streaming data to the streaming platform. This would usually lead to frame drop, lag, or the overall stream being cut off completely. Network instability could certainly make the entire picture worse. Problems such as fluctuating connections, wireless interference, or high latency spikes may disrupt the steady flow of data, causing OBS to discard frames to stay synchronized.
On the hardware side, your computer may simply be overworked. A weak CPU, low RAM, or an overcrowded GPU can become a bottleneck quickly, especially when running multiple demanding programs at the same time as OBS, to solve this issue you could opt to use a video stabilizer. Video encoding is resource-intensive, and your system will drop frames simply because it can't handle the task. Or, maybe it is OBS's fault? Wrong OBS settings are easier to miss. You may have the bitrate set too high for your internet upload speed, or you have the wrong performance encoder selected, or maybe you're operating at a resolution and framerate that your hardware can't sustain.
Part 3. How to Fix Dropped Frames OBS
Step 1 Fixing dropped frames in OBS requires identifying whether the issue comes from your network, hardware, or settings. Start by checking your internet connection. Run a speed test and make sure your upload speed can handle your chosen bitrate; if not, lower the bitrate in OBS. Switching from Wi-Fi to a wired Ethernet connection often reduces instability.
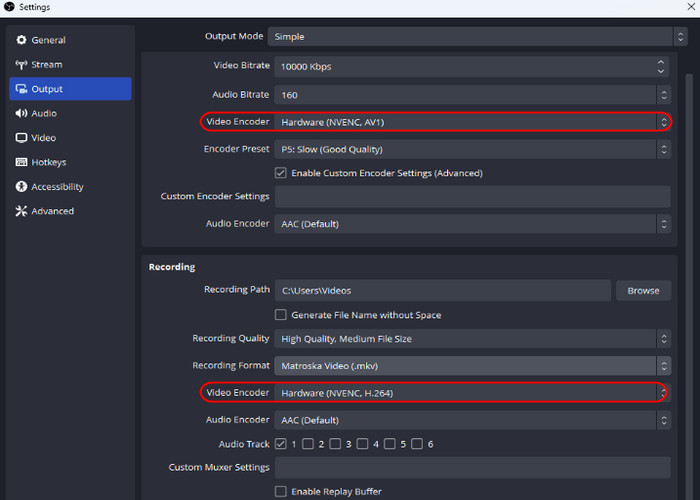
Step 2 Next, review your OBS settings. Choose the appropriate encoder (NVENC for NVIDIA GPUs, AMF for AMD, or x264 for CPU) based on your hardware. Adjust output resolution or frame rate to reduce strain on your system if performance is an issue.
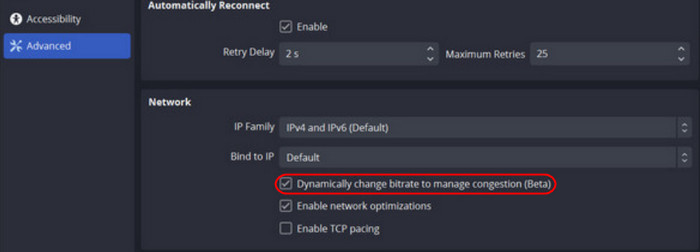
Step 3 Regularly update your graphics drivers and OBS, as software that has not been updated may create compatibility issues. Close background programs that you do not need running; doing this can save some of your CPU and RAM. Last, you can turn on Dynamic Bitrate in OBS, which automatically controls your streaming quality for you when your network has temporary drops. Doing all of this can greatly reduce frame loss.
Part 4. Best OBS Alternative to Record Streaming Video
While OBS is powerful, some users still experience frequent frame drops or complex setup issues. If you want more stability and ease of use, I would recommend using Tipard Screen Capture; it shows great stability with no dropped frames, and your video will be fluid and continuous. You can capture any area of your screen promptly, and you can record the system sound and your microphone's audio quality separately, and you can make some small edits without leaving the application. Its user-friendly design makes recording stress-free, giving you professional results without the hassle of complicated settings.
Step 1 Download and Launch App
Assuming that you have not installed the application yet, you can download it by clicking the Download button below. After you have installed the application, launch it.
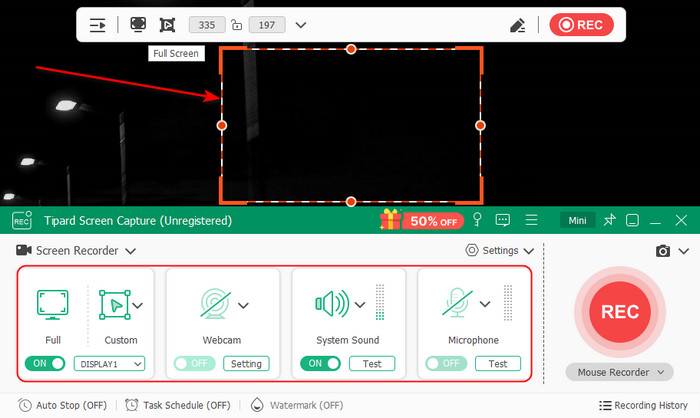
Step 2 Set Settings and Capture Screen
After launching the application, you will be able to see its main interface. Now, toggle the options that you are going to use. Also, set the screen capture area where you want your screen to be recorded.
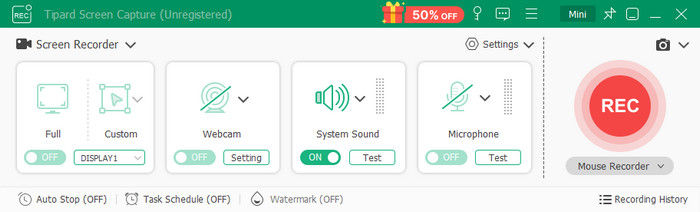
Step 3 Start Recording
After you have set the right settings for your recording, you can now start recording. To do that, click on the REC button that is available on the right side of the app interface. Your recorded file will be saved in your local directory.
Conclusion
Dropped frames in OBS are a common challenge, but they can be minimized with proper adjustments. By understanding their causes and applying the right fixes, you can ensure smoother, more stable streaming and deliver a better viewing experience.
More Reading


About the Author
