
Final Cut Pro is a feature-packed video editing program popular among Mac users. It lets you cut, trim, add effects, and create professional videos with ease. But what if you have a Blu-ray? Can you just import it directly into Final Cut Pro, or do you need an extra step first?
You will learn the answer here, and we will teach you how to change Blu-ray to Final Cut Pro formats to make editing possible. Without further ado, let us dive in and get started.
Part 1. Can You Directly Add Blu-ray to Final Cut Pro
Many users wonder about Final Cut Pro 7 Blu-ray support, whether they can put a Blu-ray straight into Final Cut Pro and start editing right away. However, it does not work that way. Learn the reasons why below:
1.Format Incompatibility
Final Cut Pro cannot open or read a Blu-ray directly. The program only accepts certain file types, and Blu-ray format is not one of them.
2.Copyright Protection
Most Blu-ray discs are locked with copy protection. It is designed to stop people from copying or moving the content without permission. Because of this, you cannot drag and drop Blu-ray footage into the program.
The only way to use Blu-ray footage is to convert it into a compatible format in order to import it to Final Cut Pro without facing compatibility issues. We got you with that; we will teach you in the next part.
Part 2. How to Convert Blu-ray to Final Cut Pro Supported Format
You cannot directly add a Blu-ray to Final Cut Pro. That is why the first thing you need to do is convert the Blu-ray to a format that Final Cut Pro supports, and Tipard Blu-ray Converter can help you. It can turn your Blu-ray into many video formats that work well with Final Cut Pro.
The best part is that it keeps the original video and audio quality, so your movie will still look and sound great. You can also upscale the resolution and improve the quality with its built-in tools. Plus, it is easy to use. You will not get lost or feel confused while using it.
- Convert Blu-ray to ProRes, MP4, MKV, MOV, and 500+ other formats.
- 30× faster ripping speed with 3-level GPU acceleration.
- Edit and customize Blu-ray movies with built-in tools.
- Batch converts Blu-ray, DVD, and videos at high speed.

Step 1 Launch the Tipard Blu-ray Converter
Open the Tipard Blu-ray Converter on your Windows or Mac computer once downloaded and installed successfully.
Step 2 Load the Blu-ray Disc or File
Insert your Blu-ray disc into the drive. Hit the Load Disc button on the top menu to add the movie. If your Blu-ray is saved as an ISO file or folder, click Load Blu-ray ISO or Load Blu-ray Folder. After that, Tipard Blu-ray Converter will let you pick whether to load just the Movie Title or the Full Title List.

Step 3 Choose Final Cut Pro Supported Format
Go to the Format drop-down menu. From the list of formats, choose ProRes; this format works best with Final Cut Pro. You can also choose other formats, HEVC MP4 or MKV, or MX. But, ProRes is recommended for keeping high quality while still being smooth to edit.

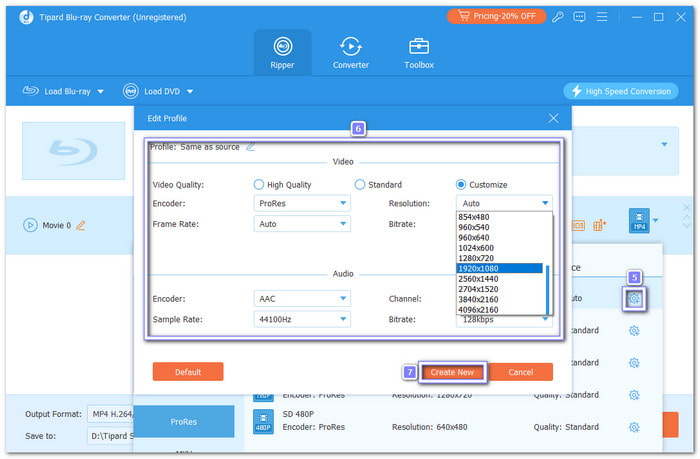
Step 4 Customize Video and Audio Settings (Optional)
Click on the Custom Profile button beside the format name to fine-tune your output. Here is what you can tweak:
For Video:
• Resolution - Set it to 1920×1080 (full high-definition) or your original resolution.
• Frame Rate - Choose 24fps, 30fps, or match the source.
• Bitrate - Higher bitrate = better clarity (but larger file).
• Encoder - Choose ProRes or H.264 based on your format.
For Audio:
• Bitrate - Choose from 128kbps, 256kbps, or higher for clearer sound.
• Sample Rate - Commonly used are 44100Hz or 48000Hz.
• Encoder - Usually AAC or PCM.
• Channel - Select between 2, 5.1, 1 or 7.1.
Once done, hit the Create New button to save your customized settings.
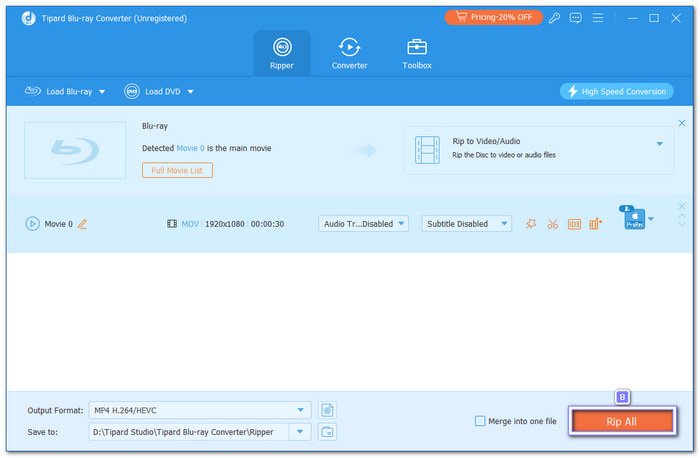
Step 5 Start the Conversion and Find Your File
Finally, click the Rip All button to start the process. Please wait for the conversion to finish. Once done, click Open Folder to find your new video.
Extra Tip: You can also use Tipard Blu-ray Converter for editing. It has built-in tools, like crop and rotate, effects and filters, trimming, adding audio tracks, and even watermarks. Another good thing is that it gives you many video and audio tools in one section. You can use its compressor, enhancer, and metadata editor. It makes it more than just a converter, and it is also a smart choice if you are looking for Final Cut Pro for Windows.
Part 3. How to Import Blu-ray Video to Final Cut Pro for Editing
Now that you have already converted your Blu-ray to a Final Cut Pro-supported format, you can import it without running into compatibility issues. Once inside Final Cut Pro, you can organize the video in your library and event, making it easier to manage your project.
From there, you can start editing with tools like trimming, cutting, adding transitions, applying effects, color correct, etc. Final Cut Pro gives you full control, so your Blu-ray video is ready to be shaped into a polished project.
Follow the steps carefully to import Blu-ray to Final Cut Pro properly:
Step 1 Open Final Cut Pro
Launch Final Cut Pro on your Mac. Choose the library and event where you want to add your Blu-ray video.
Step 2 Open the Import Media Window
There are different ways to do this. You can click the Import Media button in the toolbar, go to File > Import > Media, or simply press Command-I. All of these options will open the import window.
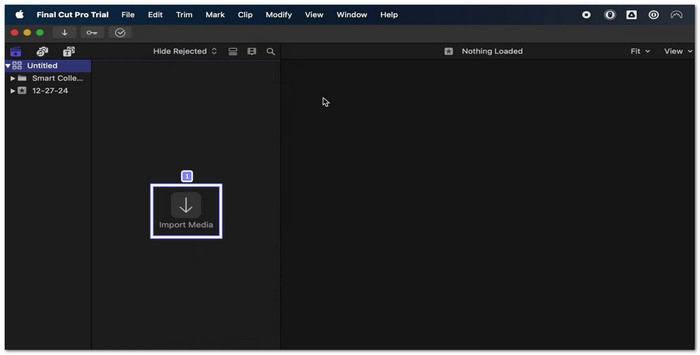
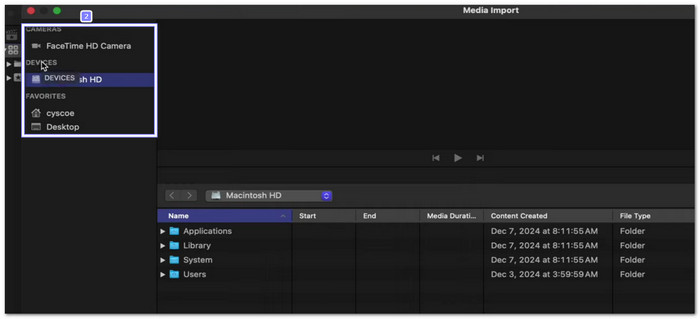
Step 3 Find Your Converted Blu-ray File
In the left panel of the import window, you will see your devices and drives. Pick the location where your converted Blu-ray video is saved, such as your Mac's hard drive or an external drive. From there, browse through the folders until you find the file.
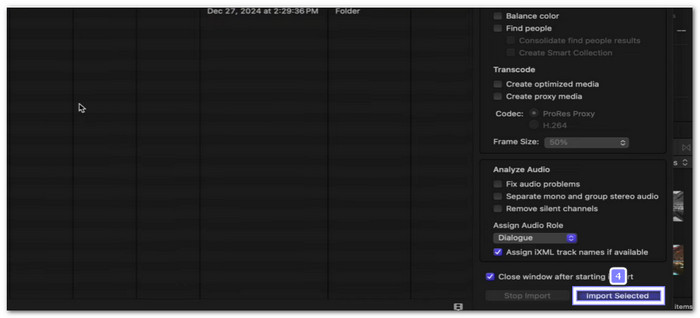
Step 4 Adjust Import Settings
On the right side of the import window, you can set how the file is handled. Choose Copy to library if you want Final Cut Pro to store a copy of the video inside the library. Or pick Leave files in place if you want the file to stay in its original location. You can also create a new event, rename it, or apply Finder tags as metadata.

Step 5 Import and Start Editing
Highlight the Blu-ray file you want, then click Import Selected. The video will be added to your library and is now ready to edit in Final Cut Pro. You can trim, cut, add effects, or color correct right away.
You can also add audio to Final Cut Pro. Just go to File > Import > Media, then pick the audio file you want. Once imported, drag it into your timeline and line it up with your video. It lets you add music, voiceovers, or sound effects to make your Blu-ray project more engaging.
Conclusion
It is not possible to import Blu-ray to Final Cut Pro right away since the program does not support it. To make it work, you need to first convert the Blu-ray into a format that Final Cut Pro accepts. As you have discovered above, Tipard Blu-ray Converter can help you with this process. Once converted, you can import the file without any compatibility issues and focus on editing your video with ease.
More Reading


About the Author
