
The Best Way to Convert WMA to MP3 and MP3 to WMA File

Let's come to this guide now – convert WMA MP3.
Step 1: Download and install Tipard WMA MP3 Converter.
Download and install Tipard WMA MP3 Converter.
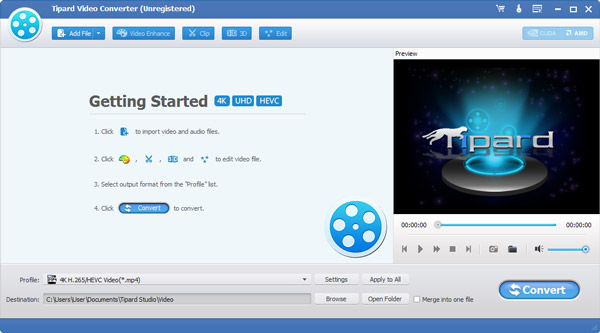
Step 2: Add file to Tipard WMA MP3 Converter interface. There are three ways to put your files on it.
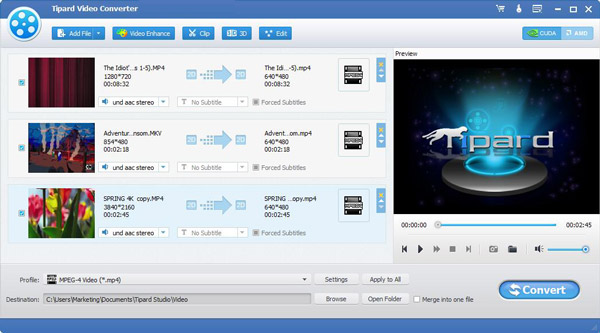
Method One:Click "Add File", it would pop up one window, and select you want to convert file on this window.
Method Two:At the top of the drop menu, click "File", then select "Add File" to import your video and audio files.
Method Three:Drag the file to Tipard WMA MP3 Converter interface directly.
Step 3: Choose profile
Tipard WMA MP3 Converter can convert WMA to MP3 and MP3 to WMA. As powerful WMA MP3 Converter, it can convert almost all popular audio like AAC, M4A, AC3, etc to WMA, MP3, AAC, AC3, M4A, MP2 as well as extract audio from standard video and HD video. According to your need sellect suitable output format.
Note:
Before you start the conversion, you can define the video and audio settings. Click the "Settings" button to open the Settings window.
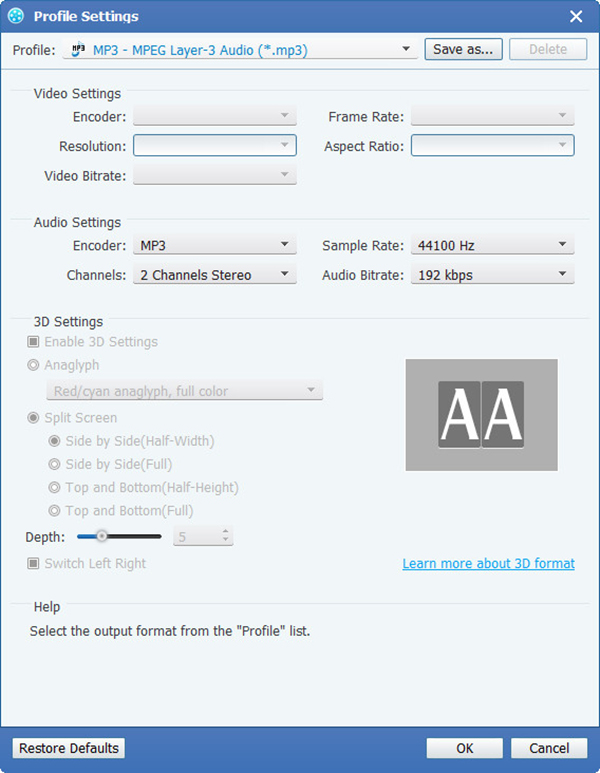
In the Video Settings, you can select Encoder, Frame Rate, Resolution and Video Bitrate to convert your movie. Moreover, you can also directly input your own resolution as the form of "XXX*XXX";
In the Audio Settings, you can select Encoder, Channels, Bitrate and Sample Rate to convert your movie. You also can save all the output settings as your preference, which is saved in the user-defined column automatically.
Tips:
Tip 2: Clip video
Click "Clip" button on the top of the interface to pop up the video edit Clip window.
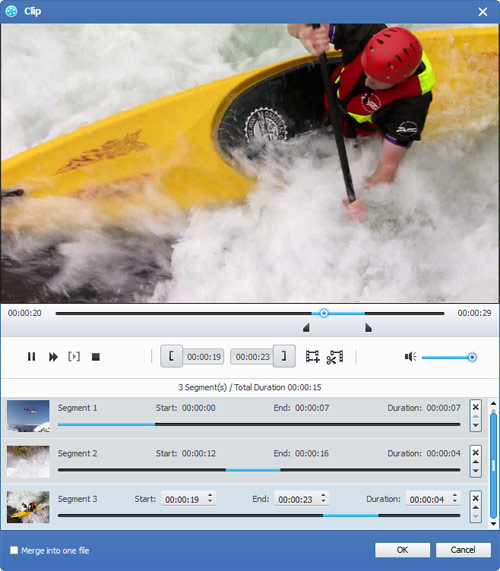
Tipard WMA MP3 Converter provides you three methods to trim your video length.
Method 1: Enter the start time in the Start Time box and click OK, then enter the end time in the Set End Time box and click OK.
Method 2: Drag the scissors bars under the preview window when you want to trim, then the time will be shown in the Start Time box and End Time box for your reference.
Method 3: Click "Trim From" button when you want to begin your trimming. Click "clip To" button where you want to stop your trimming.
After you set clip time, the length of the captured clip will be shown in the Select Length box for your reference.
Tip 2: Snapshot:
Click "Snapshot" button on the right bottom of the preview video window and the current picture in the Preview window will be captured and saved.
Click "Folder" button to open the folder where the captured images are saved. As default the captured image will be saved at users' My Documents\Tipard Studio\Snapshot.
Click "Preference" menu, you can reset the snapshot folder and the type of your captured image: JPEG, GIF or BMP formats.
Tip 3: Preferences
Click "Preferences" menu to adjust the settings related to conversion
It includes the output folder, snapshot folder, image type, conversion done, cpu usage.
Step 4: Convert
After all the steps above are done, click the right button on the interface to start converting.

 Top 5 True 4K Video Player for Windows and Mac
Want to play 4K movies on your computer? Don't know which player can support 4K Ultra HD playback smoothly. In this post, we will introduce the most powerful 4K media player for Windows and Mac.
 What are the Video Noise Reduction Programs
In order to reduce the noise of the video, you have to use the video noise reduction to improve the video quality. Learn the detail about the best programs now.
 3 Methods to Stabilize Video Files on PC/Mac
If you are facing challenges to stabilize the shaky video, you can learn multiple solutions to stabilize video files and different video stabilizers in this article.
 How to Use Phone as Flip Video Camera
If you have used some flip video camera previously, you can use the powerful video flipper together with any phone to achieve the same effect as flip camera.