
WAV to MP4 conversion is essential when you want to share audio as video content. WAV is a high-quality audio format, while MP4 is a multimedia video container. Since they serve different purposes, converting between them requires adding visuals to create a playable and shareable video file.

Part 1. Why You Cannot Convert WAV Audio Directly into an MP4 Video File
An audio WAV file cannot be directly converted into an MP4 video because the two formats serve different purposes. Here are several important points:
1. Incompatible Formats: While disparity exists in both cases, ultra-digital audio is only affiliated with the WAV standard, whereas the separate MP4 notation encompasses far more than mere sound files, as it can incorporate videos, audio, and supplementary content, unlike a WAV to MP3 conversion, which deals with audio-only formats.
2. Lack of Video Stream: Many do not regard static images or animations as content worthy enough to stream, so many media players will face difficulty reading them if placed alone.
3. Ancillary Visual Essentials Warning: As indicated earlier, sounds scaled down to different codecs or layers are unable to carry codified imagery, thus rendering it useless without augmentation.
4. Disguised Attempts: The ecosystem encapsulated in conversion disguises snippets with a variety of images serving as a basic set through simple addition, providing shallow decoration beneath the surface frame.
Part 2. Best Ways to Convert WAV to MP4
Maintaining quality in audio files throughout the processes they undergo is crucial. While it is true that WAV is considered to be one of the high-quality audio formats, it should also be noted that MP4 is a type of video file format. Thus, converting WAV to MP4 necessitates additional work, such as adding a cover or some moving visuals, so that the resultant file can indeed be called a video. Here are five theories every user can rely upon while trying to convert from WAV to MP4:
1. Tipard Video Converter Ultimate
Tipard Video Converter Ultimate has been proven to be very effective and reliable as a media converter, supporting over 500 formats, including MP3 and MP4. The software serves best for people looking to transform their audio files, such as adding images to WAV videos, which even allows for effects and templates, thus serving as a great aid during uploading to YouTube, presentations, or simply saving into archives.

- Accelerated by GPU for quicker processing.
- Export ultra-high-resolution MP4 videos.
- Instantly create stylish videos from audio and images.
- Add text, trim, crop, apply filters, and more.
- GIF creator, video compressor, audio sync fixer, and watermark tools.

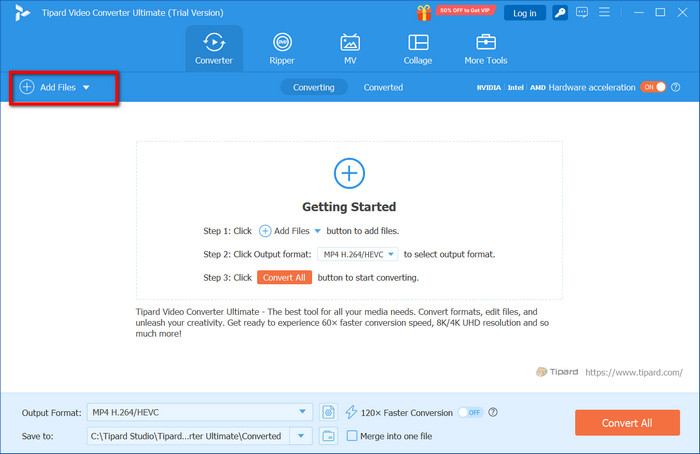
Step 1 Launch the Program
Users need to first download and install Tipard Video Converter Ultimate. You can find an official website that provides the software. Like any other software, make sure to open it once it is installed.
Step 2 Add the WAV File
Now that the program is open, users will see the Add Files button situated in the top left corner. All they have to do is browse through their system folders and select the WAV audio file needed.
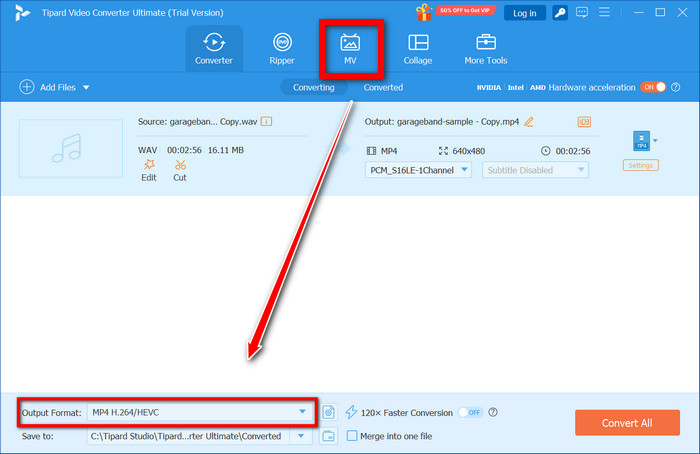
Step 3 Add an Image For The Video
It is now time to transform your newly created project into something eye-pleasing by adding visuals. To do so, upload backgrounds under the MV tab, which utilizes assigned or created flexible plans, allowing for the creation of powerful versions tailored to meet all the requirements.
Step 4 Set Output Format to MP4
Locate Output Format on the drop-down list, tap Video, and choose MP4. It is also possible to set the resolution there.

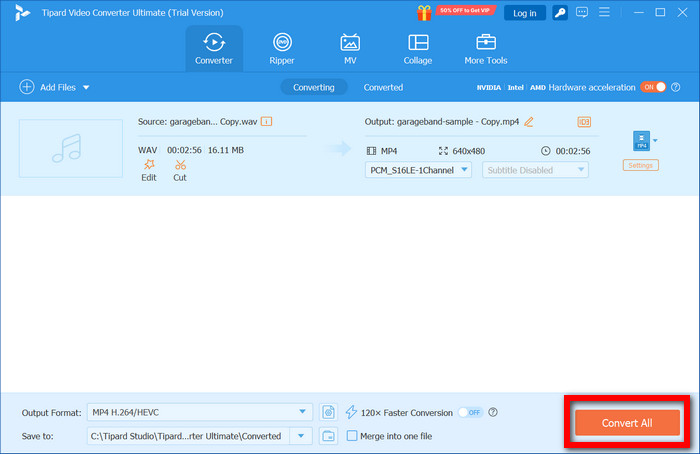
Step 5 Initiate Conversion of File
Press the Convert All button, and your WAV file will be converted into an MP4 video containing your image or visuals.
2. FFmpeg (Windows/Mac/Linux)
FFmpeg is an open-source, cross-platform tool for audio/video processing. It allows users to convert WAV files with static images into playable MP4 files.
Step 1 Ensure that you have installed FFmpeg and added it to the PATH on your computer.
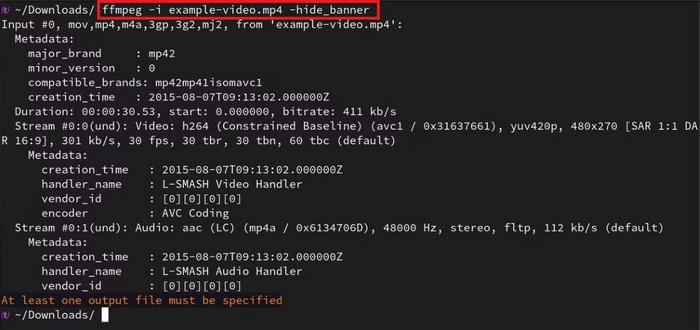
Step 2 Download a static image that you want to use as a background for the video, and save it as something like image.
Step 3 Access the terminal window or command prompt.
Step 4 Enter this exact command line below in your console:
- CSS
- CopyEdit
- ffmpeg -loop 1 -i image -i audio.wav -c:v libx264 -c: a aac -b: a 192k -shortest output.mp4
Step 5 You will find a generated MP4 file combining both image and sound stream, which can be played in any common video player.
3. CloudConvert (Online)
Hundreds of file types are supported by the web-based file converter CloudConvert. It is easy to use and compatible with all browsers.

Step 1 Visit cloudconvert.com. Select MP4 as the output format and WAV as the input format.
Step 2 After uploading your WAV file, select Options to include an image in the video stream.
Step 3 Modify the resolution, codec, and other settings as necessary.
Step 4 After selecting Convert and waiting for processing, you can download the MP4.
4. DaVinci Resolve (Windows/Mac/Linux)
Professional video editing software is DaVinci Resolve. A WAV file can be imported, combined with images, and then exported as an MP4 file.
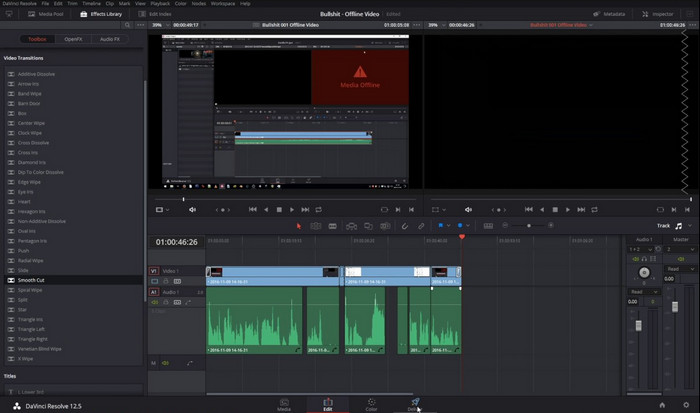
Step 1 Launch a new project in DaVinci Resolve.
Step 2 Navigate to the Media tab and import your WAV along with any background image or video.
Step 3 Drag the image and WAV file to the Edit tab timeline.
Step 4 Adapt the image duration to the audio.
Step 5 Select MP4 as the output format under the Deliver tab, then export the video.
5. Audio to Video Converter App (Android/iOS)
There are several mobile apps available, such as Audio to Video Converter (Android) or Add Music to Video Editor, that allow you to convert WAV to MP4 with a photo.
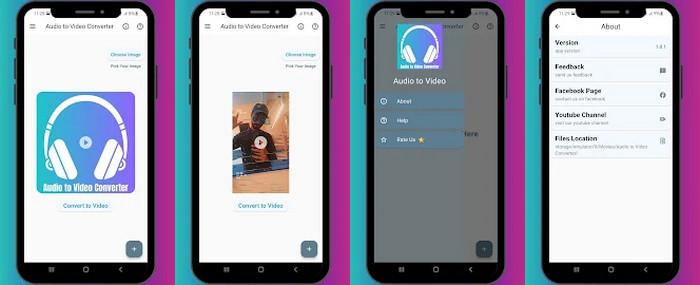
Step 1 Install Audio to Video Converter from the Play Store.
Step 2 Open the app and tap Select Audio to choose your WAV file.
Step 3 Tap Select Image to pick a photo as the video background.
Step 4 Tap Convert to Video and choose MP4 as the output format.
Step 5 Wait for the conversion to complete, then save or share your video.
Part 3. Adding Images to Your MP4
Adding pictures, slideshows, or basic animations will enhance the visual appeal of your WAV-to-MP4 conversion. These components help convert unwatchable audio into a video.
Best Image Formats and Sizes
Standard image formats, such as JPG, PNG, or WEBP, work best. A 16:9 aspect ratio should be maintained, ideally at 1920 x 1080 pixels (Full HD). This guarantees that on the majority of screens, your video will appear crisp and expert.
Creating Simple Slideshows
You can display several images that are in sync with your audio by using a slideshow. To fit the tone of the sound, you can incorporate images, quotations, or artwork. The majority of editors allow you to add fluid transitions between images and change how long each image appears on the screen.
Adding Waveform Animations
Waveforms add movement to your audio by visualizing the sound in real-time. These can be lines, bars, or circles that react to the beat. They are perfect for music tracks or podcasts and can be easily added using online tools or video editors, unlike an MP4 to WAV conversion, which strips away visuals and retains only the audio.
Conclusion
To convert WAV to MP4, you need to add visuals like images, slideshows, or animations. Whether using desktop software, online tools, or mobile apps, these methods help turn audio into shareable video content suitable for platforms like YouTube or social media.
More Reading

About the Author
