
Converting MOV to WAV is a practical way to extract high-quality audio from video files for editing, playback, or music production. Whether you are working on a podcast, trimming a voiceover, or saving sound from a video clip, this guide covers everything you need. From advanced software like Tipard Video Converter Ultimate to built-in macOS tools, Audacity, and online converters, you will find the perfect method for your needs, no matter your experience level or device preference.

Part 1. One-Click Tool to Convert MOV to WAV
Tipard Video Converter Ultimate has all the features you need for easy MOV to WAV conversions. It has a very user-friendly interface and guarantees high-speed work without quality loss. The program is both professional and simple, as it is designed to handle over 500 formats and offers 60× conversion speed due to GPU acceleration. Besides being a video converter, the program also performs DVD ripping, video/audio editing, and format optimization. Tipard simplifies conversion processes, allowing users to extract audio or convert files with just a few clicks.

- Converts MOV to WAV, MP3, FLAC, AAC, and more with no quality loss.
- Uses Intel, AMD, and NVENC for up to 60× faster conversions.
- Extracts audio from MOV and converts to WAV with clear quality.
- Converts multiple MOV files to WAV at once for efficiency.
- Trim, merge, adjust volume, or fix delay before exporting.

Step 1 Download and Install
Go to the official page and download Tipard Video Converter Ultimate. The program is available for both Windows and MAC, so install it on the desired device.
Step 2 Add MOV Files
Launch the program and click on the Add Files button located in the upper left corner. Pick as many MOV files as you wish to convert.
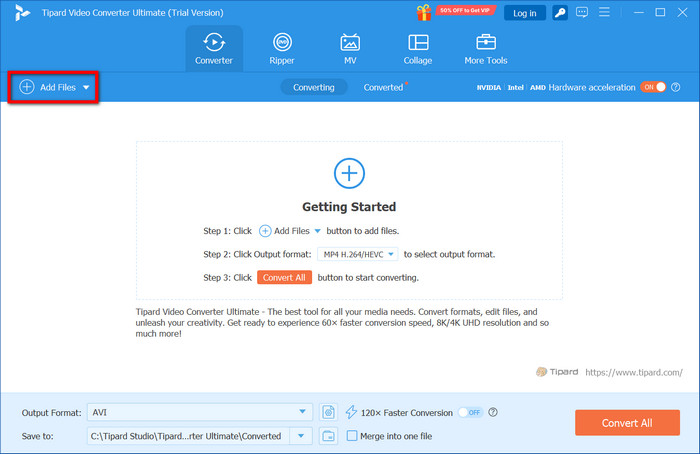
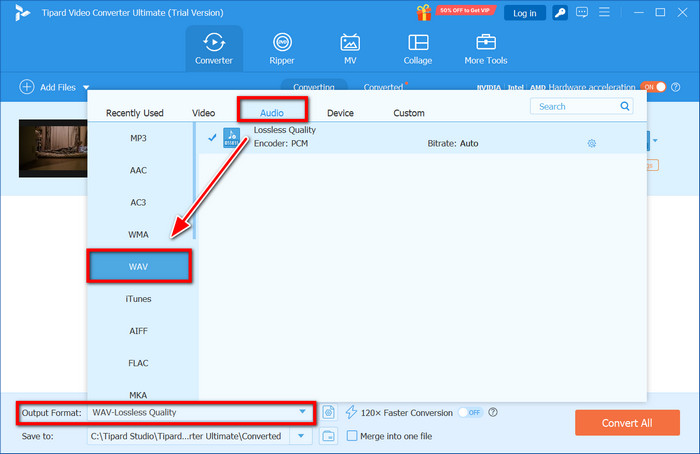
Step 3 Select WAV as Output Format
Locate the Output Format dropdown section. Under the Audio category, select WAV as your target format.
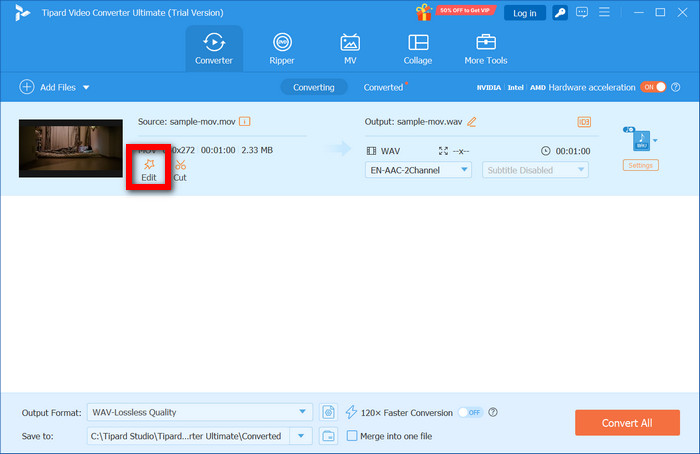
Step 4 Customize Output (Optional)
In case you want to change the sample rate, bitrate, or channels, click on the Edit button pertaining to the output format.
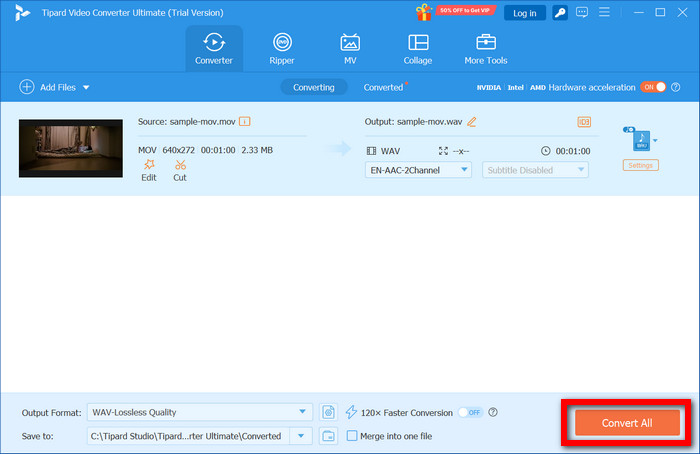
Step 5 Initiate Conversion Process
You may now press the button Convert All to commence the conversion of MOV files to WAV files. Thanks to GPU acceleration, the process completes swiftly with no quality loss. Once done, you can find the WAV audio files in your chosen output folder, ready for playback or editing.
Part 2. Try the Hidden Feature on macOS
macOS offers a built-in method to extract audio from MOV files using Automator, no additional software required, and lets you convert to WAV directly in Finder. Here is how to set it up:
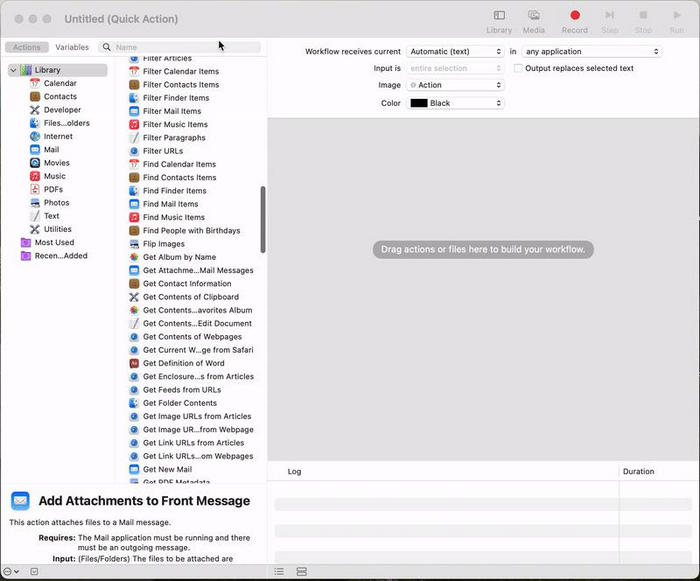
Step 1 Access Automator within the Applications folder.
Step 2 Choose Quick Action for the type of document.
Step 3 Change the workflow to receive movie files in Finder.
Step 4 Search Encode Media on the left sidebar. The action should be dragged into the main workflow area.
Step 5 In the settings for Encode Media, set the output format to Audio Only (it will be exported as M4A).
Step 6 Click on the File Menu, select Save, name your action Extract Audio, and then click on Save.
Step 7 Go to Finder, right-click any MOV file, hover over Quick Actions, and click Extract Audio. The audio will be saved in the same folder as the original video.
Part 3. Using Audacity to Extract Audio from MOV Files
Audacity can be used as a MOV audio extractor, and is free and open-source. Although it is primarily an audio editing program, if you have the necessary media support like FFmpeg installed, it works with video files and can convert their audio to WAV, MP3, and other formats. This is useful for users who wish to fine-tune the audio prior to exporting it or need to edit it after extraction, serving as an Audacity for Mac alternative.
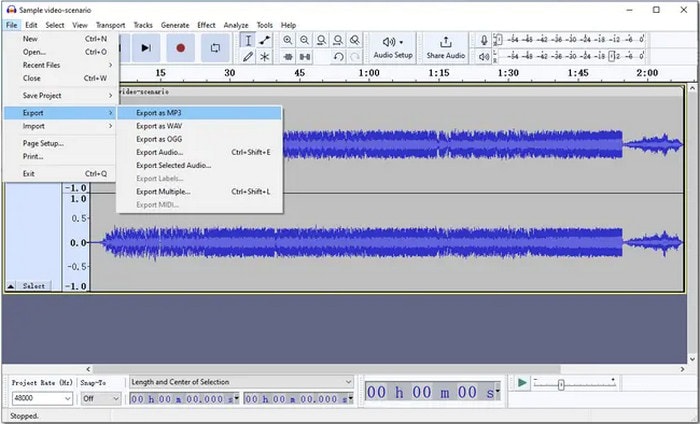
Step 1 Visit audacityteam.org to download and install Audacity. Ensure to enable the optional FFmpeg library during installation, as it is needed for MOV files.
Step 2 Start Audacity, click on File, then Open, and browse for the MOV file. Audacity will automatically perform the extraction of the audio track.
Step 3 Further audio modification can be performed using cut, noise reduction, volume control, and equalization.
Step 4 Click on the File menu, go to Export and choose Export as WAV. You may also select to export as MP3 or other formats provided.
Step 5 Final extraction is done by clicking Save after setting the file name, folder, and confirming settings.
Part 4. If You Want an Online Converter
For individuals who do not wish to install any application, an online MOV to WAV converter is an easy and convenient choice. CloudConvert and FreeConvert are two well-known web-based converters that allow you to convert MOV files to WAV using cloud storage or directly from your PC. These converters are ideal for urgent jobs and offer a range of additional features.
1. CloudConvert
CloudConvert is one of the online converters you can rely on because it is secure and has no limitations on file restrictions. Also, it offers hundreds of formats, including MOV to WAV. It has no registration limit offer, but for enhanced control over the audio bitrate, sample rate, and size, an account is necessary.
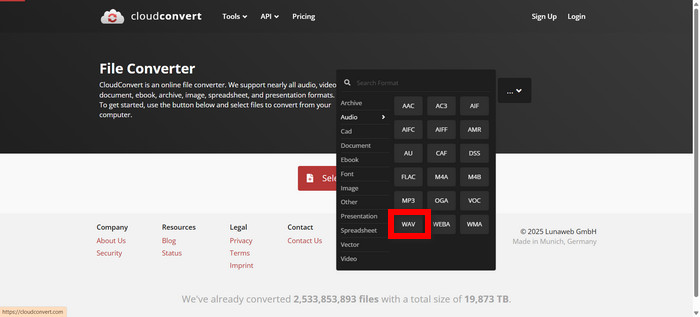
Step 1 Navigate to cloudconvert.com/mov-to-wav
Step 2 Hit Select File, and upload the MOV from your device, Google Drive, Dropbox, or even provide a URL.
Step 3 Set the output format to WAV.
Step 4 If adjustments to bitrate, volume, or trim length need to be done, click the wrench button to modify those and other settings.
Step 5 Wait till the conversion process gets completed, click the button, and download the resultant WAV file.
2. FreeConvert
The user-friendly interface of FreeConvert has made it popular, and it also has support for MOV to WAV conversions. Along with format changes, users can also trim the audio, change its volume, and compress the file.
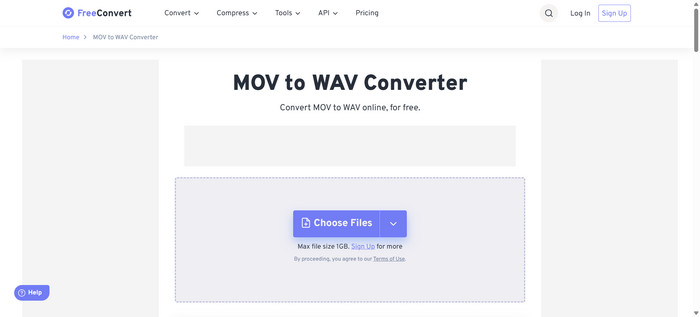
Step 1 Go to freeconvert.com/mov-to-wav
Step 2 From your computer, cloud storage, or any given link, click Choose Files to upload a MOV file.
Step 3 Confirm that the target format selected is WAV.
Step 4 If you want to edit the codec, fade in/out or adjust the audio bitrate, click on Advanced Settings to unlock those options.
Step 5 To finalize the process, press Convert to WAV, and after the conversion process has finished, download the file.
Conclusion
Having a trustworthy tool to convert MOV files to WAV guarantees you seamless extraction of audio from your video files. For some people, a single-click desktop application would work best, while others prefer built-in features on macOS, open-source software such as Audacity, or quick online alternatives. Regardless of what method you prefer, rest assured, you will find a dependable application to get the job done.
More Reading


About the Author
